Configuring very very strict Linux Firewall using iptables

So, you want to configure a very very secure Linux Firewall using iptables? no probs. Here is how to do it;

#!/bin/sh
# My system IP/set ip address of server
SERVER_IP="2.2.2.2"

# Flushing all rules
iptables -F
iptables -X

# Setting default filter policy
iptables -P INPUT DROP
iptables -P OUTPUT DROP
iptables -P FORWARD DROP

# Allow ALL traffic on loopback
iptables -A INPUT -i lo -j ACCEPT
iptables -A OUTPUT -o lo -j ACCEPT
 
# Allow INCOMING CONNECTIONS ON SSH PORT 22
iptables -A INPUT -p tcp -s 0/0 -d $SERVER_IP --sport 513:65535 --dport 22 -m state --state NEW,ESTABLISHED -j ACCEPT
iptables -A OUTPUT -p tcp -s $SERVER_IP -d 0/0 --sport 22 --dport 513:65535 -m state --state ESTABLISHED -j ACCEPT
# DROP ALL TRAFFIC COMING IN AND GOING OUT

iptables -A INPUT -j DROP
iptables -A OUTPUT -j DROP

This above configuration locks down everything apart from SSH.

But, most customers want to configure access from their client’s IP address only. I.e. they don’t want SSH to accept connections from any IP address. Only from the client on for example 1.1.1.1. Here’s how to do that:

# Allow incoming ssh only from IP 1.1.1.1
iptables -A INPUT -p tcp -s 1.1.1.1 -d $SERVER_IP --sport 513:65535 --dport 22 -m state --state NEW,ESTABLISHED -j ACCEPT
iptables -A OUTPUT -p tcp -s $SERVER_IP -d 1.1.1.1 --sport 22 --dport 513:65535 -m state --state ESTABLISHED -j ACCEPT

Credit goes to; http://www.cyberciti.biz/tips/linux-iptables-4-block-all-incoming-traffic-but-allow-ssh.html

Install KVM and virt-manager on CentOS 7

So, you wanna install KVM on CentOS7. First we want to check if the instruction set for the cpu supports virtualisation emulation. This is important for great performance but in the case it is missing.

$ egrep -c '(vmx|svm)' /proc/cpuinfo
2

If the result comes back 0, you don’t have it!

Installing KVM

sudo yum install kvm virt-manager libvirt virt-install qemu-kvm xauth dejavu-lgc-sans-fonts

Preparing a Github/Gitlab Development Bastion Server

So you are looking to use github / gitlab to manage your infrastructure and development. To do this effectively you will need to prepare your environment. Here is an example.

This is for our ansible playbook.

Install Required Dependencies

yum update -y
yum install -y vim git ansible tree fail2ban

Add user for repo

useradd -m -G wheel osan
passwd osan

Secure SSH by disabling root login and changing SSH port

sed 's/#PermitRootLogin yes/PermitRootLogin no/g;s/#Port 22/Port 222/g' -i /etc/ssh/sshd_config
firewall-cmd --add-port=666/tcp --permanent
firewall-cmd --reload
systemctl restart sshd.service

Generate key for osan user

su - osan
ssh-keygen -f ~/.ssh/id_rsa -t rsa -N ''

Output the key you generated

cat ~/.ssh/id_rsa.pub

The next step is adding your SSH key above to the ‘profiles’ section of your gitlab/github user. Find this in my profile, under ‘SSH KEYS’.

Screen Shot 2016-04-25 at 10.13.03 AM

Screen Shot 2016-04-25 at 10.13.19 AM

Set Git Variables

USERNAME=yourgitlabusername
git config --global user.name $USERNAME
git config --global user.email "[email protected]"

Clone Project

git clone [email protected]:$USERNAME/projectname.git

Delete All Cloud Backup from Cloud Files

Please note that by performing the below commands the effect can be destructive.

TAKE CAUTION WHEN USING THIS COMMAND IT CAN DELETE EVERYTHING IF YOU DO SOMETHING WRONG!!!!

# swiftly --verbose --eventlet --concurrency=100 for "" --prefix z_DO_NOT_DELETE --output-names do delete "" --recursive --until-empty

This particularly command *should* only remove the cloud files directories starting with z_DO_NOT_DELETE. I have tested it and it appears to work correctly.

Creating a Next Generation Server image from a First Generation Server

So we had a customer today that wanted to create a next generation cloud-server using a first generation server image. Since the first gen platform uses cloud files, it’s possible to do manually, downloading from cloud files , concatenating and untar to access the filesystem.

Like so;

cat receiverTar1.tar receivedTar2.tar >> alltars.tar
tar -itvf alltars.tar

Although I used on my mac:

tar -vxf alltars.tar 

This gives us the VHD files extracted into an ‘image’ folder;

$ ls -al image/
total 79851760
drwxr-xr-x   6 adam9261  RACKSPACE\Domain Users          204 Apr 19 12:17 .
drwxr-xr-x  11 adam9261  RACKSPACE\Domain Users          374 Apr 19 11:47 ..
-rw-r--r--   1 adam9261  RACKSPACE\Domain Users  40884003328 Jan  4 07:05 image.vhd
-rwxr-xr-x   1 adam9261  RACKSPACE\Domain Users         1581 Apr 19 12:15 import-container.sh
-rw-r--r--   1 adam9261  RACKSPACE\Domain Users            8 Jan  4 07:05 manifest.ovf
-rw-r--r--   1 adam9261  RACKSPACE\Domain Users        84480 Jan  4 07:05 snap.vhd

We are interested in the image.vhd file. Now lets upload it to cloud files to IMPORT it into Glance, which is what is used by the next generation platform to create a new server. The problem of course was that the first gen image format wasn’t compatible. Next gen builds need to retrieve the VHD image from glance.

Also, lets ensure we use Transfer-Encoding: chunked” as a host -H header. This tells Cloud Files that the .vhd exceeds 5G and it will create a multi-part manifest for us for the main file. Splitting it up for us into multiple objects spanned across 5Gig Files!


# Username used to login to control panel
USERNAME='mycloudusername'
# Find the APIKey in the 'account settings' part of the menu of the control panel
APIKEY='mycloudapikey'
# Find the image ID you'd like to make available on cloud files
CUSTOMER_ID=10001010

IMPORT_CF_ENDPOINT="https://storage101.lon3.clouddrive.com/v1/MossoCloudFS_50441c7a-dc22-4287-8e8c-b9844df"

# This section simply retrieves the TOKEN
TOKEN=`curl https://identity.api.rackspacecloud.com/v2.0/tokens -X POST -d '{ "auth":{"RAX-KSKEY:apiKeyCredentials": { "username":"'$USERNAME'", "apiKey": "'$APIKEY'" }} }' -H "Content-type: application/json" |  python -mjson.tool | grep -A5 token | grep id | cut -d '"' -f4`

# Upload VHD
curl -X PUT -T image.vhd \
-H "X-Auth-Token: $TOKEN" \
-H "Transfer-Encoding: chunked" \
"$IMPORT_CF_ENDPOINT/import/image.vhd"

Update:

Something in curl transmission caused it to sadly, mess up. So I used swiftly instead.

$ swiftly put -i image.vhd import/image.vhd

The problem with swiftly was it didn’t like my .swiftly file in my ~ as should work 100% without problems, but it didn’t. With help of my friend Jake this is what I did, to get round that and set manually in the environment (as opposed to using the .swiftly file)

abull-mb:~ adam9261$ export SWIFTLY_AUTH_URL=https://identity.api.rackspacecloud.com/v2.0
abull-mb:~ adam9261$ export SWIFTLY_AUTH_USER=cloudusernamehere
abull-mb:~ adam9261$ export SWIFTLY_AUTH_KEY=apikeyhere
abull-mb:~ adam9261$ swiftly auth

Next stage import to glance

#!/bin/bash

# Username used to login to control panel
USERNAME='mycloudusername'
# Find the APIKey in the 'account settings' part of the menu of the control panel
APIKEY='mycloudapikey'
# Find the image ID you'd like to make available on cloud files
CUSTOMER_ID=10001010
IMPORT_CF_ENDPOINT="https://storage101.lon3.clouddrive.com/v1/MossoCloudFS_50441c7a-dc22-4287-8e8c-b6d76b237da"
IMPORT_IMAGE_ENDPOINT=https://LON.images.api.rackspacecloud.com/v2/$CUSTOMER_ID


# This section simply retrieves the TOKEN
TOKEN=`curl https://identity.api.rackspacecloud.com/v2.0/tokens -X POST -d '{ "auth":{"RAX-KSKEY:apiKeyCredentials": { "username":"'$USERNAME'", "apiKey": "'$APIKEY'" }} }' -H "Content-type: application/json" |  python -mjson.tool | grep -A5 token | grep id | cut -d '"' -f4`


VHD-NOTES=TESTING-RACKSPACE-IMAGE-IMPORT
IMPORT_CONTAINER=import

curl -X POST "$IMPORT_IMAGE_ENDPOINT/tasks" \
      -H "X-Auth-Token: $TOKEN" \
      -H "Content-Type: application/json" \
      -d "{\"type\":\"import\",\"input\":{\"image_properties\":{\"name\":\"$VHD_NOTES\"},\"import_from\":\"$IMPORT_CONTAINER/image.vhd\"}}" |\
      python -mjson.tool

Please note that image.vhd is hardcoded into the curl import. Also see VHD-NOTES variable which is passed to the task. This is just to identify the image more easily.

Response:

{
    "created_at": "2016-04-19T13:12:57Z",
    "id": "ff7d8c09-9dd7-43ed-824f-338201681b12",
    "input": {
        "image_properties": {
            "name": ""
        },
        "import_from": "import/image.vhd"
    },
    "message": "",
    "owner": "10001010",
    "result": null,
    "schema": "/v2/schemas/task",
    "self": "/v2/tasks/ff7d8c09-9dd7-43ed-815f-338201681ba7",
    "status": "pending",
    "type": "import",
    "updated_at": "2016-04-19T13:12:57Z"
}

I then retrieved the Task details: (code not included yet). In this case I used pitchfork.cloudapi.co. A rackspace service that allows you to make API calls using a web frontend.

I was in a rush to get this done for the customer as soon as possible.

{
    "status": "processing", 
    "created_at": "2016-04-19T13:12:57Z", 
    "updated_at": "2016-04-19T13:12:58Z", 
    "id": "ff7d8c09-9dd7-43ed-824f-338201681b12", 
    "result": null, 
    "owner": "10009158", 
    "input": {
        "image_properties": {
            "name": ""
        }, 
        "import_from": "import/image.vhd"
    }, 
    "message": "", 
    "type": "import", 
    "self": "/v2/tasks/ff7d8c09-9dd7-43ed-815f-338201681ba7", 
    "schema": "/v2/schemas/task"
}

We can now see that the status is processing. When it has completed, it will tell us whether it failed or not

After waiting 30 minutes or so:

{
    "status": "success", 
    "created_at": "2016-04-19T13:12:57Z", 
    "updated_at": "2016-04-19T14:22:53Z", 
    "expires_at": "2016-04-21T14:22:53Z", 
    "id": "ff7d8c09-9dd7-43ed-815f-338201681ba7", 
    "result": {
        "image_id": "826bbb51-0f83-4278-b0ad-702aba088aae"
    }, 
    "owner": "10009158", 
    "input": {
        "image_properties": {
            "name": ""
        }, 
        "import_from": "import/image.vhd"
    }, 
    "message": "", 
    "type": "import", 
    "self": "/v2/tasks/ff7d8c09-9dd7-43ed-815f-338201681ba7", 
    "schema": "/v2/schemas/task"
}

It worked!

Disable TCP offloading on all Interfaces in Linux

We had a customer that was experiencing severe issues with checksum failures and it was causing many retransmissions to occur on the virtual machine.

My colleague was able to come up with a oneliner to disable offloading on all the interfaces.

# for iface in $(cd /sys/class/net; echo *); do ethtool -k $iface | awk -F: '/offload: on$/{print$1}' | sed 's/^\(.\).*-\(.\).*-\(.\).*/\1\2\3/' | xargs --no-run-if-empty -n1 -I{} ethtool -K $iface {} off; done

Nice. Thanks D 😀

Retrieve all CDN Rackcdn.com URL’s and URI

So, today we had a customer ask if I could trace down the containers for their specific domain CNAMES.

First I would dig the CNAME the customer setup. For instance cdn.customerdomain.com. This would give me a rackcdn.com link like;

# dig adam.haxed.me.uk

; <<>> DiG 9.9.4-RedHat-9.9.4-29.el7_2.2 <<>> adam.haxed.me.uk
;; global options: +cmd
;; Got answer:
;; ->>HEADER<<- opcode: QUERY, status: NOERROR, id: 19402
;; flags: qr rd ra; QUERY: 1, ANSWER: 6, AUTHORITY: 0, ADDITIONAL: 1

;; OPT PSEUDOSECTION:
; EDNS: version: 0, flags:; udp: 1500
;; QUESTION SECTION:
;adam.haxed.me.uk.		IN	A

;; ANSWER SECTION:
adam.haxed.me.uk.	3600	IN	CNAME	ceb47133a715104a5805-6490a1e5c1b40c9f5aaee7a62e1812f7.r59.cf3.rackcdn.com.
ceb47133a715104a5805-6490a1e5c1b40c9f5aaee7a62e1812f7.r59.cf3.rackcdn.com. 300 IN CNAME	a59.rackcdn.com.
a59.rackcdn.com.	281	IN	CNAME	a59.rackcdn.com.mdc.edgesuite.net.
a59.rackcdn.com.mdc.edgesuite.net. 300 IN CNAME	a61.dscg10.akamai.net.
a61.dscg10.akamai.net.	1	IN	A	104.86.110.99
a61.dscg10.akamai.net.	1	IN	A	104.86.110.115

;; Query time: 39 msec
;; SERVER: 83.138.151.81#53(83.138.151.81)
;; WHEN: Thu Apr 14 09:15:25 UTC 2016
;; MSG SIZE  rcvd: 261

This would give me detail of the CDN URL that my TLD points to. But, what if I am trying to track down the container, like my customer was? I will now create a script to list ALL rackCDN url's. Then we can search for the ceb47133 CNAME that adam.haxed.me.uk points to. This will give us a 'name' of the cloud files container that the rackcdn is associated/connected with.

USERNAME='mycloudusername'
APIKEY='mycloudapikey'

TOKEN=`curl https://identity.api.rackspacecloud.com/v2.0/tokens -X POST -d '{ "auth":{"RAX-KSKEY:apiKeyCredentials": { "username":"'$USERNAME'", "apiKey": "'$APIKEY'" }} }' -H "Content-type: application/json" |  python -mjson.tool | grep -A5 token | grep id | cut -d '"' -f4`

TENANT=10045567
API_ENDPOINT="https://cdn3.clouddrive.com/v1/MossoCloudFS_$TENANT"
#API_ENDPOINT="https://global.cdn.api.rackspacecloud.com/v1.0/$TENANT"
#API_ENDPOINT="https://cdn3.clouddrive.com/v1/MossoCloudFS_c2ad0d46-31e2-4c31-a60b-b611bb8e5f8b2"

curl -v -X GET $API_ENDPOINT/?format=json \
-H "X-Auth-Token: $TOKEN" | python -mjson.tool

It's well worth noting the API ENDPOINT is different from customer to customer so you may wish to retrieve all of the endpoints to check you have the right CDN endpoint. See at the bottom of the page how to check your endpoint is correct if you get permission error, it is likely the API endpoint. It's different for each customer I have learnt.

[
    {
        "cdn_enabled": true,
        "cdn_ios_uri": "http://a30ae7cddb38b2112bce-03b08b0e5c91ea60f938585ef20a12d7.iosr.cf3.rackcdn.com",
        "cdn_ssl_uri": "https://1627826b1dc042d6b3be-03b08b0e5c91ea60f938585ef20a12d7.ssl.cf3.rackcdn.com",
        "cdn_streaming_uri": "http://ee7e9298372b91eea2d2-03b08b0e5c91ea60f938585ef20a12d7.r91.stream.cf3.rackcdn.com",
        "cdn_uri": "http://beb2ec8d649b0d717ef9-03b08b0e5c91ea60f938585ef20a12d7.r91.cf3.rackcdn.com",
        "log_retention": false,
        "name": "some.com.cdn.container",
        "ttl": 86400
    },
    {
        "cdn_enabled": true,
        "cdn_ios_uri": "http://0381268aadeda8ceab1e-37d5bb63c6aad292ad490c7fddb2f62f.iosr.cf3.rackcdn.com",
        "cdn_ssl_uri": "https://5b190eda013130300b94-37d5bb63c6aad292ad490c7fddb2f62f.ssl.cf3.rackcdn.com",
        "cdn_streaming_uri": "http://5f756e93360bbef82e84-37d5bb63c6aad292ad490c7fddb2f62f.r75.stream.cf3.rackcdn.com",
        "cdn_uri": "http://47aabb1759520adb10a1-37d5bb63c6aad292ad490c7fddb2f62f.r75.cf3.rackcdn.com",
        "log_retention": false,
        "name": "container-001",
        "ttl": 604800
    },
    {
        "cdn_enabled": true,
        "cdn_ios_uri": "http://006acc500edc34a84075-1257f240203d0254bc8c5602aafda48d.iosr.cf3.rackcdn.com",
        "cdn_ssl_uri": "https://b68de0566314da76870d-1257f240203d0254bc8c5602aafda48d.ssl.cf3.rackcdn.com",
        "cdn_streaming_uri": "http://632bed500bfc691eb677-1257f240203d0254bc8c5602aafda48d.r49.stream.cf3.rackcdn.com",
        "cdn_uri": "http://b52a6ade17a64c459d85-1257f240203d0254bc8c5602aafda48d.r49.cf3.rackcdn.com",
        "log_retention": false,
        "name": "container-002",
        "ttl": 604800
    },
    {
        "cdn_enabled": true,
        "cdn_ios_uri": "http://38d59ebf089e8ebe00a0-6490a1e5c1b40c9f5aaee7a62e1812f7.iosr.cf3.rackcdn.com",
        "cdn_ssl_uri": "https://02a84412d877be1b8313-6490a1e5c1b40c9f5aaee7a62e1812f7.ssl.cf3.rackcdn.com",
        "cdn_streaming_uri": "http://b8b8fe52062f7fb25f43-6490a1e5c1b40c9f5aaee7a62e1812f7.r59.stream.cf3.rackcdn.com",
        "cdn_uri": "http://ceb47133a715104a5805-6490a1e5c1b40c9f5aaee7a62e1812f7.r59.cf3.rackcdn.com",
        "log_retention": false,
        "name": "scripts",
        "ttl": 259200
    },
    {
        "cdn_enabled": true,
        "cdn_ios_uri": "http://0c29cc67d5299ac41fa0-1426fb5304d7a905cdef320e9b667254.iosr.cf3.rackcdn.com",
        "cdn_ssl_uri": "https://4df79706147258ab315b-1426fb5304d7a905cdef320e9b667254.ssl.cf3.rackcdn.com",
        "cdn_streaming_uri": "http://66baf30a268d99e66228-1426fb5304d7a905cdef320e9b667254.r68.stream.cf3.rackcdn.com",
        "cdn_uri": "http://8b27955f0b728515adde-1426fb5304d7a905cdef320e9b667254.r68.cf3.rackcdn.com",
        "log_retention": false,
        "name": "test",
        "ttl": 259200
    },
    {
        "cdn_enabled": true,
        "cdn_ios_uri": "http://cc1d82abf0fbfced78b7-53ad0106578d82de3911abdf4b56c326.iosr.cf3.rackcdn.com",
        "cdn_ssl_uri": "https://7173244627f44933cf9e-53ad0106578d82de3911abdf4b56c326.ssl.cf3.rackcdn.com",
        "cdn_streaming_uri": "http://dd74f1300c187bb447f3-53ad0106578d82de3911abdf4b56c326.r30.stream.cf3.rackcdn.com",
        "cdn_uri": "http://cb7b587bb6e7186c9308-53ad0106578d82de3911abdf4b56c326.r30.cf3.rackcdn.com",
        "log_retention": false,
        "name": "test2",
        "ttl": 259200
    }
]
TOKEN=`curl https://identity.api.rackspacecloud.com/v2.0/tokens -X POST -d '{ "auth":{"RAX-KSKEY:apiKeyCredentials": { "username":"'$USERNAME'", "apiKey": "'$APIKEY'" }} }' -H "Content-type: application/json" |  python -mjson.tool`

As we can see below the ceb46 rackcdn link is the 'scripts' container. the CNAME adam.haxed.me.uk points to the rackcdn.com domain http://ceb47133a715104a5805-6490a1e5c1b40c9f5aaee7a62e1812f7.r59.cf3.rackcdn.com which is 'pointing' at the cloud files 'scripts' folder.

    {
        "cdn_enabled": true,
        "cdn_ios_uri": "http://38d59ebf089e8ebe00a0-6490a1e5c1b40c9f5aaee7a62e1812f7.iosr.cf3.rackcdn.com",
        "cdn_ssl_uri": "https://02a84412d877be1b8313-6490a1e5c1b40c9f5aaee7a62e1812f7.ssl.cf3.rackcdn.com",
        "cdn_streaming_uri": "http://b8b8fe52062f7fb25f43-6490a1e5c1b40c9f5aaee7a62e1812f7.r59.stream.cf3.rackcdn.com",
        "cdn_uri": "http://ceb47133a715104a5805-6490a1e5c1b40c9f5aaee7a62e1812f7.r59.cf3.rackcdn.com",
        "log_retention": false,
        "name": "scripts",
        "ttl": 259200
    },

Simple enough!

Pro actively Securing and Analyzing Login Attacks in WordPress and automating abuse reports

So, noticed there were a lot of failed logins being reported by my security software. So, I thought I’d do some manual digging around as to what is going on my box. Here is what I did.

Scan the physical packets coming in/out of the box

tcpdump -i eth0 | grep -v rackspace | grep -v newrelic | grep -v 212.121.212.121

This above line gave me lots of output. I could see a lot of ip’s were hitting tcp port 80 a lot, and I wondered why. Obviously it was a bruteforce login attack.

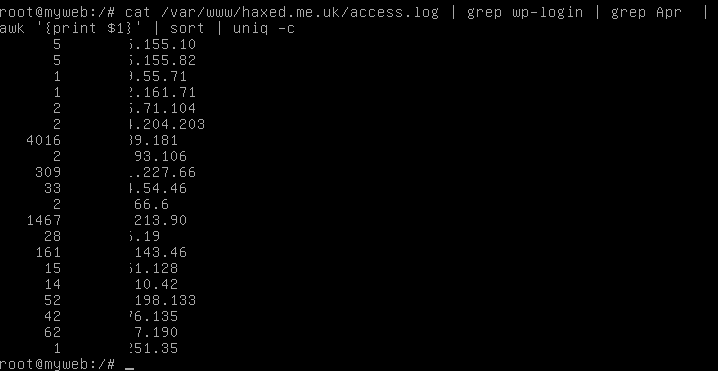
When analysing attacks it’s important to consult the webserver logs for all access, if port 80 http is being used as a vector of attack it is therefore important to identify which addresses are hitting sensitive files, such as wp-logon.php , this is what I expect is being targeted, so I will target them a little;

cat /some/path/to/mywebwww/access.log | grep wp-login | grep Apr | awk '{print $1}' | sort | uniq -c

What this does is output the entire webserver access log and only show requests that have wp-login in. Then it removes all entries from Apr, and then it extracts only the IP addresses of those accessing it, and then sorts them uniquely but also -c counting them too, so we know exactly how many access requests have been made to this sensitive wp-logon.php file in just 1 month.
This will allow us to identify the clear attackers and block them.

wp-login

Lets start blocking their access

iptables -I INPUT -s 1.1.1.1 -j DROP

The above line instructs the firewall to block the source ip 1.1.1.1 and DROP all packets coming in on the interface. Simple enough!

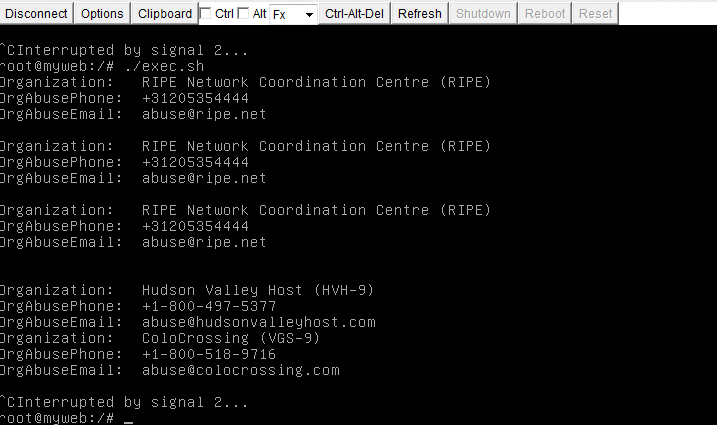
What I could do is take the line further, and find out exactly which networks these attacks are coming from by piping the ip addresses to whois. Lets do this now and extract some data we need to start making automated abuse reports with our script;

cat /somepath/www/access.log | grep wp-login | grep Apr | awk  '{print $1}' | sort | uniq | xargs -i echo "whois" {} | grep 'Organization\|AbuseEmail\|OrgAbusePhone'; echo;" > exec.sh;

 ./exec.sh

This is what the output looks like
ip-finder

Lets go one step further and refer to the {} output which has the initial IP argument. Then we’ll know which IP to email which abuse contact for when we pipe it to sendmail! ;D

cat /var/logs/access.log | grep wp-login | grep Apr | awk '{print $1}' | sort | uniq | xargs -i echo "echo {}" ";whois" {} "| grep 'OrgAbuseEmail';sleep 3;"

Output looks like

ip-abuse-email-output-automation

Sadly I run out of time with this.. but I will try and get the automatic abuse reporting finished soon 😀ip-abuse-email-output-automation

Installing Drupal 8 the hard way

Many people use phpmyadmin, but we’re going to do this properly to add users, databases and privileges. Heres how I did it.
Please note that this is a work in progress and is not finished yet .

Install httpd and mysql-server

yum install httpd mariadb-server php php-mysql

What you might find is that drupal 8 requires php5.5.9 lets install that;

[root@web-test-centos7 html]# yum install centos-release-scl
[root@web-test-centos7 html]# yum install php55-php-mysqlnd

Open Firewall port 80 http for CentOS

     sudo iptables -I INPUT 1 -p tcp --dport 80 -j ACCEPT
     sudo iptables -I INPUT 1 -p tcp --dport 443 -j ACCEPT

Save firewall rules in CentOS

/etc/init.d/iptables save

Alternatively, save firewall rules Ubuntu

iptables-save > /etc/iptables.rules

Save firewall rules for all other distros

iptables-save > /etc/sysconfig/iptables

Connect to MysQL to configure database user ‘drupal’

# mysql -u root
Welcome to the MariaDB monitor.  Commands end with ; or \g.
Your MariaDB connection id is 3
Server version: 5.5.47-MariaDB MariaDB Server

Copyright (c) 2000, 2015, Oracle, MariaDB Corporation Ab and others.

Type 'help;' or '\h' for help. Type '\c' to clear the current input statement.

Create Drupal database

MariaDB [(none)]> create database drupal;

Grant ability to connect with drupal user

MariaDB [(none)]> grant usage on *.* to drupal@localhost identified by '@#@DS45Dfddfdgj334k34ldfk;DF';
Query OK, 0 rows affected (0.00 sec)

Grant all Privileges to the user drupal for database drupal

MariaDB [(none)]> grant all privileges on drupal.* to drupal@localhost;
Query OK, 0 rows affected (0.00 sec)