I have been doing a lot of lab work lately and it has occurred to me that it would be pretty cool to run a 2 vcpu vm with 2gb ram, minimal resources in the lab, to host our own x86 repository for my favourite OS of choice, centos. It’s really easy to do too thanks to yum-utils.
Using my current lab template above, I simply alter a few things like name, vcpus, and increase the initial disk space to 500GB. Which should be ample for now.
Configuring a cronjob to automatically resync the repo daily
vi /etc/cron.daily/update-repo
# create new

#!/bin/bash

VER='9'
ARCH='x86_64'
REPOS=(baseos appstream extras-common)

for REPO in ${REPOS[@]}
do
    reposync -p /var/www/repos/centos-stream/${VER}/${ARCH}/os/ --repo=${REPO} --download-metadata --newest-only
done
sudo restorecon -r /var/www/repos/

# exit vim :wq and chmod the cronfile for good measure
chmod 755 /etc/cron.daily/update-repo
Then we install the httpd server and configure it for this path
vi /etc/httpd/conf.d/repos.conf
# create new

Alias /repos /var/www/repos
<directory /var/www/repos>
    Options +Indexes
    Require all granted
</directory>

#exit vim and restart the httpd with the new root repo
systemctl restart httpd
All done. Now we can configure the local server with our golden image cloud image we’re using to boot from libvirt with our own local repo. Ideally we’d also have a local dns server so we can run mirror.some.tld or similar. In this case the ip address will for now suffice, with a hostname in /etc/hosts of the golden image like local-mirror <centos9-local-repo-ip>, instead so it looks pretty and recognisable in the repo file.
vi /etc/yum.repos.d/centos.repo
# change to local mirror server

[baseos]
name=CentOS Stream $releasever - BaseOS
#metalink=https://mirrors.centos.org/metalink?repo=centos-baseos-$stream&arch=$basearch&protocol=https,http
baseurl=http://local-mirror/repos/centos-stream/$releasever/$basearch/os/baseos/
gpgkey=file:///etc/pki/rpm-gpg/RPM-GPG-KEY-centosofficial
gpgcheck=1
repo_gpgcheck=0
metadata_expire=6h
countme=1
enabled=1

[appstream]
name=CentOS Stream $releasever - AppStream
#metalink=https://mirrors.centos.org/metalink?repo=centos-appstream-$stream&arch=$basearch&protocol=https,http
baseurl=http://local-mirror/repos/centos-stream/$releasever/$basearch/os/appstream/
gpgkey=file:///etc/pki/rpm-gpg/RPM-GPG-KEY-centosofficial
gpgcheck=1
repo_gpgcheck=0
metadata_expire=6h
countme=1
enabled=1

# vi /etc/yum.repos.d/centos-addons.repo
# change to local mirror server

[extras-common]
name=CentOS Stream $releasever - Extras packages
#metalink=https://mirrors.centos.org/metalink?repo=centos-extras-sig-extras-common-$stream&arch=$basearch&protocol=https,http
baseurl=http://local-mirror/repos/centos-stream/$releasever/$basearch/os/extras-common/
gpgkey=file:///etc/pki/rpm-gpg/RPM-GPG-KEY-CentOS-SIG-Extras-SHA512
gpgcheck=1
repo_gpgcheck=0
metadata_expire=6h
countme=1
enabled=1
Finally clean and re-update yum to test config change
dnf clean all
dnf repolist
If you are insisting on running selinux like me, make sure you allow filegetattr;
[adam@centos9-repo-server appstream]$ sudo audit2allow -a -M filegetattr
******************** IMPORTANT ***********************
To make this policy package active, execute:

semodule -i filegetattr.pp

[adam@centos9-repo-server appstream]$ semodule -i filegetattr.pp
libsemanage.semanage_create_store: Could not read from module store, active modules subdirectory at /var/lib/selinux/targeted/active/modules. (Permission denied).
libsemanage.semanage_direct_connect: could not establish direct connection (Permission denied).
semodule:  Could not connect to policy handler
[adam@centos9-repo-server appstream]$ sudo semodule -i filegetattr.pp
It wouldn’t go amiss to tag the files either however in this case chcon isn’t necessary because the /var/www context already has the correct mask by default in selinux. 😀
As it turns out you also need read, as well as getattr to actually download the packages (getattr is needed for listing them i.e. ls)
$ sudo audit2allow -a


#============= httpd_t ==============

#!!!! This avc is allowed in the current policy
allow httpd_t var_t:file getattr;
allow httpd_t var_t:file read;
[adam@centos9-repo-server appstream]$ sudo audit2allow -a -M httpdread.pp
[adam@centos9-repo-server appstream]$ sudo semodule -i httpdread.pp
Once again we retry. OK, turns out we do need to set the unconfined files/folder that were written; which can be done like
sudo restorecon -r /var/www/repos/
I guess we’ll add this restorecon -r /var/www/repos/ to our cronjob for good measure to make sure the context is right.
I have previously described how to create a galera cluster using a created libvirt lab. I now describe how to create a master-slave mysql replication lab of the same without utilising Galera and instead using the inbuilt mysql binary-log master and a slave replica synchronising with it’s own user to the master.
Creating the Master and Slave VM’s
As before we create a pair of oneliners, and user-data and meta-data for cloud init to create the two nodes with our provided .ssh/id_rsa.pub key. In this case we only need to recreate the meta-data for the new hostnames and VM instance name. The cloud-init.yaml we created in the previous article is still relevant since that only contains our SSH public key, so we will reuse it.
Above we obtain the ip address of the the two nodes with virsh net-dhcp-leases, and a grep for our name tag used in the creation of the VM’s for easy to view output.
We then login and install the mariadb-server package, since we’re at it lets do it properly and install firewalld too and add a firewall rule for mysql port [3306]. We’ll also install vim, because its awesome fast for editing config files and isn’t present in our minimal base image. We also make sure firewalld and mariadb start on boot.
# Login to Master to install packages
ssh [email protected] -i ~adam/.ssh/id_rsa

yum install firewalld mariadb-server vim
[adam@mysql-master ~]$ sudo systemctl start firewalld
[adam@mysql-master ~]$ sudo systemctl enable firewalld
[adam@mysql-master ~]$ sudo systemctl enable mariadb
[adam@mysql-master ~]$ sudo mysql_secure_installation
[adam@mysql-master ~]$ sudo firewall-cmd --add-service=mysql --permanent
[adam@mysql-master ~]$ sudo systemctl restart firewalld

# Login to Slave and perform the same

[adam@mysql-slave ~]$ sudo yum install firewalld mariadb-server vim
[adam@mysql-slave ~]$ sudo systemctl start firewalld
[adam@mysql-slave ~]$ sudo systemctl enable firewalld
[adam@mysql-slave ~]$ sudo systemctl enable mariadb
[adam@mysql-slave ~]$ sudo mysql_secure_installation
[adam@mysql-slave ~]$ sudo firewall-cmd --add-service=mysql --permanent
[adam@mysql-slave ~]$ sudo systemctl restart firewalld

# For good measure we check firewall-cmd open ports were added as the services we need

[adam@mysql-slave ~]$ sudo firewall-cmd --list-all
public (active)
  target: default
  icmp-block-inversion: no
  interfaces: eth0
  sources:
  services: cockpit dhcpv6-client mysql ssh
 -- truncated output

[adam@mysql-master~]$ sudo firewall-cmd --list-all
public (active)
  target: default
  icmp-block-inversion: no
  interfaces: eth0
  sources:
  services: cockpit dhcpv6-client mysql ssh
 -- truncated output
We proceed with the masters configuration by giving it id=1 and enabling bin logs for replication.
Make sure you add these in the correct section. Note some distributions still use /etc/my.cnf as opposed to /etc/my.cnf.d/ , such as Ubuntu. It’s clear which one you have since there will be a [mysqld] section. Include the two lines we need to add in there. Once done restart mariadb on the master.
So far so good. Let’s create a user on the master for the slave mysql VM to use for replicating (copying) the data from master node. After creating the new account we flush privileges table for good measure and put the master in a read-only mode to prevent changes for the next step ‘bin file location’ and ‘bin file position’.
[adam@mysql-master ~]$ sudo mysql -u root

MariaDB [(none)]> grant replication slave on *.* to 'replication'@'192.168.122.117' IDENTIFIED BY 'makemereallysecureplease'

MariaDB [(none)]> flush privileges;
MariaDB [(none)]> flush tables with read lock;
A word on Secure Passwords if binding in a publicnet
This is only a test lab so it is safe for us to use a low security password. I recommend you use pwgen or similar to create a secure password in a production environment though, especially if you are binding to 0.0.0.0 and are in an open public net.
If you install pwgen install it, by first installing epel-release repo and then pwgen.
Most people will have a private network backend that sits behind a load balancer or master sql server that is only accessible to the service network. Still it’s better in a non lab environment to always get into the habit of using a secure password; notice in my use case I only give access via explicit static ipv4 of the VM in question to prevent unauthorised access to the db. [this is really much more important in a publicnet setting where there is no option for rich rules with firewalld etc]
Pretty simple, the only important thing is to set the id.
[mysqld]
server-id = 2
Now we’re ready to tell the Slave where the master is. First we need to login to the master sql server to get some important information for the slave we don’t know yet know.
[adam@mysql-master ~]$ sudo mysql -u root

MariaDB [(none)]> show master status;
+------------------+----------+--------------+------------------+
| File             | Position | Binlog_Do_DB | Binlog_Ignore_DB |
+------------------+----------+--------------+------------------+
| mysql-bin.000001 |      328 |              |                  |
+------------------+----------+--------------+------------------+
1 row in set (0.001 sec)
[adam@mysql-slave ~]$ sudo mysql -u root
MariaDB [(none)]> change master to master_host='192.168.122.132', master_user='replication', master_password='test', master_log_file='mysql-bin.000001', master_log_pos=328;
In the legacy mysql master-slave replica’s we need to know 3 things. The credentials for the slave login set on the master (in this case you can see this is set above as the user replication and the password, and also the name and position of the master log file, this is critical for the slave node to know ‘where to sync from’, especially if there is major differences in the two databases. Also, its important to understand later on if you add additional slaves or one of the slaves gets corrupted and needs to be manually resynced with the master.
Checking that the Slave is synching with the replica user using ‘show slave status‘. We use \G for clearer output.
MariaDB [(none)]> show slave status\G;
*************************** 1. row ***************************
                Slave_IO_State: Waiting for master to send event
                   Master_Host: 192.168.122.132
                   Master_User: replication
                   Master_Port: 3306
                 Connect_Retry: 60
               Master_Log_File: mysql-bin.000003
           Read_Master_Log_Pos: 342
                Relay_Log_File: mariadb-relay-bin.000006
                 Relay_Log_Pos: 641
         Relay_Master_Log_File: mysql-bin.000003
              Slave_IO_Running: Yes
             Slave_SQL_Running: Yes
          Replicate_Rewrite_DB:
               Replicate_Do_DB:
           Replicate_Ignore_DB:
            Replicate_Do_Table:
        Replicate_Ignore_Table:
       Replicate_Wild_Do_Table:
   Replicate_Wild_Ignore_Table:
                    Last_Errno: 0
                    Last_Error:
                  Skip_Counter: 0
           Exec_Master_Log_Pos: 342
               Relay_Log_Space: 1251
               Until_Condition: None
                Until_Log_File:
                 Until_Log_Pos: 0
            Master_SSL_Allowed: No
            Master_SSL_CA_File:
            Master_SSL_CA_Path:
               Master_SSL_Cert:
             Master_SSL_Cipher:
                Master_SSL_Key:
         Seconds_Behind_Master: 0
 Master_SSL_Verify_Server_Cert: No
                 Last_IO_Errno: 0
                 Last_IO_Error:
                Last_SQL_Errno: 0
                Last_SQL_Error:
   Replicate_Ignore_Server_Ids:
              Master_Server_Id: 1
                Master_SSL_Crl:
            Master_SSL_Crlpath:
                    Using_Gtid: No
                   Gtid_IO_Pos:
       Replicate_Do_Domain_Ids:
   Replicate_Ignore_Domain_Ids:
                 Parallel_Mode: optimistic
                     SQL_Delay: 0
           SQL_Remaining_Delay: NULL
       Slave_SQL_Running_State: Slave has read all relay log; waiting for more updates
              Slave_DDL_Groups: 1
Slave_Non_Transactional_Groups: 0
    Slave_Transactional_Groups: 0
1 row in set (0.000 sec)

ERROR: No query specified
As we can see the mysql-slave is correctly configured. Once this is done we can instruct the master to continue processing queries as normal, removing the read lock on the tables;
You can see how important it is to properly label servers with cloud-init and virsh, vmware, openstack etc. Since performing maintenance and upgrades of any kind it can be easy to mistake the server otherwise, and can result in some pretty unpleasant confusion for yourself and your clients. We can quickly test that the slave is syncing with the master by creating a new database, too.
MariaDB [(none)]> show databases;
+--------------------+
| Database           |
+--------------------+
| information_schema |
| mysql              |
| performance_schema |
| sys                |
| test               |
| testsync           |
+--------------------+
6 rows in set (0.001 sec)
Sure enough our replica is taking output correctly from the master and replicating data.
You may, if the dataset on the master is pre-existing and very large, want to backup the mysql database on the master for good measure with mysqldump
In our case it was two new servers so this step wasn’t necessary for the lab demonstration.
Another useful command you might want to use is show processlist; which is handy for debugging issues that may arise;
MariaDB [(none)]> show processlist;
+----+-------------+-----------+------+-----------+-------+--------------------------------------------------------+------------------+----------+
| Id | User        | Host      | db   | Command   | Time  | State                                                  | Info             | Progress |
+----+-------------+-----------+------+-----------+-------+--------------------------------------------------------+------------------+----------+
|  8 | system user |           | NULL | Slave_IO  | 12266 | Waiting for master to send event                       | NULL             |    0.000 |
|  9 | system user |           | NULL | Slave_SQL |   274 | Slave has read all relay log; waiting for more updates | NULL             |    0.000 |
| 10 | root        | localhost | NULL | Query     |     0 | starting                                               | show processlist |    0.000 |
+----+-------------+-----------+------+-----------+-------+--------------------------------------------------------+------------------+----------+
3 rows in set (0.000 sec)
I hope that this is useful to someone, as there are not a lot of really good and simple documentation showing this process in a clear to understand way online.
Hey, so it has been a little while since I’ve ventured into libvirt and I have noticed a few things, like support for kimchi on modern versions of python is kind of lacking, so instead of firing up a small wok-kimchi html5 lab I took a different route to what I would normally prefer, to create the lab from the ground up without any helper framework or GUI.
This involved a few things, mainly to install libvirt and kvm-qemu, and then to create a virsh install script utilising cloud init user-data and meta-data for the hostnames and adding the ssh key of my cloud user.
The Box I use is a remote HP Z440 with vtx extensions for virtualisation, these are required and if you are trying to achieve it will need to enable virtualisation support in the BIOS, which oddly in my case could be found in the “Security” Section of the HP Bios.
Once virt is installed we can concentrate on creating a cloud init files, which will be used by virsh-install during VM creation.
I also retrieved the latest cloud image provided by Redhat/CentOS ‘CentOS-Stream-GenericCloud-9-latest.x86_64.qcow2’. For a list of CentOS cloud ready images you can look at https://cloud.centos.org/centos/9-stream/x86_64/images/. Remember the older images (older than CentOS 8/9 are probably not safe to run. Always use an up to date image.
Cloud Init
In order to use these images, unlike back in the day there is no default local user only password to login via KVM. You will need to use the more established way of adding your password or SSH-key via cloud-init automation.
First we will place our qcow2 image in the /var/lib/libvirt/images repoistory. It is important to organise your images as best you can and I recommend against using images in non standard directories, it may upset selinux and permissions and create for confusing lab environment;
mv /home/adam/CentOS-Stream-GenericCloud-9-latest.x86_64.qcow2 /var/lib/libvirt/images

# lets create a cloud init directory
mkdir /var/lib/libvirt/images/cloudinit
vim cloud-init.yaml
The Cloud Init YAML File structure
The cloud init file structure allows you to set a variety of different things, including running scripts, attaching assigning hostnames, pre-installing packages, setting passwords and installing ssh public keys for secure login post-boot cloud-init. Cloud init only runs once so it’s important to understand any script you want to frequently run, should be installed to crontab with cloud init so that it runs independently after first-run. etc. In our case we want to add the adam user to sudo and set a /bin/bash shell with an authorized public key from my test lab.
If you want to create your own key you will need to replace the section – ssh-rsa {} with your own generated rsa key (or equivalent cipher like ecdsa etc etc);
Creating the Meta Data File
There are two files, the above is the ‘user-data’ component of cloud-init, we also want to provide a hostname to our machine so on build time its system hostname is set, and it is clearer for us what machine we are logging into. Maybe for a small setup such things aren’t important but in a cluster, or large environment having context to the commandline of the machine you are working on could be the difference between life and death, you don’t want to restart the primary node in a cluster accidentally instead of one of the ‘slave nodes’. So Labeling is important and it it’s really easy to do;
In my case I will create two more meta-data files for my other 2 Galera nodes ‘galera2-metadata.yaml’ and ‘galera3-metadata.yaml‘ with different node numbers ‘galera-2’ etc. It’s useful if you keep these files in somewhere safe or clear like /var/lib/libvirt/images/cloudinit or similar. You will reference them using the –cloud-init command and the user-data and meta-data suboptions later when creating the Virtual machines.
Generating a Key to Login to Cloud init
# create a (by default) rsa key for your logged in user
ssh-keygen
# output the safe public key to add to cloud init for login later
[root@localhost cloudinit]# cat ~adam/.ssh/id_rsa.pub
ssh-rsa AAAAB3NzaC1yc2EAAAADAQABAAABgQDB1D9CP4jqWxKw4ug+lR2zol7W6oJZ7wuliMt8aqlYekUBk7Pi7apQakc7rqjYD+b4iUDig0/4Zk4u6DC8WPgVr6o60fV7sdpoj0GBuxL+voGE0YV84zmorHoM8TCfLeMN3AdM0EMcT2NI8V/dmZ7uILYLYaXB+RRLv1QoMiL6zLGhLOfhdVKdvmbNqNcrvAEonnzQCVhFjRied2CfhnuH9tNXzGT5Y8wz0E9I8gQQp6GCyU7HnCHW8CLWpymZIrt2y7/Bi4XlKAbvaUFZJ9XLNsAK3gBC/VygIVQkWp9o3Y+KOmOsmsS51xJsigfDI0UMRdehdNEN+6vm7Eft9QZYHOg1xoTyJkgiFs9yCRFSRuXvFSsFLXUq5TFLv73qquKE6e/STORKobF2V7LaOuvbw1BIt2zo4v4c4toyaB5hshojO7bpORzhH8K43vEs0VW2ou9Zo8L3DwmZv6qFAy88BDCAIHoElgc3fmddlZJfCvcN4ZWDuISEP/j2oVuDT40= [email protected]
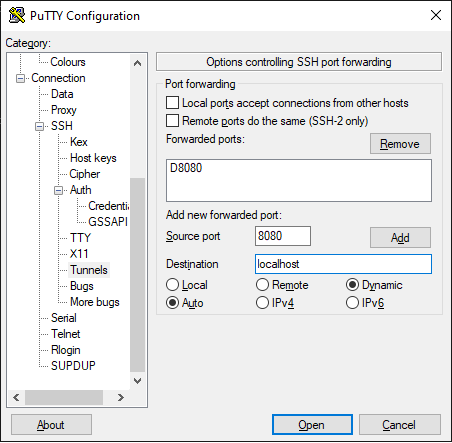
As you can see it is a very simple process to generate the key for your user. In my case the adam user is located on the same remote machine I am running the libvirtd hypervisor. However if the network routes are bridged to the local adapter on the hypervisor I could login from anywhere in the adjoined network. For convenience and security purposes I keep everything exposed locally to the remote hypervisor only, and for vnc sessions I use a dynamic tunnel on my desktop, which is frequently used to safely connect to unecnrypted local vnc sessions on the remote hypervisor. I use a socks5 configuration Dynamic Tunnel to achieve this on linux and windows machine like illustrated below;
We’ll see why this can be important and useful later.
Creating the Virtual Machines
Now we have all the necessary cloud init files created, a ssh user and key for cloud init for us to access the new vm ip addresses via ssh login and the ability to vnc to console via encrypted tunnel. Let’s go ahead and create the 3 Virtual Machines that will form part of the Galera Cluster Lab Environment.
# building out the cluster nodes
./make-galera-cluster.sh
# tearing down the cluster nodes
./destroy-galera-cluster.sh
A little bit about the virsh-install parameters. name is the label of the virtual machine. memory and vcpu’s are self explanatory. the disk size creates a 10gb qcow2 image based on the ‘golden image’ (master image reference) of Centos-Stream-9, and –cloud-Init provides our user-data and meta-data for the cloud init service to set the hostname and add our ssh key respectively. the disable=on parameter disables cloud-init after the first run, which i recommend. At least in my case virsh obtains 2 dhcp leases for the same label hostname which causes for confusion. Unless you really need to run cloud init more than once, leave it that way. –noautoconsole prevents you from being attached to the virtual machine console, and the –network bridge defines the local nic interface to use for the dhcp network lease subnet of the virtual machine. Simple, right?
Configuring the Galera Nodes
We should by now have 3 nodes running each with an IP dhcp lease on the virbr0 bridge interface.
[root@localhost cloudinit]# virsh net-dhcp-leases default
 Expiry Time           MAC address         Protocol   IP address           Hostname   Client ID or DUID
------------------------------------------------------------------------------------------------------------
 2024-02-24 02:18:19   52:54:00:1b:49:65   ipv4       192.168.122.219/24   galera-1   01:52:54:00:1b:49:65
 2024-02-24 02:19:41   52:54:00:6c:00:83   ipv4       192.168.122.247/24   galera-3   01:52:54:00:6c:00:83
 2024-02-24 02:19:40   52:54:00:c6:17:7b   ipv4       192.168.122.199/24   galera-2   01:52:54:00:c6:17:7b
In my case cloud-init actually creates 6 leases for the 3 VM’s with one dead ip that was used during cloud init boot. I find this irritating so I wipe the stat file and restart my vm’s so I don’t have to try two ip’s until I get one that is alive;
I resent the way dnsmasq works here, it certainly makes it easier to login to our first node to configure the packages for galera.
From earlier when we setup our Tunnel for VNC on the dynamic socks port 8080:localhost; we may want to access the VNC sessions to our created VM’s in an emergency. Let’s test this works OK.
[root@localhost cloudinit]# virsh list
 Id   Name      State
-------------------------
 21   galera1   running
 22   galera2   running
 23   galera3   running

[root@localhost cloudinit]# virsh vncdisplay galera1
127.0.0.1:0

[root@localhost cloudinit]# virsh vncdisplay galera2
127.0.0.1:1

[root@localhost cloudinit]# virsh vncdisplay galera3
127.0.0.1:2
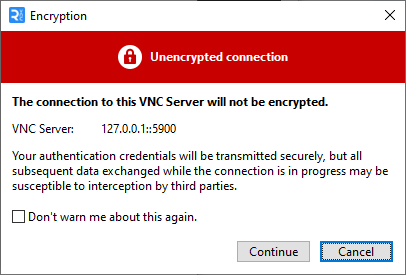
Remember, if you get a message like this you can safely ignore it. Why? Your SSH2 tunnel effectively makes the session transport encrypted locally at both points, so there is no opportunity to intercept the plaintext session by other parties that may sit in the middle, as it’s effectively a private tunnel like vpn between you and the hypervisor (No MIM Can take place that it is warning you about). The reason this is is because the socks5 is a ‘transparent’ proxy, so VNC doesn’t know or look to check socks5 traffic encapsulated by sha based encryption via our dynamic ssh tunnel]
Testing first, Automation Second, To Ansible or Not to Ansible?
Of course the next step after manually testing our cluster will be to consider automating these package installations utilising the user-data cloud-init file which can install many different packages and repo’s to our machines. We can include as meta-data additional configuration files, system package installation variables for our virtual machines, and these processes can be carried out by cloud-init.
For a Home lab setup the best (and probably most commercially flexible) approach is to let virsh and cloud init to handle the building of the VM and the installation of packages perhaps, and ansible can take care of any advanced packages and configuration changes to the cluster, because cloud-init isn’t cluster-aware, but ansible playbooks very much can be written to do that.
I think ansible will be useful later for my lab, as changing the nodes of the cluster to different consistency or performing upgrades isn’t something you could handle thru cloud-init anyways, except for brave and foolish lost souls, perhaps! 😀
In order to create an effective playbook testing manually is necessary first, unless you are fortunate to find an ansible playbook which has already been thoroughly tested by someone else to do the same. In any case you will probably want to get some hands on experience to understand what the playbook automation actually does, otherwise your sorta firing blind into the wind..
Installing Galera on the 3 Nodes Cluster
sudo dnf -y install mariadb-server-galera
I saw some versions of debian actually come with mariadb aliased repo, but CentOS package specifies ‘mariadb-server-galera’. We are using 10.11.6, as you can see below;
[adam@galera-2 ~]$ dnf info mariadb-server-galera
Last metadata expiration check: 0:00:58 ago on Sat 24 Feb 2024 11:19:55 AM EST.
Installed Packages
Name         : mariadb-server-galera
Epoch        : 3
Version      : 10.11.6
Release      : 1.module_el9+853+7b957b9b
Architecture : x86_64
Size         : 39 k
Source       : mariadb-10.11.6-1.module_el9+853+7b957b9b.src.rpm
Repository   : @System
From repo    : appstream
Summary      : The configuration files and scripts for galera replication
URL          : http://mariadb.org
License      : GPLv2 and LGPLv2
Description  : ... [shortened]
About Releases, Stability, Support, Developent Cycles
Generally we don’t live too close to the cutting edge [unless there is a good reason like support to do so]. The advantage of stable CentOS 9 stream packages is the stability and future supportability, most repo’s will have patched issues with earlier releases that are found normally in the first few months after release. According to the vendor 10.11 is the latest stable release, and considering the development cycle is important for Long Time Support (aka LTS).
It actually is important to understand that a General Availability (GA) Release may have much less future support and will not be maintained for security updates or package updates in the stream rep , a veritable nightmare a good technician is worthy of avoiding his client.
Simply using a stable LTS is the best approach since you will get support for 5 years. So in our case we will expect support to end 5 years from the release date which is sometime between 2028-2029. Probably long enough. Which is a big difference two 2025 or 2026, and likely to be a real headache sometimes, as releases can be library and cross-dependency breaking in larger more complex software stack and development environments. Most companies don’t spend so much time on such matters, but it’s really important man, and in my experience working in managed support at Rackspace for 3 years, I saw a lot of businesses who didn’t spend so much time on this matter really wish that they had when their application came tumbling down by a forced upgrade gone wrong that if they used LTS they could have avoided. etc etc. Last of all one other important consideration is whether they want to install the latest stable from the centos 9 stream repoistory, or if they want to use a specific version from the vendor repo. Again, this depends on the clients objectives and is an important consideration when carrying out implementation in a commercial environment.
Configure Galera Node
Before we begin we need to remove the anonymous mysql user and test data and ‘make mysql secure’. This can be done with the simple command below. Not much more to say as this is standard practice since forever;
[adam@galera-1 ~]$ mysql_secure_installation
Let’s configure our first Galera Node on the galera-1 virtual machine. We need to reference the other addresses of our node (wsrep_cluster_address), we need to name the node for legibility (wsrep_node_name, and its not a uuid so be warned), and we need to consider what wsrep_sst_method we are using. Finally we’ll need to set the ws_rep_on=1 before stopping our service and insuring that /var/lib/mysql is empty and does not have any other data in it that is either important or will prevent the cluster creating the db structure for the cluster.
# This file contains wsrep-related mysqld options. It should be included
# in the main MySQL configuration file.
#
# Options that need to be customized:
#  - wsrep_provider
#  - wsrep_cluster_address
#  - wsrep_sst_auth
# The rest of defaults should work out of the box.

##
## mysqld options _MANDATORY_ for correct opration of the cluster
##
[mysqld]

# (This must be substituted by wsrep_format)
binlog_format=ROW

# Currently only InnoDB storage engine is supported
default-storage-engine=innodb

# to avoid issues with 'bulk mode inserts' using autoinc
innodb_autoinc_lock_mode=2

# Override bind-address
# In some systems bind-address defaults to 127.0.0.1, and with mysqldump SST
# it will have (most likely) disastrous consequences on donor node
bind-address=0.0.0.0

##
## WSREP options
##

# Enable wsrep
wsrep_on=1

# Full path to wsrep provider library or 'none'
wsrep_provider=/usr/lib64/galera/libgalera_smm.so

# Provider specific configuration options
#wsrep_provider_options=

# Logical cluster name. Should be the same for all nodes.
wsrep_cluster_name="galeracluster"

# Group communication system handle
wsrep_cluster_address="gcomm://192.168.122.219,192.168.122.247,192.168.199"

# Human-readable node name (non-unique). Hostname by default.
wsrep_node_name=galera-1

# Base replication <address|hostname>[:port] of the node.
# The values supplied will be used as defaults for state transfer receiving,
# listening ports and so on. Default: address of the first network interface.
#wsrep_node_address=

# Address for incoming client connections. Autodetect by default.
#wsrep_node_incoming_address=

# How many threads will process writesets from other nodes
wsrep_slave_threads=1

# DBUG options for wsrep provider
#wsrep_dbug_option

# Generate fake primary keys for non-PK tables (required for multi-master
# and parallel applying operation)
wsrep_certify_nonPK=1

# Maximum number of rows in write set
wsrep_max_ws_rows=0

# Maximum size of write set
wsrep_max_ws_size=2147483647

# to enable debug level logging, set this to 1
wsrep_debug=0

# convert locking sessions into transactions
wsrep_convert_LOCK_to_trx=0

# how many times to retry deadlocked autocommits
wsrep_retry_autocommit=1

# change auto_increment_increment and auto_increment_offset automatically
wsrep_auto_increment_control=1

# retry autoinc insert, which failed for duplicate key error
wsrep_drupal_282555_workaround=0

# enable "strictly synchronous" semantics for read operations
wsrep_causal_reads=0

# Command to call when node status or cluster membership changes.
# Will be passed all or some of the following options:
# --status  - new status of this node
# --uuid    - UUID of the cluster
# --primary - whether the component is primary or not ("yes"/"no")
# --members - comma-separated list of members
# --index   - index of this node in the list
wsrep_notify_cmd=

##
## WSREP State Transfer options
##

# State Snapshot Transfer method
wsrep_sst_method=rsync

# Address which donor should send State Snapshot to.
# Should be the address of THIS node. DON'T SET IT TO DONOR ADDRESS!!!
# (SST method dependent. Defaults to the first IP of the first interface)
#wsrep_sst_receive_address=

# SST authentication string. This will be used to send SST to joining nodes.
# Depends on SST method. For mysqldump method it is root:<root password>
wsrep_sst_auth=root:

# Desired SST donor name.
#wsrep_sst_donor=

# Reject client queries when donating SST (false)
#wsrep_sst_donor_rejects_queries=0

# Protocol version to use
# wsrep_protocol_version=
Creating the Cluster DB Filestructure
Once you have configured your primary node or ‘first node’, in this case as this is a set of 3 ‘masters’ all can be written and sync with eachother. You will need to run the shell command galera_new_cluster.
[adam@galera-1 my.cnf.d]$ galera_new_cluster
Configure the other nodes in cluster with the same configuration file
Now we will need to configure the other 2 nodes ‘galera-2’ and ‘galera-3’ respectively. Making sure to give them a human readable name ‘wsrep_node_name=’ you don’t have to do it, but please do it. Your crazy running a big cluster without that and you can see why this is once you start the cluster.
Starting the Cluster
It’s important to start the cluster after the initial cluster has been created on a given node; i.e using the galera_new_cluster is defining ‘I am the copy to sync to the other nodes’. An initiatialisation state, in this configuration all the nodes will sync with eachother as data is written to any of them once this initial stage is completed.
We will check the status of the nodes using systemctl
[adam@galera-1 my.cnf.d]$ sudo systemctl status mariadb
● mariadb.service - MariaDB 10.11 database server
     Loaded: loaded (/usr/lib/systemd/system/mariadb.service; enabled; preset: disabled)
     Active: active (running) since Sat 2024-02-24 11:46:05 EST; 9s ago
       Docs: man:mariadbd(8)
             https://mariadb.com/kb/en/library/systemd/
    Process: 8105 ExecStartPre=/usr/libexec/mariadb-check-socket (code=exited, status=0/SUCCESS)
    Process: 8127 ExecStartPre=/usr/libexec/mariadb-prepare-db-dir mariadb.service (code=exited, status=0/SUCCESS)
    Process: 8364 ExecStartPost=/usr/libexec/mariadb-check-upgrade (code=exited, status=0/SUCCESS)
   Main PID: 8162 (mariadbd)
     Status: "Taking your SQL requests now..."
      Tasks: 17 (limit: 10856)
     Memory: 179.1M
        CPU: 903ms
     CGroup: /system.slice/mariadb.service
             └─8162 /usr/libexec/mariadbd --basedir=/usr

Feb 24 11:46:04 galera-1 rsyncd[8323]: sent 2005 bytes  received 416901 bytes  total size 408076
Feb 24 11:46:04 galera-1 rsyncd[8329]: connect from galera-2 (192.168.122.199)
Feb 24 11:46:04 galera-1 rsyncd[8329]: rsync allowed access on module rsync_sst from galera-2 (192.168.122.199)
Feb 24 11:46:04 galera-1 rsyncd[8324]: sent 48 bytes  received 386 bytes  total size 65
Feb 24 11:46:04 galera-1 rsyncd[8322]: sent 48 bytes  received 383 bytes  total size 67
Feb 24 11:46:04 galera-1 rsyncd[8329]: rsync to rsync_sst/ from galera-2 (192.168.122.199)
Feb 24 11:46:04 galera-1 rsyncd[8329]: receiving file list
Feb 24 11:46:04 galera-1 rsyncd[8329]: sent 48 bytes  received 185 bytes  total size 41
Feb 24 11:46:05 galera-1 rsyncd[8294]: sent 0 bytes  received 0 bytes  total size 0
Feb 24 11:46:05 galera-1 systemd[1]: Started MariaDB 10.11 database server.
We can see that our first node is receiving from galera-2.
We can also see that our 3rd node is communicating with galera-1
[root@galera-3 my.cnf.d]# systemctl status mariadb
● mariadb.service - MariaDB 10.11 database server
     Loaded: loaded (/usr/lib/systemd/system/mariadb.service; enabled; preset: disabled)
     Active: active (running) since Fri 2024-02-23 21:08:45 EST; 14h ago
       Docs: man:mariadbd(8)
             https://mariadb.com/kb/en/library/systemd/
   Main PID: 14265 (mariadbd)
     Status: "Taking your SQL requests now..."
      Tasks: 17 (limit: 10857)
     Memory: 257.0M
        CPU: 37.386s
     CGroup: /system.slice/mariadb.service
             └─14265 /usr/libexec/mariadbd --basedir=/usr

Feb 23 21:08:43 galera-3 rsyncd[14426]: sent 2005 bytes  received 416977 bytes  total size 408076
Feb 23 21:08:43 galera-3 rsyncd[14424]: sent 1853 bytes  received 4052436 bytes  total size 4045370
Feb 23 21:08:43 galera-3 rsyncd[14430]: connect from galera-1 (192.168.122.219)
Feb 23 21:08:43 galera-3 rsyncd[14430]: rsync allowed access on module rsync_sst from galera-1 (192.168.122.219)
Feb 23 21:08:43 galera-3 rsyncd[14425]: sent 48 bytes  received 380 bytes  total size 67
Feb 23 21:08:44 galera-3 rsyncd[14430]: rsync to rsync_sst/ from galera-1 (192.168.122.219)
Feb 23 21:08:44 galera-3 rsyncd[14430]: receiving file list
Feb 23 21:08:44 galera-3 rsyncd[14430]: sent 48 bytes  received 186 bytes  total size 41
Feb 23 21:08:44 galera-3 rsyncd[14397]: sent 0 bytes  received 0 bytes  total size 0
Feb 23 21:08:45 galera-3 systemd[1]: Started MariaDB 10.11 database server.
Lets install sysbench to run some performance tests of our new cluster against the nodes. This is pretty important and will reveal any bottlenecks or serious misconfiguration that results. Naturally the query size and type of queries matter too, but that is often to do with application design, rather than the physical set up of the application. Though depending on the application tuning can be done and then tests can be repeated with the application in staging, or utilising a specific sysbench query with given query size/test data etc.
# sys bench is in the epel-release repo so lets install it
dnf install epel-release
dnf install sysbench
Tuning Sysctl, threading, tcp_wait maxconn and more
So, although this is a virtualised cluster, and because each machine is virtualised by the same file system limitations set by the hypervisor, the performance increase is minimal, since, most of the writing is made to disk, and a shared disk means that having your cloud nodes on the same hyperivsor for a cloud galera cluster is very very bad indeed.
[adam@galera-1 my.cnf.d]$ sysbench oltp_read_write --table-size=1000000 --db-driver=mysql --mysql-db=test --mysql-user=root --mysql-password=test --threads=2  --mysql-host=192.168.122.219,192.168.122.247,192.168.199 run
sysbench 1.0.20 (using system LuaJIT 2.1.0-beta3)

Running the test with following options:
Number of threads: 2
Initializing random number generator from current time


Initializing worker threads...

Threads started!

SQL statistics:
    queries performed:
        read:                            31360
        write:                           7999
        other:                           5438
        total:                           44797
    transactions:                        2237   (223.52 per sec.)
    queries:                             44797  (4476.08 per sec.)
    ignored errors:                      3      (0.30 per sec.)
    reconnects:                          0      (0.00 per sec.)

General statistics:
    total time:                          10.0063s
    total number of events:              2237

Latency (ms):
         min:                                    3.67
         avg:                                    8.94
         max:                                   24.25
         95th percentile:                       13.95
         sum:                                20002.45

Threads fairness:
    events (avg/stddev):           1118.5000/60.50
    execution time (avg/stddev):   10.0012/0.00
In reality, a galera cluster could be 3 bare metal servers, or 3 cloud instances on seperate hypervisors making full use of the IOPS available (writes/reads) on each device attached to each node. So, although we won’t see much difference in our sysbench marks because of the virtual synthetic lab I have created. I still think it is really important to cover sysctl tuning et al.
So lets first increase the maxconns that Mariadb can do, and increase the size of the innodb log from 100M to 2000M, and the maxconnections to 3000 each. Whilst we’re at it lets also increase the number of threads for the galera cluster slaves from 1 to 32. This is pretty important as its effectively the number of sharding instances assigned per query-set grouping from my understanding. Let’s do it!
MariaDB [(none)]> SHOW GLOBAL VARIABLES    LIKE 'max_connections';
+-----------------+-------+
| Variable_name   | Value |
+-----------------+-------+
| max_connections | 3000  |
+-----------------+-------+
1 row in set (0.001 sec)
Let’s take a look at the mysql database of the cluster and inspect the wsrep_cluster; and verify that the members really are working correctly with each node incoming_address forwarding as it should; this is important for the distribution of load between the cluster.
Perfect, so everything is there, but I’d expect to see a little better performance, so let’s set some sysctl defaults, because the ones on these VM’s is going to be really low and TCP_WAIT on 128 threads is really miniscule
These values need to really be a lot higher for us to hit the real bottleneck, which is a lot higher as a ‘hard’ limit than these ‘soft’ limits set in the VM are imposed. So lets go ahead and put in some new sysctl tunables on all of our VM’s as follows;
vim /etc/sysctl.conf

[adam@galera-1 ~]$ sudo vim /etc/sysctl.conf
[adam@galera-1 ~]$ cat /etc/sysctl.conf
# sysctl settings are defined through files in
# /usr/lib/sysctl.d/, /run/sysctl.d/, and /etc/sysctl.d/.
#
# Vendors settings live in /usr/lib/sysctl.d/.
# To override a whole file, create a new file with the same in
# /etc/sysctl.d/ and put new settings there. To override
# only specific settings, add a file with a lexically later
# name in /etc/sysctl.d/ and put new settings there.
#
# For more information, see sysctl.conf(5) and sysctl.d(5).
#
#
# Increase the maximum number of memory map areas a process may have
# This can help prevent out-of-memory errors in large applications
vm.max_map_count=262144

# Increase the maximum number of file handles and inode cache for large file transfers
# This can improve performance when dealing with a large number of files
fs.file-max = 3261780

# Increase the maximum buffer size for TCP
net.core.rmem_max = 16777216
net.core.wmem_max = 16777216

# Increase Linux autotuning TCP buffer limits
net.ipv4.tcp_rmem = 4096 12582912 16777216
net.ipv4.tcp_wmem = 4096 12582912 16777216

# Disable caching of ssthresh from previous TCP connection
net.ipv4.tcp_no_metrics_save = 1

# Reduce the kernel's tendency to swap
vm.swappiness = 1

# Set the default queueing discipline for network devices
net.core.default_qdisc = fq_codel

# Enable TCP BBR congestion control
net.ipv4.tcp_congestion_control=bbr

# Enable TCP MTU probing
net.ipv4.tcp_mtu_probing=1

# Increase the maximum input queue length of a network device
net.core.netdev_max_backlog = 32768

# Increase the maximum accept queue limit
net.core.somaxconn = 65535

# Reduce the number of SYN and SYN+ACK retries before packet expires
net.ipv4.tcp_syn_retries = 1
net.ipv4.tcp_synack_retries = 1

# Reduce the timeout to close client connections in TIME_WAIT state
net.ipv4.tcp_fin_timeout = 30

# Disable SYN cookie flood protection
net.ipv4.tcp_syncookies = 0

# Increase the local port range used by TCP and UDP
net.ipv4.ip_local_port_range = 1024 61000

# Additional Galera Cluster optimizations
# Increase the number of allowed open files per process for MariaDB
fs.file-max = 100000

# Increase the number of file handles specifically for MariaDB
# Adjust according to the needs of your Galera Cluster
fs.aio-max-nr = 1000000
And be sure to run this afterwards so that sysctl runs the present configuration
sysctl -p
Let’s rerun our test using all 32 threads, which was failing before from timeouts [due to too many threads overwhelming the sysctl limits set in sysbench’s shell we’re testing from]
The error we were getting :
[adam@galera-1 ~]$ sysbench oltp_read_write --table-size=1000000 --db-driver=mysql --mysql-db=test --mysql-user=root --mysql-password=test --threads=16  --mysql --host=192.168.122.219,192.168.122.247,192.168.199 run
sysbench 1.0.20 (using system LuaJIT 2.1.0-beta3)

Running the test with following options:
Number of threads: 16
Initializing random number generator from current time


Initializing worker threads...

FATAL: Worker threads failed to initialize within 30 seconds!
After we have increased the limits on mariadb galera, and sysctl we can rerun the test to get maximum throughput (
[adam@galera-1 ~]$ sysbench oltp_read_write --table-size=1000000 --db-driver=mysql --mysql-db=test --mysql-user=root --mysql-password=test --threads=16  --mysql-host=192.168.122.219,192.168.122.247,192.168.122.199 run   sysbench 1.0.20 (using system LuaJIT 2.1.0-beta3)

Running the test with following options:
Number of threads: 16
Initializing random number generator from current time


Initializing worker threads...

Threads started!

SQL statistics:
    queries performed:
        read:                            204624
        write:                           52222
        other:                           35396
        total:                           292242
    transactions:                        14555  (1453.33 per sec.)
    queries:                             292242 (29180.70 per sec.)
    ignored errors:                      61     (6.09 per sec.)
    reconnects:                          0      (0.00 per sec.)

General statistics:
    total time:                          10.0131s
    total number of events:              14555

Latency (ms):
         min:                                    3.62
         avg:                                   11.00
         max:                                  123.99
         95th percentile:                       15.83
         sum:                               160056.66

Threads fairness:
    events (avg/stddev):           909.6875/105.22
    execution time (avg/stddev):   10.0035/0.01
Wow! What a difference, we have nearly quadrupled the read performance now by taking all of these steps. I am really impressed with the results. Though this hypervisor is utilising NVME, so I would ideally expect to see writes in the 1GB/s to 6GB/s range at least! I think though, that it depends on how the queries are bulked together, and the delay in each transaction sent to and from the cluster and disk. Also, we have to bare in mind that these aren’t baremetal benchmarks either. Lets run hdparm and see what libvirt can do anyways.
[adam@galera-1 ~]$ sudo fdisk -l
Disk /dev/vda: 10 GiB, 10737418240 bytes, 20971520 sectors
Units: sectors of 1 * 512 = 512 bytes
Sector size (logical/physical): 512 bytes / 512 bytes
I/O size (minimum/optimal): 512 bytes / 512 bytes
Disklabel type: dos
Disk identifier: 0xdce436c4

Device     Boot Start      End  Sectors Size Id Type
/dev/vda1  *     2048 20971486 20969439  10G 83 Linux
[adam@galera-1 ~]$ hdparm -Tt /dev/vda1
/dev/vda1: Permission denied
[adam@galera-1 ~]$ sudo hdparm -Tt /dev/vda1

/dev/vda1:
 Timing cached reads:   21602 MB in  1.99 seconds = 10856.33 MB/sec
 Timing buffered disk reads: 6226 MB in  3.00 seconds = 2074.76 MB/sec
Woof. I really love my HP Z440. With those 16 cores and 32 threads and a 10GB/s pci busspeed it leaves nothing much to be more desired. I think that with some more effort , perhaps by increasing the number of CPU cores and ram of the Galera Cluster we could get this far beyond 15k/qps which is pretty impressive for a single server machine. I am going to run some benchmark against mariadb on the hypervisor on the bare metal and see how much efficiency is really lost in splitting it between these 3 instances. However, if this was 3 dedicated machines, I am confident the results would be pretty amazing.
I think I could probably loosen the consistency restraints so that others worked as slaves rather than synchronous masters, and get a lot more than 15k qps.
With 32 threads we see even better performance.
[adam@galera-1 ~]$ sysbench oltp_read_write --table-size=1000000 --db-driver=mysql --mysql-db=test --mysql-use                                                                                                                               r=root --mysql-password=test --threads=32  --mysql-host=192.168.122.219,192.168.122.247,192.168.122.199 run
sysbench 1.0.20 (using system LuaJIT 2.1.0-beta3)

Running the test with following options:
Number of threads: 32
Initializing random number generator from current time


Initializing worker threads...

Threads started!

SQL statistics:
    queries performed:
        read:                            275352
        write:                           70394
        other:                           47423
        total:                           393169
    transactions:                        19513  (1948.12 per sec.)
    queries:                             393169 (39252.79 per sec.)
    ignored errors:                      155    (15.47 per sec.)
    reconnects:                          0      (0.00 per sec.)

General statistics:
    total time:                          10.0145s
    total number of events:              19513

Latency (ms):
         min:                                    4.75
         avg:                                   16.41
         max:                                  121.10
         95th percentile:                       26.68
         sum:                               320136.02

Threads fairness:
    events (avg/stddev):           609.7812/98.11
    execution time (avg/stddev):   10.0043/0.00
Likely there are a lot more things I can do to increase performance and make use of the nvme backed virtio disk, however because all the instances are on the same box hypervisor lab theqps is lower that it would otherwise be in a real production setting, which is important to consider.
Anyways, that’s all folks! Hopefully I will get time to automate this with ansible on the local hyperivisors adam user and build a little automation script that puts together libvirt vm creation and the configuration of all described above into a single script. And maybe as an added bonus we could add in some sysbench tests and return codes from the playbook, which might be with some adaptation really handy for testing out database implementations on different cloud providers.
Last but not least! Lets make it so that mariadb [galera] is running on boot, do this on all machines;