GREETINGS! Welcome to this unusual Howto. So, thinking about setting up some PCIE Passthrough on your Linux box, so you can feel less embarrassed about needing windows to run your steam-games? Look no further!
Looking to setup SLI on your Linux Ubuntu Windows virtual machine? Look no further!!!
Are you looking to overcome some of the mean issues that are presented by devices with the same ID? (This is a big problem guys sometimes when passing through devices, if the device ID’s are the same you can also get problems).
Are you looking to discover why USB passthrough doesn’t work properly (or at all?) for your mouse/keyboard/usb audio? Look no further!! It’s quite common apparently that Ubuntu’s App armor, either, without being insecurely disabled, or a secure rule added, will prevent you from using libvirtd usb passthrough, due to the way the apparmor prevents sharing between applications that are unsupported. Whilst apparmor goes a little bit beyond the scope of this tutorial. Setting up this basic (starter) VM with 2 RX 580, is really a synch once you have it down. There are some important considerations before beginning though.
1. You will need an IGFX (integrated gfx) on your motherboard. Why you ask? Thats what Ubuntu is going to use. Whilst we will pass to pci-stub (and possibly vtio too I believe in some setups). VTIO pci passthrough is more modern the pci-stub passthrough I use. Though, when mining with the 2 rx 580 sapphire nitro I have within the virtual machine I got 22MH/s, knowing that these cards run stock unvirtualized in this machine at 23MH/s. I was able to calculate that PCIE passthrough, when configured correctly really is capable of 95% efficiency. To ensure that the RX580 devices are properly used, we must set in our BIOS, IGFX.
Step 1. Prepare BIOS display adapter/primary order
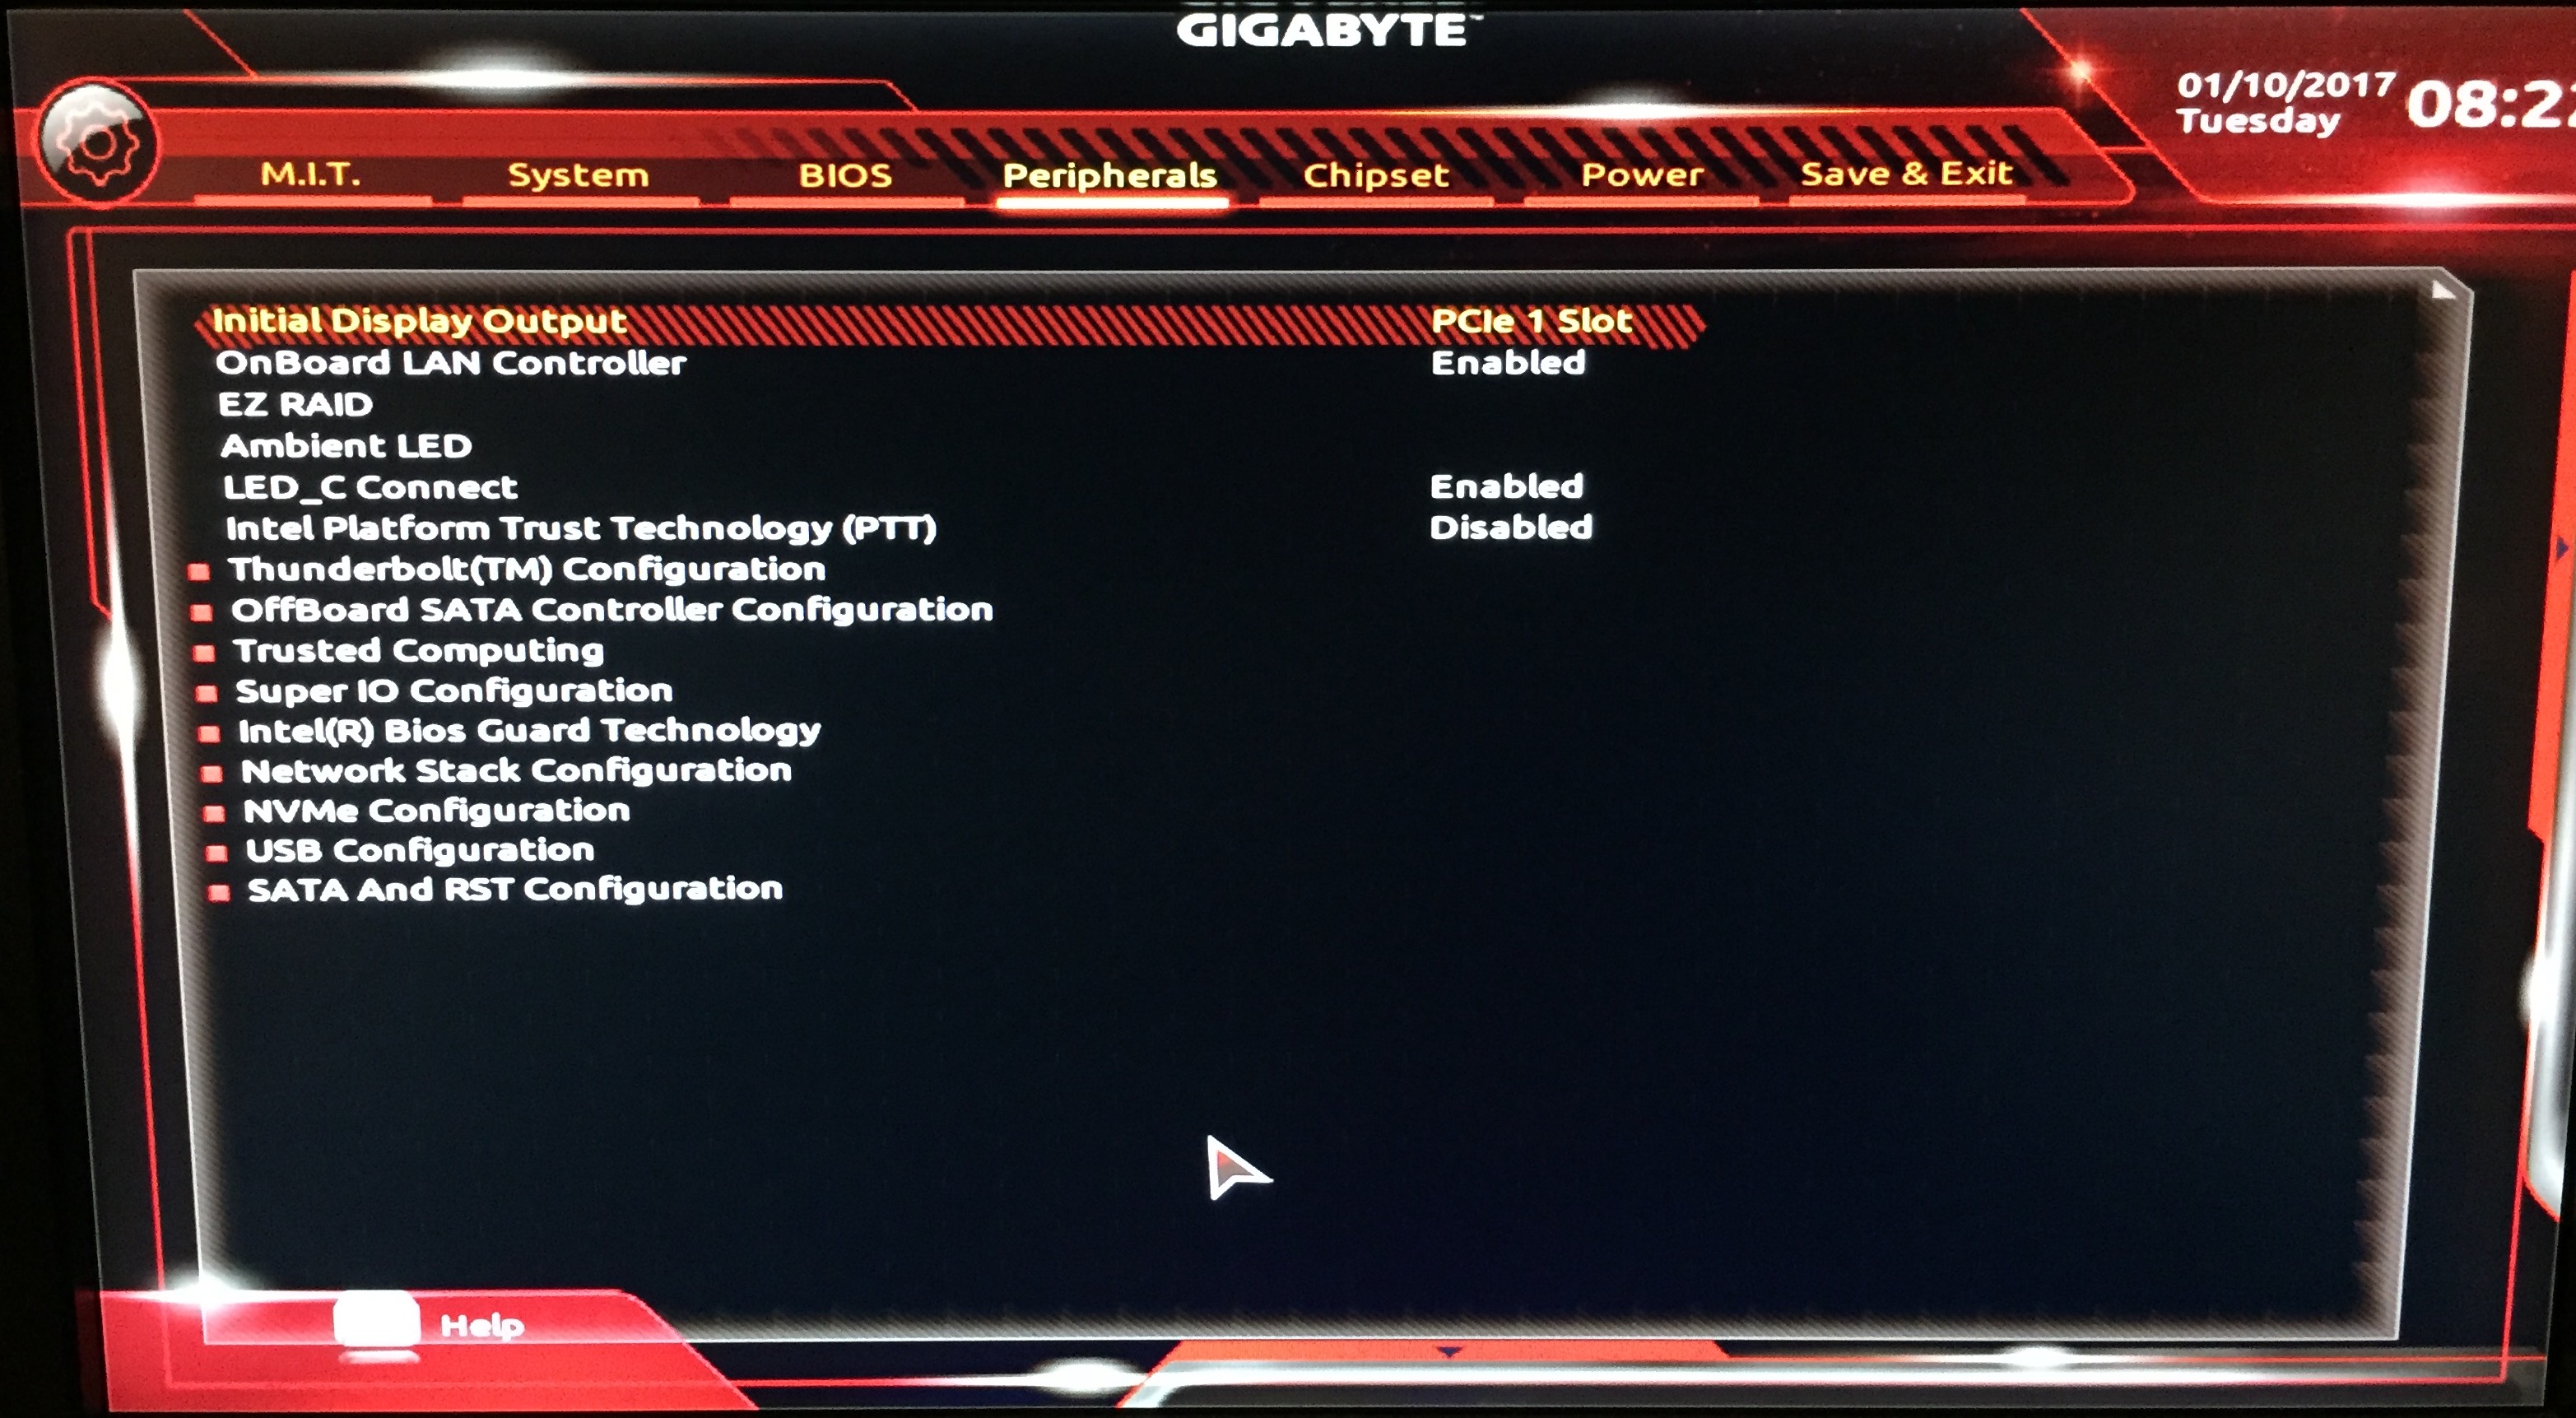
The first thing you need to do for Ubuntu PCIE passthrough is set the initial display output,
Change this from PCIE 1 slot (or whatever is set) to IGFX. Some bios might have different menu for enabling the igfx. What this setting does is toggle the integrated graphics as the primary graphics adapter when passed via the BIOS. This will actually allow you to start Ubuntu 16.04 without the amd_driver used for the RX580 cards. Also, because X on ubuntu will automatically bind to the IGFX, you don’t need to update your Ubuntu configuration to achieve this wondrous task of passthrough.
Though, if you have windows 7 or 10 on dual boot, Windows may prefer you to set the Initial display output back to PCIE 1 or whatever it was before. So take special care to note (or save) your bios configuration before making these changes.
I have 2 profiles ‘virtualized igfx for ubuntu’ and ‘pcie slot for windows’ are the name of my configs for logical purposes!
Step 2. Understanding IGFX, and the nature of the VT-d and VTIO and what it needs to work
Now you’ve setup the IGFX you can boot into Ubuntu normally. Installing Linux goes kind of below the scope of this tutorial. If you do not know how to configure Linux. Please find another howto and install Ubuntu 16.04 Linux first, then continue onto this step.
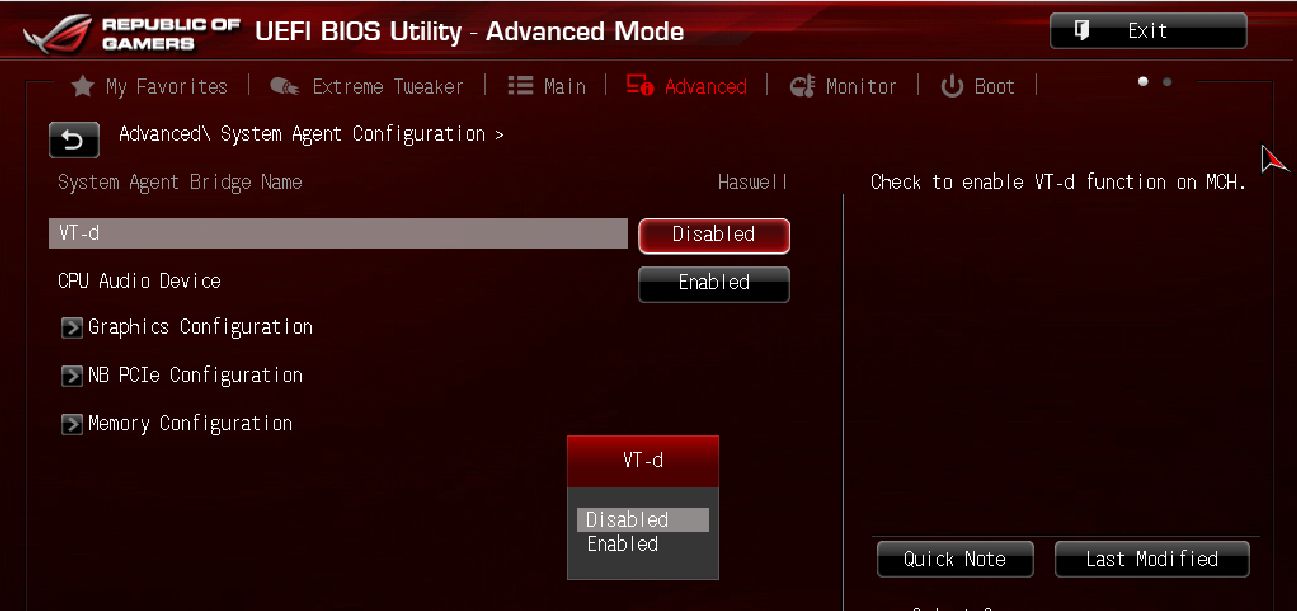
Be sure to ensure that VT-d or ‘Virtualization’ is also enabled in your BIOS, without it, nothing works, and you will cry with your kernel config wondering why.
Ubuntu will not be using the RX580 card, and the drivers may or may not be loaded in the kernel, depending on whether the OS is using the cards. In my situation, I had already disabled the rx580 driver in the kernel, and set the blacklist in modprobe.d accordingly, as well as ensured the module order list was correct, to allow me to achieve the ‘pass’ of the RX580 PCI interupts to the pci-stub kernel driver. The pci-stub kernel driver will then in turn pass that thru the VT-D (virtualisation) and VTIO (virtual input/output) bus supported by your CPU, and this is how the graphics cards get passed to the pass-through virtual machine. Therefore, if you haven’t done so already. Make sure that VT-d or ‘virtualization’ is enabled in your BIOS. Please note that some cpu do not support VTd or VT-x extensions. However if you have intel i3, i5, i7 etc, or any modern chip, you should definitely have this. Some motherboards have limited virtualization settings, so ensure you’ve properly looked into step 1 before going further here. It’s very important everything is just-right. There are a lot of turning wheels in pci-passthrough, but it’s remarkably simple once you get the basics.
Step 3: Final preparations for Linux Config. Stuff you may need
Remember GPU passthrough relies on specific technology. Providing your CPU, BIOS and PCIE graphics card, such as the RX580 I use in this tutorial are modern. You should be OK.
If in the BIOS you do not see something similar to “VT-d” (Intel) or “AMD Virtualization” (AMD), you should probably consult your BIOS manual.
Once you know the hardware is suitable, you’ll probably want to consider these additional factors, just to make sure your not wasting your time with this howto;
- You should have at least 2 graphics cards (i.e. one onboard gpu on the motherboard and another discrete graphics card in one of the PCIE slots of the motherboard).
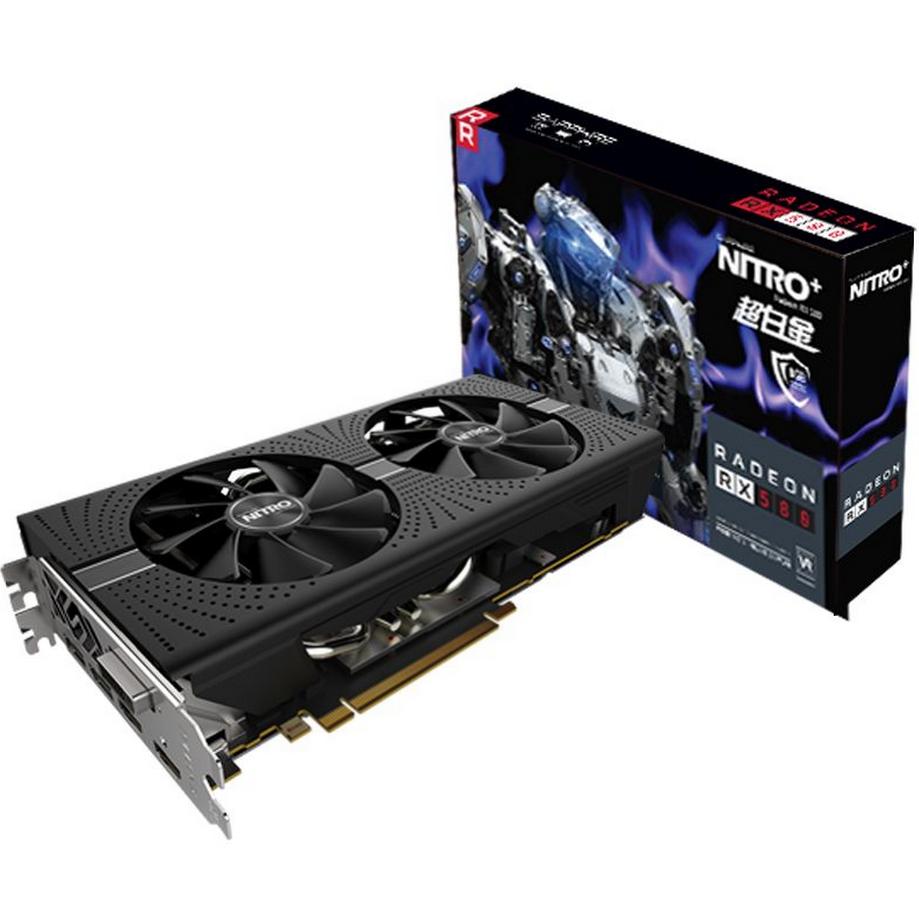
I’m using the RX580 Sapphire NITRO+ 8GB Graphics cards, 2 of them actually, + IGFX. Don’t worry this tutorial shows you how to configure, 1 or 2 PCIE passthroughs, and in SLI or Crossfire too! How awessseom!!?
- Consider a second monitor, it’s quite annoying using the same monitor and having to switch from my DVI to HDMI, all the time. (DVI being the IGFX port connected to the monitors DVI input and HDMI being the input on my monitor plugged into the discrete PCIE RX580 graphics card(s).)
- You do need a copy of Windows. I downloaded the iso available here which you can use without a key temporarily.
- Although not 100% necessary, it’s much better to use a dedicated additional SSD disk with your virtual machine, VTIO is capable of passing through the physical hard disk, instead of relying on the vmdk or qcow raw file, which has the limitation of being a chained vdi. This has serious performance implications in terms of read/writes from the disk. Obviously the advantage of also passing an SSD to the machine is the speed optimization from the kernel being able to pass directly between the PCI and north bridge bus of the motherboard, directly thru the cpu and to the virtual machine, without any kind of abstraction being required (as was the case before PCIE passthrough virtualization type devices i.e. cirrus/vga etc).
- In my example I’m just using a Qcow2 file, but adding SSD is so easy to do, you’ll have no difficulty if your capable of doing the PCIE passthrough kernel config.
MY SYSTEM
- Graphics: AMD Sapphire ‘Radeon’ RX580 8GB GDDR5 NITRO+
- CPU: Intel Core i7-6700 4GHz
- Motherboard: Gigabyte Z170X ultra gaming
- 32GB System RAM
- USB Audio device if you do not want to use your monitor’s speakers for HDMI OUTPUT (yes the virtual machine can use the inbuilt audio of your graphics card, and yes, your graphics card obviously has inbuilt audio for HDMI standard which includes sound with audio bus. Link of the device I used below.
- https://www.amazon.co.uk/Plugable-Headphone-Microphone-Aluminum-Compatibility-Black/dp/B00NMXY2MO/ref=sr_1_7?s=computers&ie=UTF8&qid=1517989287&sr=1-7&keywords=usb+audio
Step 4. Checking it all checks out
You might not see this output straight away, and you may need to change your module order later in step 5 to see some of these confirmation checks show good. Don’t freak out. So many moving wheels, arrghh.
Check Motherboard is playing the Virtualization extensions
dmesg | grep -e "Directed I/O"

For AMD Systems
dmesg | grep AMD-Vi
Output should be like:
AMD-Vi: Enabling IOMMU at 0000:00:00.2 cap 0x40
AMD-Vi: Lazy IO/TLB flushing enabled
AMD-Vi: Initialized for Passthrough Mode
HURRAH! We’re probably OK. Now lets get down to it.
Step 5. Locating my PCIE Graphics Cards
 In my setup you can see there are 3 Adapters in total. The Intel Corporation Sky Lake integrated graphics adapter, is the motherboard hdmi output VGA. The other 2 VGA below are the 2 rx580 I have in both PCIE slots 1 and 2. As denoted by their PCI bus id 01:00.0 and 02:00.0 respectively. These are the hardware addresses used by the Local Linux ‘HOST OS’. That is to say, the hypervisor machine, the machine which is not virtualized hosting our virtual machine, is the one which knows about these addresses, the virtual machine knows nothing though 🙁
Step 6 Instructing the Linux Kernel
We need to tell Linux what to do , so the pci-stub kernel driver module is able to do it’s heavy lifting and just redirect command struct to the pcie ports irrelevant to the Ubuntu OS. If you kind of think about how awesome this is and how fancy it is have the host operating system pass a device to a virtual OS and BIOS as if the graphics card was running on a host windows OS. And 95% efficiency too (see my mining tests later on!). Simply amazing. Lets tell linux about it;
Step 6A: identifying the vendor ID of the RX580 Graphics cards is necessary to pass to pci-stub
lspci -nn | grep 01:00
lspci -nn | grep 02:00

Just showing the ID is the same for my two RX580 cards, mainly because they both have exactly the same model number. I found other PCIE passthrough guides which basically said oh you can’t do it properly because VTIO blah blah blah can’t do it. Well it can actually and I did achieve working RX580 x 2 in my windows guest. I guess this could be useful for people that wanted to virtualization their mining operations. Note our PCIE RX580 graphics cards have an AUDIO DEVICE!!!!!
It’s a real pain having to drive out somewhere, the idea you could create this on a virtualization layer that was rock solid stable like Ubuntu has to be good. At least if you weren’t using something like EthOS already. Which by the way, is very good if your into your mining. Probably irrelevant though. Most people just want to play their games, and me too!!
We’ll come back to the hardware ID’s in a sec.
STEP 7A: Use Grub Bootloader to blacklist kernel drivers (we don’t want our Host Ubuntu Linux Operating System stealing devices from the bus, only 1 host or 1 guest can access devices at once, if they attempt to together you will crash both OS and your computer will lock)

Had to experiment around a bit. radeon.modeset=0 and amdgpu.runpm=0 are apparently effective ways to disable the Radeon Catalyst drivers Ubuntu automatically installed when you installed it (at least if the rx580 were plugged in then). If they weren’t, there is the small potential the radeon linux default settings aren’t necessary.
The things that are definitely necessary is passing to pci-stub (or VTIO as well as :
intel_iommu=on which tells to the system to load VT-d (amd_iommu=on for AMD CPUs)
I’ve done that by defining a pci-stub.ids=1002:67df,1002:aaf0
Ignore the last ID in my config, sorry if its confusing. 8086:a170. Stupid me thought I needed to use pci stub for USB audio for some reason. You don’t.
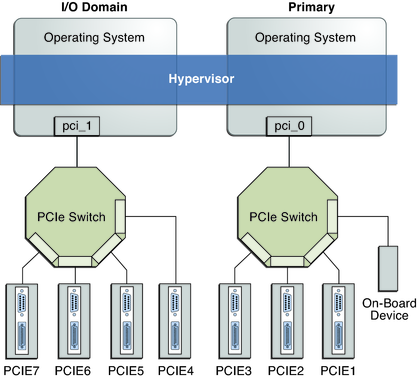
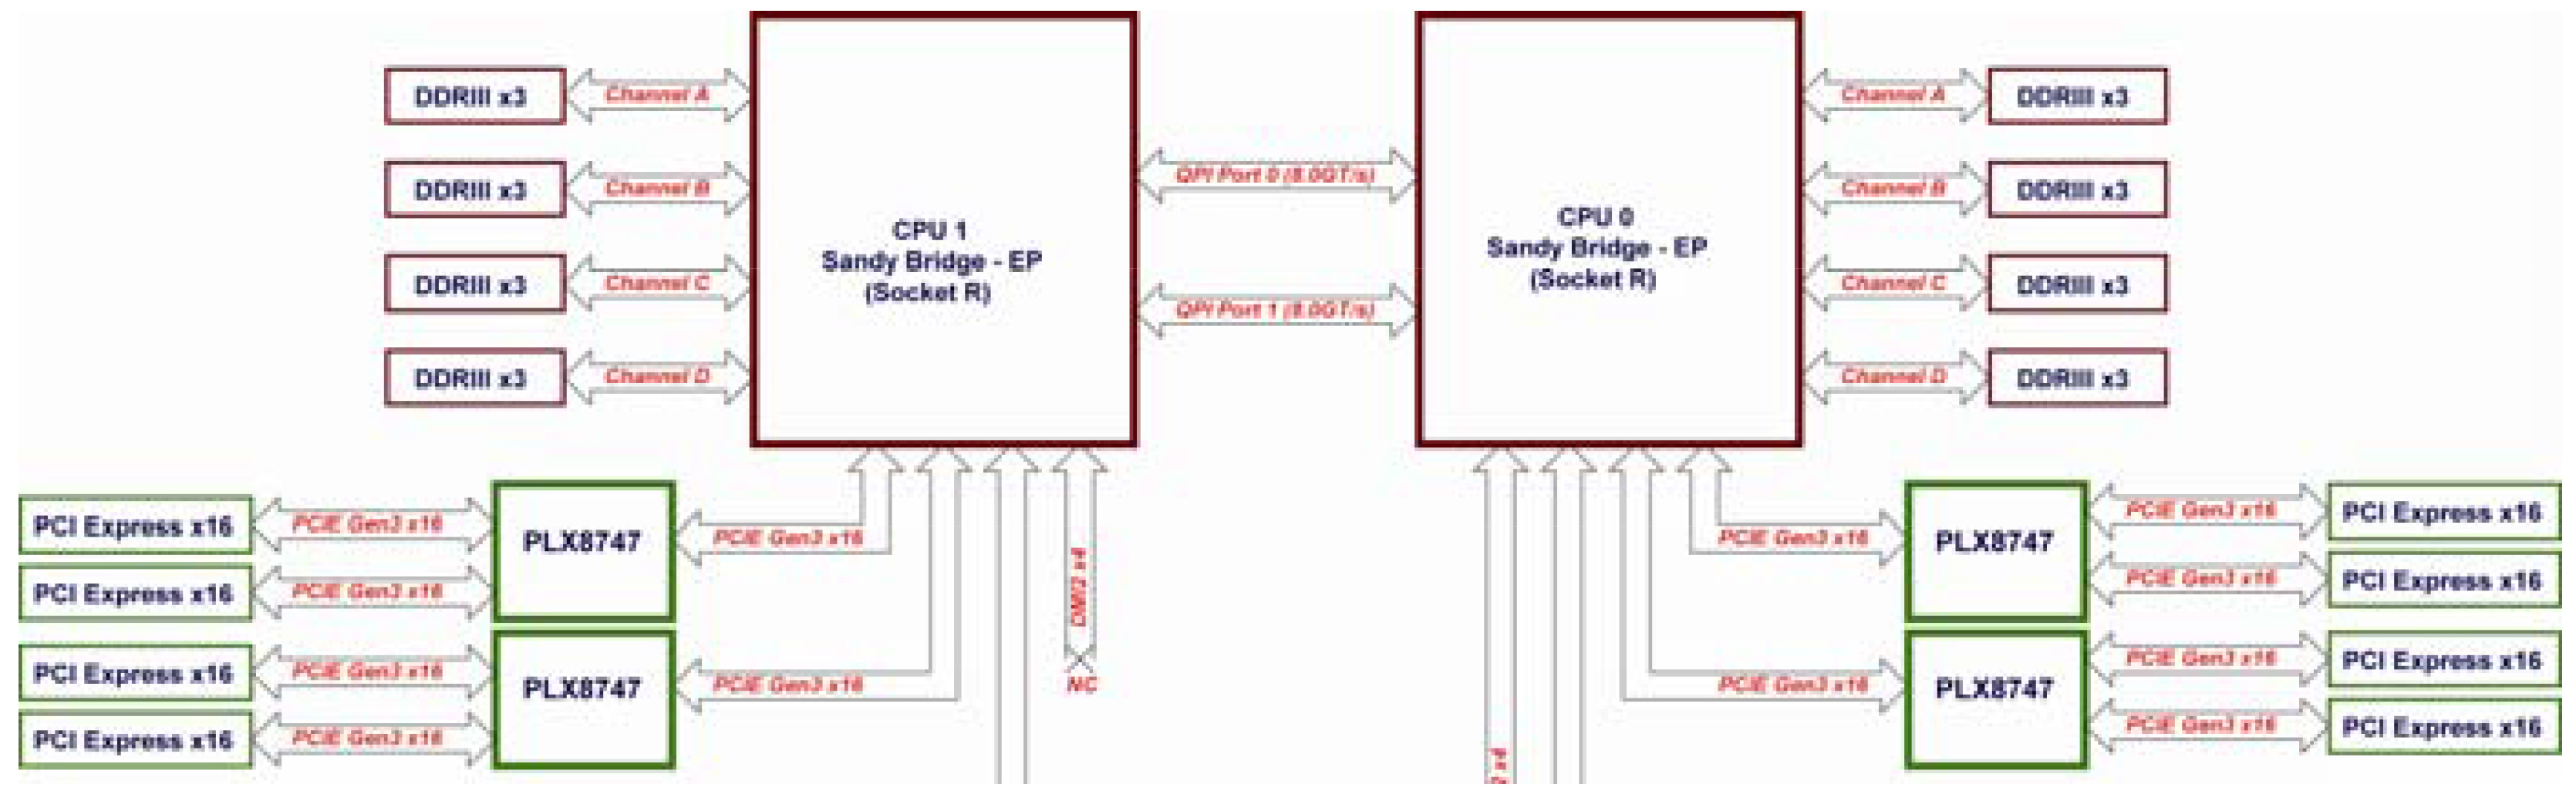
Not the best diagram illustrating the setup, but you get the idea
The reason why there are two PCI stub ID’s is simple. The pci output bus for each discrete radeon rx580 graphics card actually has 2 devices! One audio device and one video device. They work together to output to the hdmi port MUX. (they mix the shit and throw it out hdmi). Your computer does all this stuff transparently normally, but to get the passthrough to work, because of the nature of the architecture, to use the VGA card you actually need to assign both sub-busses of the device, if that makes sense.
About MMIO Groups (Memory Mapped IO)
Hence why we have them inside the group, it’s called an MMIO group, essentially for the device to be passed, all sub-id’s need to be a part of it. This is actually the exact reason why 2 x rx580 setups don’t work, or are not regarded popularly to be workable (due to laziness/stupidity/inability probly), since the MMIO group of the devices is usually determined by the defining ID, so how can you group a vga device and an audio card in that group using the vendorID, if there are two cards on two pcie slots, with the same vendor ID! Anyways, you get the idea. To understand how this shiz work you really need to get a fundamental understanding of why some combinations can’t work, or why people think they might not, and then look to overcoming the problem. I was able to overcome this problem, so keep reading if you are trying to as well, its a royal pain in the butt, and I hope my article can help you along. Hopefully it’s as complete as it needs to be for you to complete Crossfire rx580 passthrough, but if it isn’t drop a message and I’ll try help you get it set.
There’s a lot of technology at work making the regular GPU on your windows OS go. You see that when configuring livirtd, that these addresses really really matter and essentially influence whether your PCIE passthrough setup is a muddled success, failure, or complete failure.
For most of us muddled success is quite acceptable. Providing we understand this isn’t for use in production. This is my home setup.
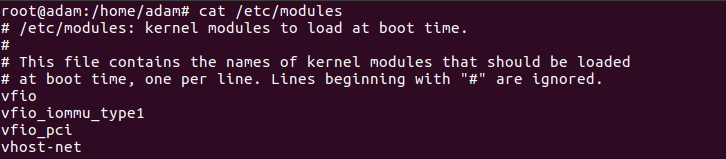
Step 7B: Ensure Linux Kernel Modules (ubuntu’s equivalent of windows Drivers) are loaded
Also ensuring to check your GRUB_CMDLINE_LINUX_DEFAULT is saved too (as done earlier):

Apologies for the extra text there ,8086:a170. You dont need the bit that says ‘,8086:a170’, it’s relevant but shouldn’t hurt though if your confused and just want it working 🙂
Step 7C: Making Linux use your changes, Sorting BOOT & INIT
Now we need to make sure that the GRUB CMDLINE default is actually being used, to do that we need to rebuild grub bootloader, so that the command gets included in the /boot/grub/grub.cfg or similar file. (basically boot options like windows safe mode but much more awwwsome). There is something important to know here GRUB CAN BREAK YOUR WINDOWS BOOT IF YOU HAVE DUAL BOOT. It caused me much aggrievance so THINK BEFORE ACTING.
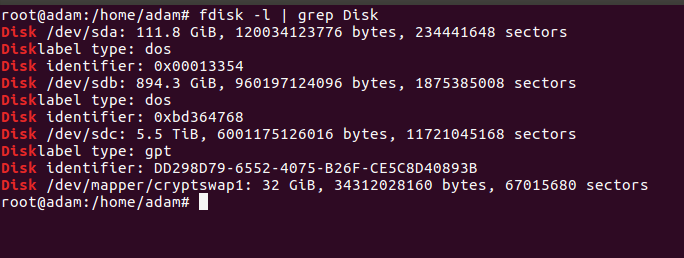
In my case I had 3 disks. /dev/sda, /dev/sdb and /dev/sdc. Where /dev/sdb1 was the partition and /dev/sdb was the physical device that disk partition was stored. /dev/sda was my Windows 10 disk. Windows 10 has a MBR BIOS type bootloader installed to the disk on /dev/sda, if I instruct grub to update the bootloader, it will update all of them , dev/sda, dev/sdb and /dev/sdc (the bootloader isn’t stored on a partition, its stored on the first blocks of the physical device, hence /sdb /sdc and not sdb1.).
So whilst this shouldn’t cause DATA LOSS itself, it will cause bootloader loss if you run grub-update unaccordingly. It happened to me a few times, because I’m so noobish with windows bootloaders. So, the way to avoid breaking your windows MBR BIOS bootloader is simply to issue the grub-update command the device you wish to regenerate the bootloader for (as afterall the only reason we are doing this is to include that default command to make sure our pci stubs get passed thru early and drivers dont load up on the HOST OS which will kill the guest OS if they both have connections to those PCIE busses).
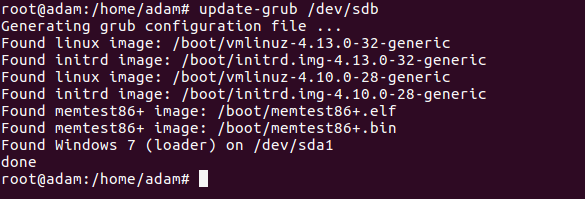
Simply then to apply the grub bootloader updater only to my Ubuntu /dev/sdb partition Linux runs only.
update-grub /dev/sdb
You may (most definitely will need to) to also update the initramfs , mainly because initramfs interacts with the module blacklist.
If you haven’t used modprobe.d before, it just disables your kernel drivers. Here is the 3 lines I added to the end of my file /etc/modprobe.d/blacklist.conf (make the file if it doesnt exist, and ensure .conf is the file extension or its ignored).

Might not be necessary, may be slightly different drivers for you to disable, etc. use lspci -v to find out ful details about what drivers your pcie cards are using, and you’ll be able to blacklist the correct driver.
In my case the reason why I blacklisted snd_hda_intel was because of this output from my lspci -v for that device revealed that kernel module driver used;
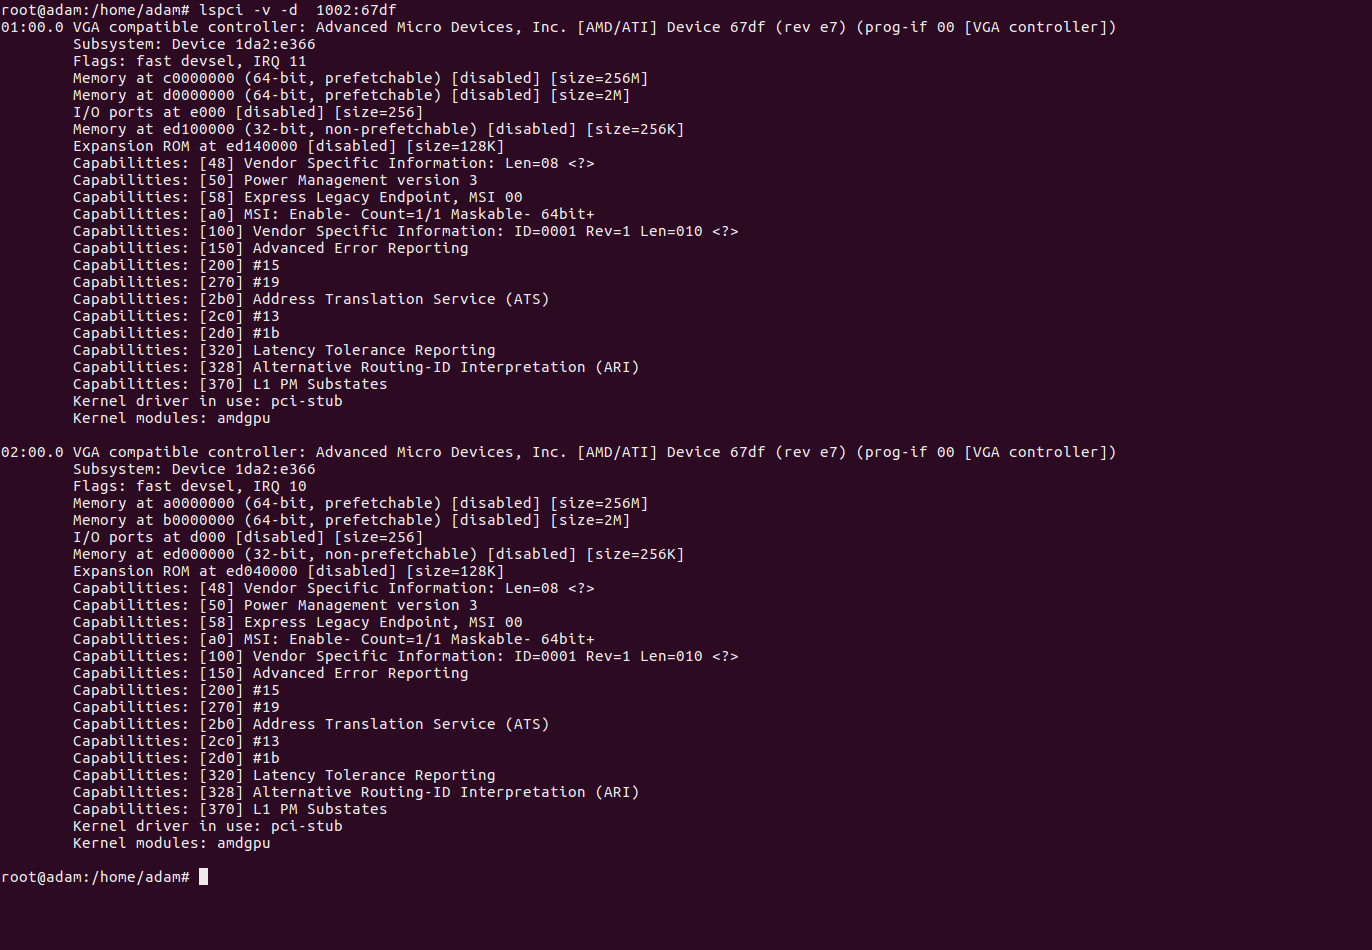
In my case it says kernel-driver in use:pci-stub because I’m writing this tutorial and have already configured it. Note that’s what it’ll say for your graphics card too once it is passed to pci-stub. And then, once thats done, and only then you’ll be able to use the card on the virtual machine, whew!!! I’m tired, I don’t know about you!
Just to give you an idea about the MMIO groups used by the VTIO/VT-d technologies, this is the structure of the tree of devices;
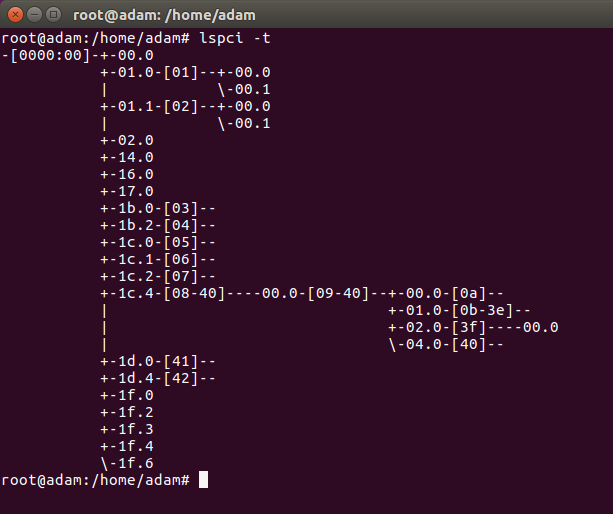
You can see our graphics cards at 01.0 and the MMIO [01] group consisting of the two sub chips on that bus 00.0, and 00.1.
We still need to make sure that pci-stub module is loaded. If it’s not in there already add pci_stub (note _ not -) in the configuration. Yes I put both in my configuration because it doesn’t matter, and I had a hell of a time getting this to work in Ubuntu kk).
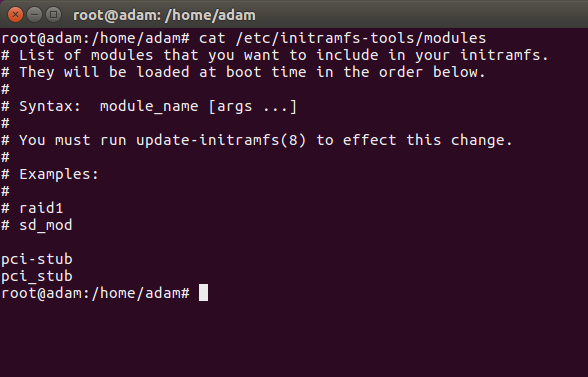
Once done simply finally update the initramfs-tools, to ensure this change to /etc/initramfs-tools/modules gets compiled into the linux boot image. The Linux boot image is used at bootime, and contains included module drivers for Linux Kernel. Don’t miss this bit.

REBOOT!
Step 8: Checking it all worked right
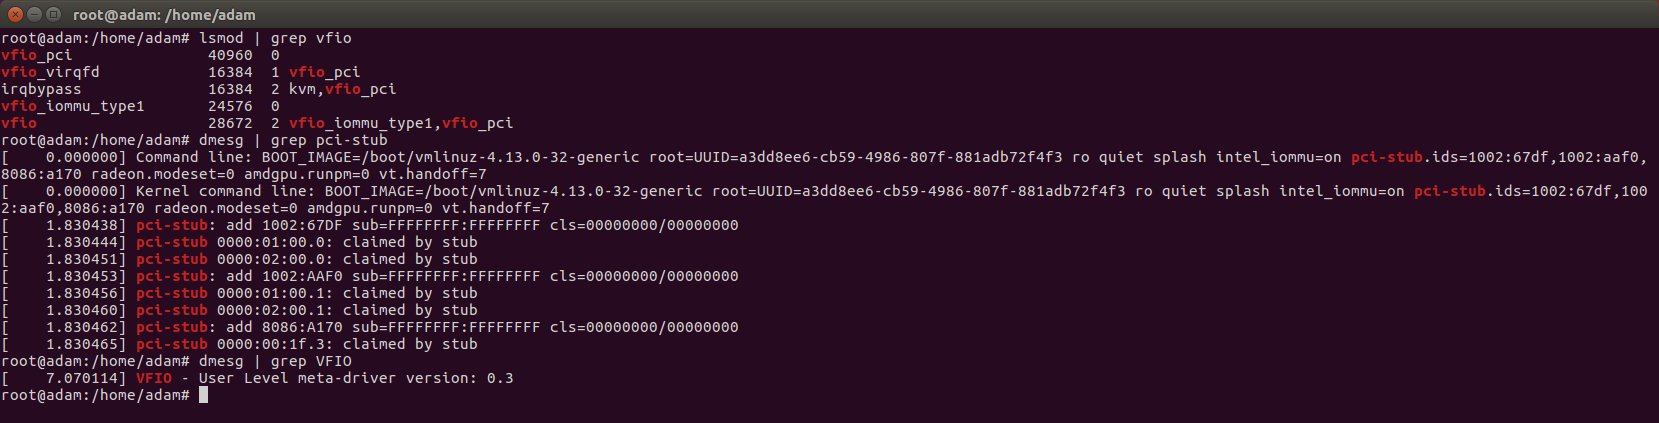
This is what you should see. You want to see those pci-stub add’s against the device vendor ID’s. Don’t tell me how I did it, but as you can see both vendor ID’s get added, but not both MMIO groups. Yet, you will still find, that this works with multiple RX580 with same vendor ID (or whatever gpu you have). And I’m wondering if that has simply been fixed in the latest 16.04 kernel
For anyone having difficulty matching my environment;
root@adam:/home/adam# uname -a
Linux adam 4.13.0-32-generic #35~16.04.1-Ubuntu SMP Thu Jan 25 10:13:43 UTC 2018 x86_64 x86_64 x86_64 GNU/Linux
Also, more is to come including the libvirtd installation and configuration. To get it working from here, just install libvirtd as normal, and add the PCI devices that now become available with the 440FX and Q35 chipsets.
HAVE FUN y’all! I did spend a little while getting my head around this and hope that others can benefit or make comments of anything I’ve missed, or mistaken. It’s a huge piece of turning wheels!

