Creating a proper Method of Retrieving, Sorting, and Parsing Rackspace CDN Access Logs

So, this has been rather a bane on the life which is lived as Adam Bull. Basically, a large customer of ours had 50+ CDN’s, and literally hundreds of gigabytes of Log Files. They were all in Rackspace Cloud Files, and the big question was ‘how do I know how busy my CDN is?’.

screen-shot-2016-11-07-at-12-41-30-pm

This is a remarkably good question, because actually, not many tools are provided here, and the customer will, much like on many other CDN services, have to download those logs, and then process them. But that is actually not easier either, and I spent a good few weeks (albeit when I had time), trying to figure out the best way to do this. I dabbled with using tree to display the most commonly used logs, I played with piwik, awstats, and many others such as goaccess, all to no avail, and even used a sophisticated AWK script from our good friends in Operations. No luck, nothing, do not pass go, or collect $200. So, I was actually forced to write something to try and achieve this, from start to finish. There are 3 problems.

1) how to easily obtain .CDN_ACCESS_LOGS from Rackspace Cloud Files to Cloud Server (or remote).
2) how to easily process these logs, in which format.
3) how to easily present these logs, using which application.

The first challenge was actually retrieving the files.

swiftly --verbose --eventlet --concurrency=100 get .CDN_ACCESS_LOGS --all-objects -o ./

Naturally to perform this step above, you will need a working, and setup swiftly environment. If you don’t know what swiftly, is or understand how to set up a swiftly envrionment, please see this article I wrote on the subject of deleting all files with swiftly (The howto explains the environment setup first! Just don’t follow the article to the end, and continue from here, once you’ve setup and installed swiftly)

Fore more info see:
https://community.rackspace.com/products/f/25/t/7190

Processing the Rackspace CDN Logs that we’ve downloaded, and organising them for further log processing
This required a lot more effort, and thought

The below script sits in the same folder as all of the containers

# ls -al 
total 196
drwxrwxr-x 36 root root  4096 Nov  7 12:33 .
drwxr-xr-x  6 root root  4096 Nov  7 12:06 ..
# used by my script
-rw-rw-r--  1 root root  1128 Nov  7 12:06 alldirs.txt

# CDN Log File containers as we downloaded them from swiftly Rackspace Cloud Files (.CDN_ACCESS_LOGS)
drwxrwxr-x  3 root root  4096 Oct 19 11:22 dev.demo.video.cdn..com
drwxrwxr-x  3 root root  4096 Oct 19 11:22 europe.assets.lon.tv
drwxrwxr-x  5 root root  4096 Oct 19 11:22 files.lon.cdn.lon.com
drwxrwxr-x  3 root root  4096 Oct 19 11:23 files.blah.cdn..com
drwxrwxr-x  5 root root  4096 Oct 19 11:24 files.demo.cdn..com
drwxrwxr-x  3 root root  4096 Oct 19 11:25 files.invesco.cdn..com
drwxrwxr-x  3 root root  4096 Oct 19 11:25 files.test.cdn..com
-rw-r--r--  1 root root   561 Nov  7 12:02 generate-report.sh
-rwxr-xr-x  1 root root  1414 Nov  7 12:15 logparser.sh

# Used by my script
drwxr-xr-x  2 root root  4096 Nov  7 12:06 parsed
drwxr-xr-x  2 root root  4096 Nov  7 12:33 parsed-combined
#!/bin/bash

# Author : Adam Bull
# Title: Rackspace CDN Log Parser
# Date: November 7th 2016

echo "Deleting previous jobs"
rm -rf parsed;
rm -rf parsed-combined

ls -ld */ | awk '{print $9}' | grep -v parsed > alldirs.txt


# Create Location for Combined File Listing for CDN LOGS
mkdir parsed

# Create Location for combined CDN or ACCESS LOGS
mkdir parsed-combined

# This just builds a list of the CDN Access Logs
echo "Building list of Downloaded .CDN_ACCESS_LOG Files"
sleep 3
while read m; do
folder=$(echo "$m" | sed 's@/@@g')
echo $folder
        echo "$m" | xargs -i find ./{} -type f -print > "parsed/$folder.log"
done < alldirs.txt

# This part cats the files and uses xargs to produce all the Log oiutput, before cut processing and redirecting to parsed-combined/$folder
echo "Combining .CDN_ACCESS_LOG Files for bulk processing and converting into NCSA format"
sleep 3
while read m; do
folder=$(echo "$m" | sed 's@/@@g')
cat "parsed/$folder.log" | xargs -i zcat {} | cut -d' ' -f1-10  > "parsed-combined/$folder"
done < alldirs.txt


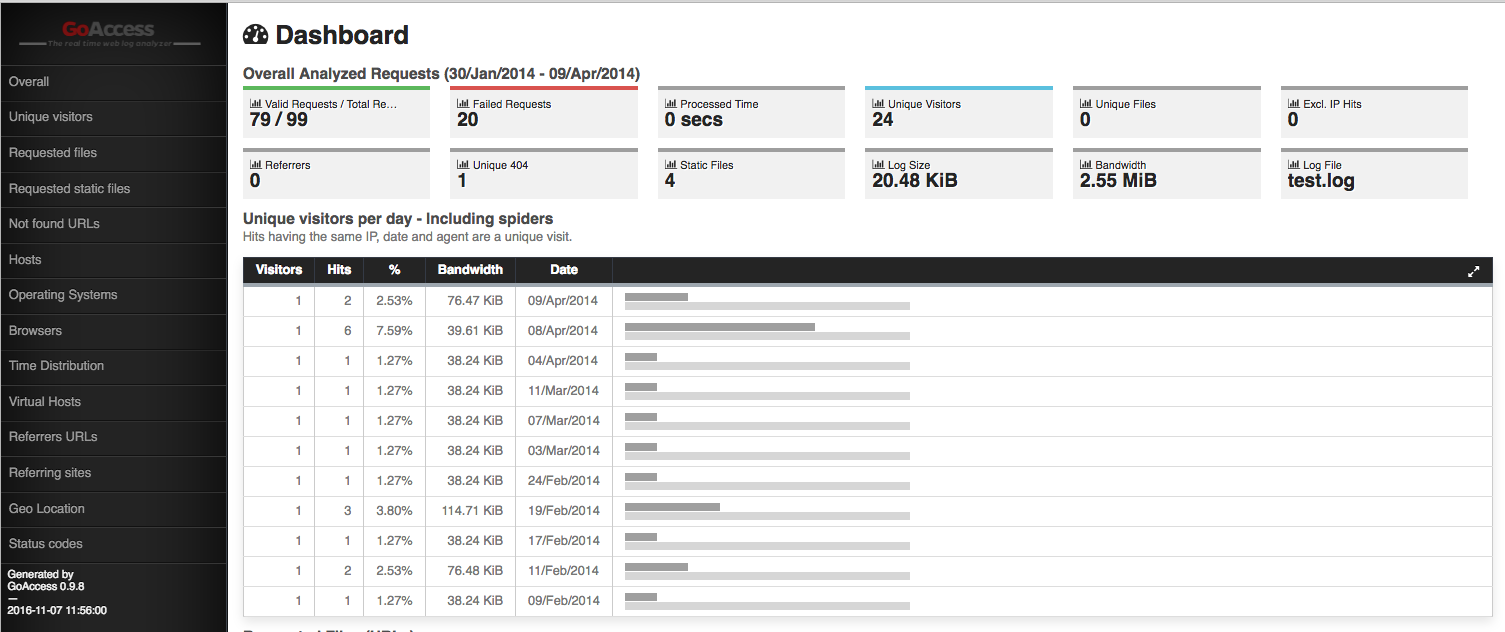
# This part processes the Log files with Goaccess, generating HTML reports
echo "Generating Goaccess HTML Logs"
sleep 3
while read m; do
folder=$(echo "$m" | sed 's@/@@g')
goaccess -f "parsed-combined/$folder" -a -o "/var/www/html/$folder.html"
done < alldirs.txt

How to easily present these logs

I kind of deceived you with the last step. Actually, because I have already done it, with the above script. Though, you will naturally need to have an httpd installed, and a documentroot in /var/www/html, so make sure you install apache2:

yum install httpd awstats

De de de de de de da! da da!

screen-shot-2016-11-07-at-12-41-30-pm

Some little caveats:

Generating a master index.html file of all the sites


[root@cdn-log-parser-mother html]# pwd
/var/www/html
[root@cdn-log-parser-mother html]# ls -al | awk '{print $9}' | xargs -i echo " {}
" > index.html

I will expand the script to generate this automatically soon, but for now, leaving like this due to time constraints.

Enabling Automatic Security Updates in CentOS 6, 7 and RHEL 6 and RHEL 7 (and Debian and Ubuntu too)

yum -y install yum-cron

This can also be done on Debian and Ubuntu systems if you are feeling left out:

apt-get -y install unattended-upgrades

Configuration on the CentOS/RHEL side is:

da da da da da da da ! Actually that’s all you need to do to enable it, but there are a lot of things you can customise in /etc/yum/yum-cron.conf

[commands]
#  What kind of update to use:
# default                            = yum upgrade
# security                           = yum --security upgrade
# security-severity:Critical         = yum --sec-severity=Critical upgrade
# minimal                            = yum --bugfix update-minimal
# minimal-security                   = yum --security update-minimal
# minimal-security-severity:Critical =  --sec-severity=Critical update-minimal
update_cmd = default

# Whether a message should be emitted when updates are available,
# were downloaded, or applied.
update_messages = yes

# Whether updates should be downloaded when they are available.
download_updates = yes

# Whether updates should be applied when they are available.  Note
# that download_updates must also be yes for the update to be applied.
apply_updates = no

# Maximum amout of time to randomly sleep, in minutes.  The program
# will sleep for a random amount of time between 0 and random_sleep
# minutes before running.  This is useful for e.g. staggering the
# times that multiple systems will access update servers.  If
# random_sleep is 0 or negative, the program will run immediately.
# 6*60 = 360
random_sleep = 360


[emitters]
# Name to use for this system in messages that are emitted.  If
# system_name is None, the hostname will be used.
system_name = None

# How to send messages.  Valid options are stdio and email.  If
# emit_via includes stdio, messages will be sent to stdout; this is useful
# to have cron send the messages.  If emit_via includes email, this
# program will send email itself according to the configured options.
# If emit_via is None or left blank, no messages will be sent.
emit_via = stdio

# The width, in characters, that messages that are emitted should be
# formatted to.
ouput_width = 80


[email]
# The address to send email messages from.
email_from = root@localhost

# List of addresses to send messages to.
email_to = root

# Name of the host to connect to to send email messages.
email_host = localhost


[groups]
# NOTE: This only works when group_command != objects, which is now the default
# List of groups to update
group_list = None

# The types of group packages to install
group_package_types = mandatory, default

[base]
# This section overrides yum.conf

# Use this to filter Yum core messages
# -4: critical
# -3: critical+errors
# -2: critical+errors+warnings (default)
debuglevel = -2

# skip_broken = True
mdpolicy = group:main

# Uncomment to auto-import new gpg keys (dangerous)
# assumeyes = True

DISASTER RECOVERY! Exporting a Broken Cloud-server image VHD from Rackspace and attempting to recover data

Thanks to my colleague Marcin for thie guestmount tools protip.

I wrote a previous guide which explains how to download/export a Cloud server image VHD from Rackspace Cloud, which is failing to build. It might allow you to perform data recovery, even if the image can’t be booted. Which I’m guessing someone is going to run into sooner or later, and will be pleased to see this article, it will at least give you a best shot at reading the VHD and recovering it, since as you might know already, just because boot or kernel is broken, doesn’t mean that the data isn’t there!

# A better article to use if you want to download via commandline
https://community.rackspace.com/products/f/25/t/3583

# My article doing this thru a web-browser which might be useful too for some customers
https://community.rackspace.com/products/f/25/t/7089

Once the image gets downloaded to your new cloud instance you can use ‘libguestfs-tools’ package (same name on Ubuntu and CentOS) which contains tools necessary for mounting .vhd image files.

The command would be (read-only mode):

guestmount -a {image-name}.vhd -i --ro {mount-point}

Concatenating all Rackspace CDN Logs into a single File

In my previous article Retrieve CDN log files via swiftly I shown how to download all of the CDN logs.

After downloading all of the CDN logs, you will likely want to parse them. However, the way that Rackspace presently log the CDN is a different log file for each hour, on each day, on each month, and year. So this actually is convenient if you require the logs seperate, but if you want to parse them in something like awstats, piwik, or other log parsers like goaccess, it would help if they are all part of the same file.

Here’s how I achieved it (where /home/adam/cdn is the path of the cdn logs. Don’t worry this will pickup ALL log files inside there, at least the ones that are gz files

find /home/adam/cdn -type f | xargs -i zcat {} > alldomains.cdn.log

I could have probably used -type gz or similar and used select to find everything. It works nicely though. It’s a quickie, but a goodie.

Adding nodes and Updating nodes behind a Cloud Load Balancer

I have succeeded in putting together a basic script documenting exactly how API works and for adding node(s), listing the nods behind the LB, as well as updating the nodes (such as DRAINING, DISABLED, ENABLED).

Use update node to set one of your nodes to gracefully drain (not accept new connections, wait for present connections to die). Naturally, you will want to put the secondary server in behind the load balancer first, with addnode.sh.

Once new node is added as enabled, set the old node to ‘DRAINING’. This will gracefully switch over the server.

# List Load Balancers

#!/bin/bash

USERNAME='yourmycloudusernamegoeshere'
APIKEY='apikeygoeshere'
LB_ID='157089'
CUSTOMER_ID='10017858'

TOKEN=`curl https://identity.api.rackspacecloud.com/v2.0/tokens -X POST -d '{ "auth":{"RAX-KSKEY:apiKeyCredentials": { "username":"'$USERNAME'", "apiKey": "'$APIKEY'" }} }' -H "Content-type: application/json" |  python -mjson.tool | grep -A5 token | grep id | cut -d '"' -f4`


curl -v -H "X-Auth-Token: $TOKEN" -H "content-type: application/json" -X GET "https://lon.loadbalancers.api.rackspacecloud.com/v1.0/$CUSTOMER_ID/loadbalancers/$LB_ID"

#

# Add Node(s) addnode.sh

#!/bin/bash

USERNAME='yourmycloudusernamegoeshere'
APIKEY='apikeygoeshere'
LB_ID='157089'
CUSTOMER_ID='10017858'

TOKEN=`curl https://identity.api.rackspacecloud.com/v2.0/tokens -X POST -d '{ "auth":{"RAX-KSKEY:apiKeyCredentials": { "username":"'$USERNAME'", "apiKey": "'$APIKEY'" }} }' -H "Content-type: application/json" |  python -mjson.tool | grep -A5 token | grep id | cut -d '"' -f4`

# Add Node
curl -v -H "X-Auth-Token: $TOKEN" -d @addnode.json -H "content-type: application/json" -X POST "https://lon.loadbalancers.api.rackspacecloud.com/v1.0/$CUSTOMER_ID/loadbalancers/$LB_ID/nodes"


## 

For the addnode script you require a file, called addnode.json
that file must contain the snet ip's you wish to add

#
# addnode.json

{"nodes": [
        {
            "address": "10.0.0.1",
            "port": 80,
            "condition": "ENABLED",
            "type":"PRIMARY"
        }
    ]
}

##

##

# updatenode.sh

#!/bin/bash

USERNAME='yourmycloudusernamegoeshere'
APIKEY='apikeygoeshere'
LB_ID='157089'
CUSTOMER_ID='100101010'
NODE_ID=719425

TOKEN=`curl https://identity.api.rackspacecloud.com/v2.0/tokens -X POST -d '{ "auth":{"RAX-KSKEY:apiKeyCredentials": { "username":"'$USERNAME'", "apiKey": "'$APIKEY'" }} }' -H "Content-type: applic

# Update Node

curl -v -H "X-Auth-Token: $TOKEN" -d @updatenode.json -H "content-type: application/json" -X PUT "https://lon.loadbalancers.api.rackspacecloud.com/v1.0/$CUSTOMER_ID/loadbalancers/$LB_ID/nodes/$NODE_ID"

##

##

## updatenode.json

{"node":{
            "condition": "DISABLED",
            "type":"PRIMARY"
        }
}

Naturally, you will be able to change condition to ENABLED, DISABLED, or DRAINING.

I recommend to use DRAINING, since it will gracefully remove the cloud-server, and any existing connections will be waited on, before removing the server from LB.

HTTPS to HTTP redirect for Rackspace Cloud Load Balancer

Hello,

So a customer reached out to us today asking about how to configure HTTPS to HTTP redirects. This is actually really easy to do.

Think of it like this;

When you enable HTTP and HTTPS (allow insecure and secure traffic), the protocol is always HTTP hitting the server.

When you ‘only allow secure traffic’ it will always be HTTPS. Think of it like, if the load balancer has certificates on it and supports both protocols (i.e. terminates SSL at the load balancer), then the requests hitting the server will always be HTTP.

This is why the X_forwarded_Proto becomes important in your server being able to determine what traffic hitting it coming from load balancer originated from HTTPS protocol, and which originated from HTTP protocol. This is what allows you to effectively do the redirection on the cloud-server side.

I hope this helps!

So the rewrite rule on the server, using x_forwarded_proto to detect the protocol instead of the usual ‘https’ directive can be (or rather will need to be replaced) with a rule that uses the header instead of the regular incoming protocol to determine redirect.

    RewriteEngine On
    RewriteCond %{HTTP:http_x_forwarded_proto} !=http
    RewriteCond %{REQUEST_URI} !^/some/path.*
    RewriteRule (.*) http://%{HTTP_HOST}%{REQUEST_URI} [L,R=301]

Quite simple, but took me the better part of half an hour to get my head properly around this 😀

You might be interested in achieving this on Windows systems with iis or similar, so check this link out which explains how to do that step by step in windows;

https://support.rackspace.com/how-to/configuring-load-balanced-sites-with-ssl-offloading-using-iis/

Reinstalling the Linux Nova Agent for Rackspace Cloud

So, you have imaged a cloud-server and then built it but learnt ‘you got network issues bra’?’

Re-Install nova-agent using this automation script, on the original server:

curl -s novaagent.myconfig.info | sudo bash

Once this is done, you should be safe to re-image your server. Provided it’s just nova-agent and you don’t have other breakage. It will make sure that nova-agent is setting your networking detail at boot time.

Hope this helps!

Cheers &
Best wishes,
Adam

Checking a Website or Rackspace Load Balancers Supported SSL Ciphers

So, you may have recently had an audit performed, or have been warned about the dangers of SSLv3, poodle attack, heartbleed and etc. You want to understand exactly which ciphers your using on the Load Balancer, cloud-server, or dedicated server. It’s actually very easy to do this with nmap. Install it first, naturally.

# CentOS / RedHat
yum install nmap

# Debian / Ubuntu
apt-get install nmap

# Check for SSL ciphers

# nmap hostnamegoeshere.com --script ssl-enum-ciphers -p 443

Starting Nmap 6.47 ( http://nmap.org ) at 2016-10-11 09:12 UTC
Nmap scan report for 134.213.236.167
Host is up (0.0017s latency).
PORT STATE SERVICE
443/tcp open https
| ssl-enum-ciphers:
| SSLv3: No supported ciphers found
| TLSv1.0:
| ciphers:
| TLS_ECDHE_RSA_WITH_AES_128_CBC_SHA - strong
| TLS_ECDHE_RSA_WITH_AES_256_CBC_SHA - strong
| TLS_RSA_WITH_3DES_EDE_CBC_SHA - strong
| TLS_RSA_WITH_AES_128_CBC_SHA - strong
| TLS_RSA_WITH_AES_256_CBC_SHA - strong
| compressors:
| NULL
| TLSv1.1:
| ciphers:
| TLS_ECDHE_RSA_WITH_AES_128_CBC_SHA - strong
| TLS_ECDHE_RSA_WITH_AES_256_CBC_SHA - strong
| TLS_RSA_WITH_3DES_EDE_CBC_SHA - strong
| TLS_RSA_WITH_AES_128_CBC_SHA - strong
| TLS_RSA_WITH_AES_256_CBC_SHA - strong
| compressors:
| NULL
| TLSv1.2: No supported ciphers found
|_ least strength: strong

Nmap done: 1 IP address (1 host up) scanned in 1.57 seconds

In this case we can see that only TLS v1.1 and TLS v1.0 are supported. No TLSv1.2 and no SSLv3.

Cheers &
Best wishes,
Adam

Securing your WordPress with chmod 644 and chmod 755 the easy (but pro) way

Let’s say we have a document root like:

It’s interesting to note the instructions for this will vary from environment to environment, it depends on which user is looking after apache2, etc.

/var/www/mysite.com/htdocs

Make all files read/write and owned by www-data apache2 user only

root@meine:/var/www/mysite.com/htdocs# find . -type f -exec chown apache2:apache2 {} \; 
root@meine:/var/www/mysite.com/htdocs# find . -type f -exec chmod 644 {} \;

Make all folders accessible Read + Execute, but no write permissions

root@meine:/var/www/mysite.com/htdocs# find . -type d -exec chmod 755 {} \;
root@meine:/var/www/mysite.com/htdocs# find . -type d -exec chown apache2:apache2 {} \;

PLEASE NOTE THIS BREAKS YOUR WORDPRESS ABILITY TO AUTO-UPDATE ITSELF. BUT IT IS MORE SECURE 😀

Note debian users, may need to use www-data:www-data instead.