Configuring very very strict Linux Firewall using iptables

So, you want to configure a very very secure Linux Firewall using iptables? no probs. Here is how to do it;

#!/bin/sh
# My system IP/set ip address of server
SERVER_IP="2.2.2.2"

# Flushing all rules
iptables -F
iptables -X

# Setting default filter policy
iptables -P INPUT DROP
iptables -P OUTPUT DROP
iptables -P FORWARD DROP

# Allow ALL traffic on loopback
iptables -A INPUT -i lo -j ACCEPT
iptables -A OUTPUT -o lo -j ACCEPT
 
# Allow INCOMING CONNECTIONS ON SSH PORT 22
iptables -A INPUT -p tcp -s 0/0 -d $SERVER_IP --sport 513:65535 --dport 22 -m state --state NEW,ESTABLISHED -j ACCEPT
iptables -A OUTPUT -p tcp -s $SERVER_IP -d 0/0 --sport 22 --dport 513:65535 -m state --state ESTABLISHED -j ACCEPT
# DROP ALL TRAFFIC COMING IN AND GOING OUT

iptables -A INPUT -j DROP
iptables -A OUTPUT -j DROP

This above configuration locks down everything apart from SSH.

But, most customers want to configure access from their client’s IP address only. I.e. they don’t want SSH to accept connections from any IP address. Only from the client on for example 1.1.1.1. Here’s how to do that:

# Allow incoming ssh only from IP 1.1.1.1
iptables -A INPUT -p tcp -s 1.1.1.1 -d $SERVER_IP --sport 513:65535 --dport 22 -m state --state NEW,ESTABLISHED -j ACCEPT
iptables -A OUTPUT -p tcp -s $SERVER_IP -d 1.1.1.1 --sport 22 --dport 513:65535 -m state --state ESTABLISHED -j ACCEPT

Credit goes to; http://www.cyberciti.biz/tips/linux-iptables-4-block-all-incoming-traffic-but-allow-ssh.html

Preparing a Github/Gitlab Development Bastion Server

So you are looking to use github / gitlab to manage your infrastructure and development. To do this effectively you will need to prepare your environment. Here is an example.

This is for our ansible playbook.

Install Required Dependencies

yum update -y
yum install -y vim git ansible tree fail2ban

Add user for repo

useradd -m -G wheel osan
passwd osan

Secure SSH by disabling root login and changing SSH port

sed 's/#PermitRootLogin yes/PermitRootLogin no/g;s/#Port 22/Port 222/g' -i /etc/ssh/sshd_config
firewall-cmd --add-port=666/tcp --permanent
firewall-cmd --reload
systemctl restart sshd.service

Generate key for osan user

su - osan
ssh-keygen -f ~/.ssh/id_rsa -t rsa -N ''

Output the key you generated

cat ~/.ssh/id_rsa.pub

The next step is adding your SSH key above to the ‘profiles’ section of your gitlab/github user. Find this in my profile, under ‘SSH KEYS’.

Screen Shot 2016-04-25 at 10.13.03 AM

Screen Shot 2016-04-25 at 10.13.19 AM

Set Git Variables

USERNAME=yourgitlabusername
git config --global user.name $USERNAME
git config --global user.email "[email protected]"

Clone Project

git clone [email protected]:$USERNAME/projectname.git

Creating a Next Generation Server image from a First Generation Server

So we had a customer today that wanted to create a next generation cloud-server using a first generation server image. Since the first gen platform uses cloud files, it’s possible to do manually, downloading from cloud files , concatenating and untar to access the filesystem.

Like so;

cat receiverTar1.tar receivedTar2.tar >> alltars.tar
tar -itvf alltars.tar

Although I used on my mac:

tar -vxf alltars.tar 

This gives us the VHD files extracted into an ‘image’ folder;

$ ls -al image/
total 79851760
drwxr-xr-x   6 adam9261  RACKSPACE\Domain Users          204 Apr 19 12:17 .
drwxr-xr-x  11 adam9261  RACKSPACE\Domain Users          374 Apr 19 11:47 ..
-rw-r--r--   1 adam9261  RACKSPACE\Domain Users  40884003328 Jan  4 07:05 image.vhd
-rwxr-xr-x   1 adam9261  RACKSPACE\Domain Users         1581 Apr 19 12:15 import-container.sh
-rw-r--r--   1 adam9261  RACKSPACE\Domain Users            8 Jan  4 07:05 manifest.ovf
-rw-r--r--   1 adam9261  RACKSPACE\Domain Users        84480 Jan  4 07:05 snap.vhd

We are interested in the image.vhd file. Now lets upload it to cloud files to IMPORT it into Glance, which is what is used by the next generation platform to create a new server. The problem of course was that the first gen image format wasn’t compatible. Next gen builds need to retrieve the VHD image from glance.

Also, lets ensure we use Transfer-Encoding: chunked” as a host -H header. This tells Cloud Files that the .vhd exceeds 5G and it will create a multi-part manifest for us for the main file. Splitting it up for us into multiple objects spanned across 5Gig Files!


# Username used to login to control panel
USERNAME='mycloudusername'
# Find the APIKey in the 'account settings' part of the menu of the control panel
APIKEY='mycloudapikey'
# Find the image ID you'd like to make available on cloud files
CUSTOMER_ID=10001010

IMPORT_CF_ENDPOINT="https://storage101.lon3.clouddrive.com/v1/MossoCloudFS_50441c7a-dc22-4287-8e8c-b9844df"

# This section simply retrieves the TOKEN
TOKEN=`curl https://identity.api.rackspacecloud.com/v2.0/tokens -X POST -d '{ "auth":{"RAX-KSKEY:apiKeyCredentials": { "username":"'$USERNAME'", "apiKey": "'$APIKEY'" }} }' -H "Content-type: application/json" |  python -mjson.tool | grep -A5 token | grep id | cut -d '"' -f4`

# Upload VHD
curl -X PUT -T image.vhd \
-H "X-Auth-Token: $TOKEN" \
-H "Transfer-Encoding: chunked" \
"$IMPORT_CF_ENDPOINT/import/image.vhd"

Update:

Something in curl transmission caused it to sadly, mess up. So I used swiftly instead.

$ swiftly put -i image.vhd import/image.vhd

The problem with swiftly was it didn’t like my .swiftly file in my ~ as should work 100% without problems, but it didn’t. With help of my friend Jake this is what I did, to get round that and set manually in the environment (as opposed to using the .swiftly file)

abull-mb:~ adam9261$ export SWIFTLY_AUTH_URL=https://identity.api.rackspacecloud.com/v2.0
abull-mb:~ adam9261$ export SWIFTLY_AUTH_USER=cloudusernamehere
abull-mb:~ adam9261$ export SWIFTLY_AUTH_KEY=apikeyhere
abull-mb:~ adam9261$ swiftly auth

Next stage import to glance

#!/bin/bash

# Username used to login to control panel
USERNAME='mycloudusername'
# Find the APIKey in the 'account settings' part of the menu of the control panel
APIKEY='mycloudapikey'
# Find the image ID you'd like to make available on cloud files
CUSTOMER_ID=10001010
IMPORT_CF_ENDPOINT="https://storage101.lon3.clouddrive.com/v1/MossoCloudFS_50441c7a-dc22-4287-8e8c-b6d76b237da"
IMPORT_IMAGE_ENDPOINT=https://LON.images.api.rackspacecloud.com/v2/$CUSTOMER_ID


# This section simply retrieves the TOKEN
TOKEN=`curl https://identity.api.rackspacecloud.com/v2.0/tokens -X POST -d '{ "auth":{"RAX-KSKEY:apiKeyCredentials": { "username":"'$USERNAME'", "apiKey": "'$APIKEY'" }} }' -H "Content-type: application/json" |  python -mjson.tool | grep -A5 token | grep id | cut -d '"' -f4`


VHD-NOTES=TESTING-RACKSPACE-IMAGE-IMPORT
IMPORT_CONTAINER=import

curl -X POST "$IMPORT_IMAGE_ENDPOINT/tasks" \
      -H "X-Auth-Token: $TOKEN" \
      -H "Content-Type: application/json" \
      -d "{\"type\":\"import\",\"input\":{\"image_properties\":{\"name\":\"$VHD_NOTES\"},\"import_from\":\"$IMPORT_CONTAINER/image.vhd\"}}" |\
      python -mjson.tool

Please note that image.vhd is hardcoded into the curl import. Also see VHD-NOTES variable which is passed to the task. This is just to identify the image more easily.

Response:

{
    "created_at": "2016-04-19T13:12:57Z",
    "id": "ff7d8c09-9dd7-43ed-824f-338201681b12",
    "input": {
        "image_properties": {
            "name": ""
        },
        "import_from": "import/image.vhd"
    },
    "message": "",
    "owner": "10001010",
    "result": null,
    "schema": "/v2/schemas/task",
    "self": "/v2/tasks/ff7d8c09-9dd7-43ed-815f-338201681ba7",
    "status": "pending",
    "type": "import",
    "updated_at": "2016-04-19T13:12:57Z"
}

I then retrieved the Task details: (code not included yet). In this case I used pitchfork.cloudapi.co. A rackspace service that allows you to make API calls using a web frontend.

I was in a rush to get this done for the customer as soon as possible.

{
    "status": "processing", 
    "created_at": "2016-04-19T13:12:57Z", 
    "updated_at": "2016-04-19T13:12:58Z", 
    "id": "ff7d8c09-9dd7-43ed-824f-338201681b12", 
    "result": null, 
    "owner": "10009158", 
    "input": {
        "image_properties": {
            "name": ""
        }, 
        "import_from": "import/image.vhd"
    }, 
    "message": "", 
    "type": "import", 
    "self": "/v2/tasks/ff7d8c09-9dd7-43ed-815f-338201681ba7", 
    "schema": "/v2/schemas/task"
}

We can now see that the status is processing. When it has completed, it will tell us whether it failed or not

After waiting 30 minutes or so:

{
    "status": "success", 
    "created_at": "2016-04-19T13:12:57Z", 
    "updated_at": "2016-04-19T14:22:53Z", 
    "expires_at": "2016-04-21T14:22:53Z", 
    "id": "ff7d8c09-9dd7-43ed-815f-338201681ba7", 
    "result": {
        "image_id": "826bbb51-0f83-4278-b0ad-702aba088aae"
    }, 
    "owner": "10009158", 
    "input": {
        "image_properties": {
            "name": ""
        }, 
        "import_from": "import/image.vhd"
    }, 
    "message": "", 
    "type": "import", 
    "self": "/v2/tasks/ff7d8c09-9dd7-43ed-815f-338201681ba7", 
    "schema": "/v2/schemas/task"
}

It worked!

Retrieve all CDN Rackcdn.com URL’s and URI

So, today we had a customer ask if I could trace down the containers for their specific domain CNAMES.

First I would dig the CNAME the customer setup. For instance cdn.customerdomain.com. This would give me a rackcdn.com link like;

# dig adam.haxed.me.uk

; <<>> DiG 9.9.4-RedHat-9.9.4-29.el7_2.2 <<>> adam.haxed.me.uk
;; global options: +cmd
;; Got answer:
;; ->>HEADER<<- opcode: QUERY, status: NOERROR, id: 19402
;; flags: qr rd ra; QUERY: 1, ANSWER: 6, AUTHORITY: 0, ADDITIONAL: 1

;; OPT PSEUDOSECTION:
; EDNS: version: 0, flags:; udp: 1500
;; QUESTION SECTION:
;adam.haxed.me.uk.		IN	A

;; ANSWER SECTION:
adam.haxed.me.uk.	3600	IN	CNAME	ceb47133a715104a5805-6490a1e5c1b40c9f5aaee7a62e1812f7.r59.cf3.rackcdn.com.
ceb47133a715104a5805-6490a1e5c1b40c9f5aaee7a62e1812f7.r59.cf3.rackcdn.com. 300 IN CNAME	a59.rackcdn.com.
a59.rackcdn.com.	281	IN	CNAME	a59.rackcdn.com.mdc.edgesuite.net.
a59.rackcdn.com.mdc.edgesuite.net. 300 IN CNAME	a61.dscg10.akamai.net.
a61.dscg10.akamai.net.	1	IN	A	104.86.110.99
a61.dscg10.akamai.net.	1	IN	A	104.86.110.115

;; Query time: 39 msec
;; SERVER: 83.138.151.81#53(83.138.151.81)
;; WHEN: Thu Apr 14 09:15:25 UTC 2016
;; MSG SIZE  rcvd: 261

This would give me detail of the CDN URL that my TLD points to. But, what if I am trying to track down the container, like my customer was? I will now create a script to list ALL rackCDN url's. Then we can search for the ceb47133 CNAME that adam.haxed.me.uk points to. This will give us a 'name' of the cloud files container that the rackcdn is associated/connected with.

USERNAME='mycloudusername'
APIKEY='mycloudapikey'

TOKEN=`curl https://identity.api.rackspacecloud.com/v2.0/tokens -X POST -d '{ "auth":{"RAX-KSKEY:apiKeyCredentials": { "username":"'$USERNAME'", "apiKey": "'$APIKEY'" }} }' -H "Content-type: application/json" |  python -mjson.tool | grep -A5 token | grep id | cut -d '"' -f4`

TENANT=10045567
API_ENDPOINT="https://cdn3.clouddrive.com/v1/MossoCloudFS_$TENANT"
#API_ENDPOINT="https://global.cdn.api.rackspacecloud.com/v1.0/$TENANT"
#API_ENDPOINT="https://cdn3.clouddrive.com/v1/MossoCloudFS_c2ad0d46-31e2-4c31-a60b-b611bb8e5f8b2"

curl -v -X GET $API_ENDPOINT/?format=json \
-H "X-Auth-Token: $TOKEN" | python -mjson.tool

It's well worth noting the API ENDPOINT is different from customer to customer so you may wish to retrieve all of the endpoints to check you have the right CDN endpoint. See at the bottom of the page how to check your endpoint is correct if you get permission error, it is likely the API endpoint. It's different for each customer I have learnt.

[
    {
        "cdn_enabled": true,
        "cdn_ios_uri": "http://a30ae7cddb38b2112bce-03b08b0e5c91ea60f938585ef20a12d7.iosr.cf3.rackcdn.com",
        "cdn_ssl_uri": "https://1627826b1dc042d6b3be-03b08b0e5c91ea60f938585ef20a12d7.ssl.cf3.rackcdn.com",
        "cdn_streaming_uri": "http://ee7e9298372b91eea2d2-03b08b0e5c91ea60f938585ef20a12d7.r91.stream.cf3.rackcdn.com",
        "cdn_uri": "http://beb2ec8d649b0d717ef9-03b08b0e5c91ea60f938585ef20a12d7.r91.cf3.rackcdn.com",
        "log_retention": false,
        "name": "some.com.cdn.container",
        "ttl": 86400
    },
    {
        "cdn_enabled": true,
        "cdn_ios_uri": "http://0381268aadeda8ceab1e-37d5bb63c6aad292ad490c7fddb2f62f.iosr.cf3.rackcdn.com",
        "cdn_ssl_uri": "https://5b190eda013130300b94-37d5bb63c6aad292ad490c7fddb2f62f.ssl.cf3.rackcdn.com",
        "cdn_streaming_uri": "http://5f756e93360bbef82e84-37d5bb63c6aad292ad490c7fddb2f62f.r75.stream.cf3.rackcdn.com",
        "cdn_uri": "http://47aabb1759520adb10a1-37d5bb63c6aad292ad490c7fddb2f62f.r75.cf3.rackcdn.com",
        "log_retention": false,
        "name": "container-001",
        "ttl": 604800
    },
    {
        "cdn_enabled": true,
        "cdn_ios_uri": "http://006acc500edc34a84075-1257f240203d0254bc8c5602aafda48d.iosr.cf3.rackcdn.com",
        "cdn_ssl_uri": "https://b68de0566314da76870d-1257f240203d0254bc8c5602aafda48d.ssl.cf3.rackcdn.com",
        "cdn_streaming_uri": "http://632bed500bfc691eb677-1257f240203d0254bc8c5602aafda48d.r49.stream.cf3.rackcdn.com",
        "cdn_uri": "http://b52a6ade17a64c459d85-1257f240203d0254bc8c5602aafda48d.r49.cf3.rackcdn.com",
        "log_retention": false,
        "name": "container-002",
        "ttl": 604800
    },
    {
        "cdn_enabled": true,
        "cdn_ios_uri": "http://38d59ebf089e8ebe00a0-6490a1e5c1b40c9f5aaee7a62e1812f7.iosr.cf3.rackcdn.com",
        "cdn_ssl_uri": "https://02a84412d877be1b8313-6490a1e5c1b40c9f5aaee7a62e1812f7.ssl.cf3.rackcdn.com",
        "cdn_streaming_uri": "http://b8b8fe52062f7fb25f43-6490a1e5c1b40c9f5aaee7a62e1812f7.r59.stream.cf3.rackcdn.com",
        "cdn_uri": "http://ceb47133a715104a5805-6490a1e5c1b40c9f5aaee7a62e1812f7.r59.cf3.rackcdn.com",
        "log_retention": false,
        "name": "scripts",
        "ttl": 259200
    },
    {
        "cdn_enabled": true,
        "cdn_ios_uri": "http://0c29cc67d5299ac41fa0-1426fb5304d7a905cdef320e9b667254.iosr.cf3.rackcdn.com",
        "cdn_ssl_uri": "https://4df79706147258ab315b-1426fb5304d7a905cdef320e9b667254.ssl.cf3.rackcdn.com",
        "cdn_streaming_uri": "http://66baf30a268d99e66228-1426fb5304d7a905cdef320e9b667254.r68.stream.cf3.rackcdn.com",
        "cdn_uri": "http://8b27955f0b728515adde-1426fb5304d7a905cdef320e9b667254.r68.cf3.rackcdn.com",
        "log_retention": false,
        "name": "test",
        "ttl": 259200
    },
    {
        "cdn_enabled": true,
        "cdn_ios_uri": "http://cc1d82abf0fbfced78b7-53ad0106578d82de3911abdf4b56c326.iosr.cf3.rackcdn.com",
        "cdn_ssl_uri": "https://7173244627f44933cf9e-53ad0106578d82de3911abdf4b56c326.ssl.cf3.rackcdn.com",
        "cdn_streaming_uri": "http://dd74f1300c187bb447f3-53ad0106578d82de3911abdf4b56c326.r30.stream.cf3.rackcdn.com",
        "cdn_uri": "http://cb7b587bb6e7186c9308-53ad0106578d82de3911abdf4b56c326.r30.cf3.rackcdn.com",
        "log_retention": false,
        "name": "test2",
        "ttl": 259200
    }
]
TOKEN=`curl https://identity.api.rackspacecloud.com/v2.0/tokens -X POST -d '{ "auth":{"RAX-KSKEY:apiKeyCredentials": { "username":"'$USERNAME'", "apiKey": "'$APIKEY'" }} }' -H "Content-type: application/json" |  python -mjson.tool`

As we can see below the ceb46 rackcdn link is the 'scripts' container. the CNAME adam.haxed.me.uk points to the rackcdn.com domain http://ceb47133a715104a5805-6490a1e5c1b40c9f5aaee7a62e1812f7.r59.cf3.rackcdn.com which is 'pointing' at the cloud files 'scripts' folder.

    {
        "cdn_enabled": true,
        "cdn_ios_uri": "http://38d59ebf089e8ebe00a0-6490a1e5c1b40c9f5aaee7a62e1812f7.iosr.cf3.rackcdn.com",
        "cdn_ssl_uri": "https://02a84412d877be1b8313-6490a1e5c1b40c9f5aaee7a62e1812f7.ssl.cf3.rackcdn.com",
        "cdn_streaming_uri": "http://b8b8fe52062f7fb25f43-6490a1e5c1b40c9f5aaee7a62e1812f7.r59.stream.cf3.rackcdn.com",
        "cdn_uri": "http://ceb47133a715104a5805-6490a1e5c1b40c9f5aaee7a62e1812f7.r59.cf3.rackcdn.com",
        "log_retention": false,
        "name": "scripts",
        "ttl": 259200
    },

Simple enough!

Pro actively Securing and Analyzing Login Attacks in WordPress and automating abuse reports

So, noticed there were a lot of failed logins being reported by my security software. So, I thought I’d do some manual digging around as to what is going on my box. Here is what I did.

Scan the physical packets coming in/out of the box

tcpdump -i eth0 | grep -v rackspace | grep -v newrelic | grep -v 212.121.212.121

This above line gave me lots of output. I could see a lot of ip’s were hitting tcp port 80 a lot, and I wondered why. Obviously it was a bruteforce login attack.

When analysing attacks it’s important to consult the webserver logs for all access, if port 80 http is being used as a vector of attack it is therefore important to identify which addresses are hitting sensitive files, such as wp-logon.php , this is what I expect is being targeted, so I will target them a little;

cat /some/path/to/mywebwww/access.log | grep wp-login | grep Apr | awk '{print $1}' | sort | uniq -c

What this does is output the entire webserver access log and only show requests that have wp-login in. Then it removes all entries from Apr, and then it extracts only the IP addresses of those accessing it, and then sorts them uniquely but also -c counting them too, so we know exactly how many access requests have been made to this sensitive wp-logon.php file in just 1 month.
This will allow us to identify the clear attackers and block them.

wp-login

Lets start blocking their access

iptables -I INPUT -s 1.1.1.1 -j DROP

The above line instructs the firewall to block the source ip 1.1.1.1 and DROP all packets coming in on the interface. Simple enough!

What I could do is take the line further, and find out exactly which networks these attacks are coming from by piping the ip addresses to whois. Lets do this now and extract some data we need to start making automated abuse reports with our script;

cat /somepath/www/access.log | grep wp-login | grep Apr | awk  '{print $1}' | sort | uniq | xargs -i echo "whois" {} | grep 'Organization\|AbuseEmail\|OrgAbusePhone'; echo;" > exec.sh;

 ./exec.sh

This is what the output looks like
ip-finder

Lets go one step further and refer to the {} output which has the initial IP argument. Then we’ll know which IP to email which abuse contact for when we pipe it to sendmail! ;D

cat /var/logs/access.log | grep wp-login | grep Apr | awk '{print $1}' | sort | uniq | xargs -i echo "echo {}" ";whois" {} "| grep 'OrgAbuseEmail';sleep 3;"

Output looks like

ip-abuse-email-output-automation

Sadly I run out of time with this.. but I will try and get the automatic abuse reporting finished soon 😀ip-abuse-email-output-automation

Sending test email at commandline to test mailserver

I was migrating some mail today to a new mailserver, i needed to test mail quickly.

So I run this on an external server

echo "Hello world" | mail -s "meh" [email protected]

I then ran an tail -f /var/log/mail.log on my local mail server

tail -f /var/log/mail.log

Mar 10 17:42:22 mymail-7-wheezy postfix/cleanup[14592]: 9EF95D42A5: message-id=<[email protected]>
Mar 10 17:42:22 mymail-7-wheezy postfix/qmgr[4691]: 9EF95D42A5: from=, size=1097, nrcpt=1 (queue active)
Mar 10 17:42:22 mymail-7-wheezy postfix/virtual[14604]: 9EF95D42A5: to=, relay=virtual, delay=0.01, delays=0/0/0/0, dsn=2.0.0, status=sent (delivered to maildir)
Mar 10 17:42:22 mymail-7-wheezy postfix/qmgr[4691]: 9EF95D42A5: removed
Mar 10 17:42:22 mymail-7-wheezy amavis[14463]: (14463-01) Passed CLEAN {RelayedOpenRelay}, [37.1.1.1]:46386 [37.1.1.1]  -> , Queue-ID: 347DDD429D, Message-ID: <[email protected]>, mail_id: Y9fimRqJrWtV, Hits: 1.693, size: 650, queued_as: 9EF95D42A5, 1448 ms
Mar 10 17:42:22 mymail-7-wheezy postfix/smtp[14596]: 347DDD429D: to=, relay=127.0.0.1[127.0.0.1]:10024, delay=1.5, delays=0.01/0/0.01/1.4, dsn=2.0.0, status=sent (250 2.0.0 from MTA(smtp:[127.0.0.1]:10025): 250 2.0.0 Ok: queued as 9EF95D42A5)
Mar 10 17:42:22 mymail-7-wheezy postfix/qmgr[4691]: 347DDD429D: removed

As we can see email is working rather nicely after my DNS updates!

A good way to test this.

A new way of Deploying CBS for Large Clusters, using the TOR method 5600% to 12800% faster

So, I was thinking about the problem with cloning CBS volumes, where if you want to make several 64 copies of a CBS disk or more in a quick time. But what happens is they are built sequentially and queued. They are copied one at a time. So when a windows customer approached us, a colleague reached out to me to see if there was any other way of doing this thru snapshots or clones. In fact there was, and cinder is to be considered a fox, fast and cunning and unseen , but it is trapped inside a cage called glance.

This is about overcoming those limitations, introducing TOR-CBS
Parallel CBS Building with Openstack Cinder

This is all about making the best of the infrastructure that is there. Cinder is massively distributed so, building 64 parallel copies is achievable at a much higher parallel bandwidth, and for those reasons it is a ‘tor like’ system. A friend of mine compared it to cellular division. There is a kind of organic nature to the method applied, as all children are used as new parents for copy. This explains the efficiency and speed of the system. I.e. the more servers you want to build the more time you save .

When this actually worked for the first time I had to take a step back. It really meant that building 64 CBS would take an hour, and building 128 of them would take 1 hour and 10 minutes. Damn, that’s fast!

When you’ve got all thatI.e. clone 1 disk to create a second disk. Clone both the first and the second disk to make four disks. Clone the four to make 8 in total. Clone 8 to make 16 in total. 32, 64, 128, 256, 512, 1024, 2048. Your cluster can double in size in roughly 10 minutes a go provided that Cinder service has the infrastructure in place. This appears to be a new potentially revolutionary way of building out in the cloud.

See the diagram below for a proper illustration and explanation.

rapiddeploy-tor-cbs

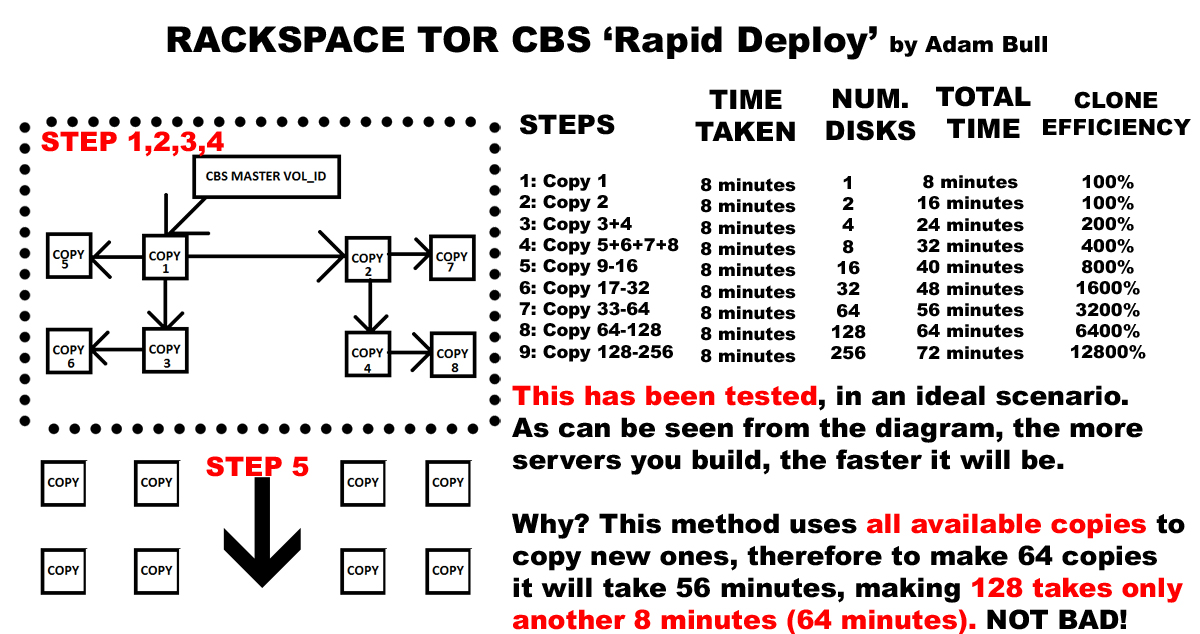
As you can see the one for one copy in the 9th or 10th step is in the tens of thousands of percent more efficient!! The reason is because CBS clone is a one to one copy, and even if you specify to build 50 from a single volume id source, it will incrementally build them, one by one.

My system works the same, except it uses all of the available disks already built from the previous n steps, therefore giving an n’th exponent of amplification of efficiency per step, in other words, ‘something for nothing’. It also properly utilizes the distributed nature of CBS and very many network ports. Instead of utilizing a single port from the source volume, which is ultimately the restricting bottleneck factor in spinning up large cloud solutions.

I am absolutely delighted. IT WORKS!!

The Code

build-cbs.sh

USERNAME='MYCLOUDUSERNAMEHERE'
APIKEY='MYAPIKEYHERE'
ACCOUNT_NUMBER=10010111
API_ENDPOINT="https://lon.blockstorage.api.rackspacecloud.com/v1/$ACCOUNT_NUMBER/volumes"
MASTER_CBS_VOL_ID="MY-MASTER-VOLUME-ID-HERE"

TOKEN=`curl https://identity.api.rackspacecloud.com/v2.0/tokens -X POST -d '{ "auth":{"RAX-KSKEY:apiKeyCredentials": { "username":"'$USERNAME'", "apiKey": "'$APIKEY'" }} }' -H "Content-type: application/json" |  python -mjson.tool | grep -A5 token | grep id | cut -d '"' -f4`

echo "Using MASTER_CBS_VOL_ID $MASTER_CBS_VOL_ID.."
sleep 2

# Populate CBS
# No longer using $1 and $2 as unnecessary now we have cbs-fork-step
for i in `seq 1 2`;
do

echo "Generating CBS Clone #$i"
curl -s -vvvv  \
-X POST "$API_ENDPOINT" \
-H "X-Auth-Token: $TOKEN"  \
-H "X-Project-Id: $ACCOUNT_NUMBER" \
-H "Accept: application/json"  \
-H "Content-Type: application/json" -d '{"volume": {"source_volid": "'$MASTER_CBS_VOL_ID'", "size": 50, "display_name": "win-'$i'", "volume_type": "SSD"}}'  | jq .volume.id | tr -d '"' >> cbs.created.newstep
done

echo "Giving CBS 15 minute grace time for 50 CBS clone"

z=0
spin() {
   local -a marks=( '/' '-' '\' '|' )
   while [[ $z -lt 500 ]]; do
     printf '%s\r' "${marks[i++ % ${#marks[@]}]}"
     sleep 1
     let 'z++'
   done
 }

spin

echo "Listing all CBS Volume ID's created"
cat cbs.created.newstep
# Ensure all of the initial created cbs end up in the master file
cat cbs.created.newstep >> cbs.created.all

echo "Initial Copy completed"

So the first bit is simple, the above uses the openstack Cinder API endpoint to create two copies of the master. It takes a bit longer the initial process, but if your building 64 to infinite servers this is going to be the most efficient and fastest way to do it. The thing is, we want to recursively build CBS in steps.

Enter cbs-fork-step.sh

cbs-fork-step.sh

USERNAME='MYCLOUDUSERNAMEHERE'
APIKEY='MYAPIKEYHERE'
ACCOUNT_NUMBER=10010111
API_ENDPOINT="https://lon.blockstorage.api.rackspacecloud.com/v1/$ACCOUNT_NUMBER/volumes"

TOKEN=`curl https://identity.api.rackspacecloud.com/v2.0/tokens -X POST -d '{ "auth":{"RAX-KSKEY:apiKeyCredentials": { "username":"'$USERNAME'", "apiKey": "'$APIKEY'" }} }' -H "Content-type: application/json" |  python -mjson.tool | grep -A5 token | grep id | cut -d '"' -f4`

z=0
spin() {
   local -a marks=( '/' '-' '\' '|' )
   while [[ $z -lt 400 ]]; do
     printf '%s\r' "${marks[i++ % ${#marks[@]}]}"
     sleep 1
     let 'z++'
   done
 }

count=$1

#count=65;
while read n; do
echo ""
# Populate CBS TOR STEPPING

echo "Generating TOR CBS Clone $count::$n"
date
curl -s  \
-X POST "$API_ENDPOINT" \
-H "X-Auth-Token: $TOKEN"  \
-H "X-Project-Id: $ACCOUNT_NUMBER" \
-H "Accept: application/json"  \
-H "Content-Type: application/json" -d '{"volume": {"source_volid": "'$n'", "size": 50, "display_name": "win-'$count'", "volume_type": "SSD"}}' | jq .volume.id | tr -d '"' >> cbs.created.newstep


((count=count+1))

done < cbs.created.all

cat cbs.created.newstep > cbs.created.all
echo "Waiting 8 minutes for Clone cycle to complete.."
spin

As you can see from the above, the volume master ID disappears, we’re now using the 2 CBS VOL ID’s that were initially copied in the first build-cbs.sh file. From now on, we’ll iterate while reading n lines of the cbs.crated.newstep file. For redundancy cbs.created.all is used as well. The problem is this is a fixed iterative loop, what about controlling how many times this runs?

Also, we obviously need to keep count and track of each CBS, so we call them win-‘$count’, the ‘ ‘ is for termination/escape from the ‘” “‘. This allows each CBS to get the correct logical name based on the sequence, but in order for this to work properly, we need to put it all together in a master.sh file. The master forker, which adds an extra loop traversal to the design.

Putting it all together

master.sh

drwxr-xr-x. 2 root root 4096 Oct 7 10:44 curl
drwxr-xr-x. 2 root root 4096 Nov 12 13:48 customer
drwxr-xr-x. 4 root root 4096 Oct 12 15:07 .gem
# Master Controller file

# Number of Copy Steps Minimum 2 Maximum 9
# Steps 2=2 copies, 3=4 copies, 4=8, 5=16, 6=32, 7=64, 8=128, 9=256
# Steps 2=4 copies, 3=8 copies, 4=16, 5=32, 6=64, 7=128
# The steps variable determines how many identical Tor-copies of the CBS you wish to make
steps=6

rm cbs.created.all
rm cbs.created.newstep

touch cbs.created.all
touch cbs.created.newstep

figlet TOR CBS
echo ‘By Adam Bull, Rackspace UK’
sleep 2

echo “This software is alpha”
sleep 2

echo “Initiating initial Copy using $MASTER_CBS_VOLUME_ID”
# Builds first copy
./build-cbs.sh

count=4
for i in `seq 1 $steps`; do
let ‘count–‘
./cbs-fork-step.sh $count
let ‘count = (count * 2)’
done

echo “Attaching CBS and Building Nova Compute..”
./build-nova.sh

This code is still alpha, but it works really nicely. The output of the script looks like;

# ./master.sh
 _____ ___  ____     ____ ____ ____
|_   _/ _ \|  _ \   / ___| __ ) ___|
  | || | | | |_) | | |   |  _ \___ \
  | || |_| |  _ <  | |___| |_) |__) |
  |_| \___/|_| \_\  \____|____/____/

By Adam Bull, Rackspace UK
This software is alpha
Initiating initial Copy using
  % Total    % Received % Xferd  Average Speed   Time    Time     Time  Current
                                 Dload  Upload   Total   Spent    Left  Speed
100  5143  100  5028  100   115   5013    114  0:00:01  0:00:01 --:--:--  5017

Generating TOR CBS Clone 3::defd5aa1-2927-444c-992d-fba6602f117c
Wed Mar  2 12:25:26 UTC 2016

Generating TOR CBS Clone 4::8283420f-b02a-4094-a857-aedf73dffcc3
Wed Mar  2 12:25:27 UTC 2016
Waiting 8 minutes for Clone cycle to complete..
  % Total    % Received % Xferd  Average Speed   Time    Time     Time  Current
                                 Dload  Upload   Total   Spent    Left  Speed
100  5143  100  5028  100   115   4942    113  0:00:01  0:00:01 --:--:--  4948

Generating TOR CBS Clone 5::defd5aa1-2927-444c-992d-fba6602f117c
Wed Mar  2 12:32:10 UTC 2016

Generating TOR CBS Clone 6::8283420f-b02a-4094-a857-aedf73dffcc3
Wed Mar  2 12:32:11 UTC 2016

Generating TOR CBS Clone 7::822687a8-f364-4dd1-8a8a-3d52687454dd
Wed Mar  2 12:32:12 UTC 2016

Generating TOR CBS Clone 8::4a97d22d-03c1-4b14-a64c-bbf3fa5bab07
Wed Mar  2 12:32:12 UTC 2016
Waiting 8 minutes for Clone cycle to complete..
  % Total    % Received % Xferd  Average Speed   Time    Time     Time  Current
                                 Dload  Upload   Total   Spent    Left  Speed
100  5143  100  5028  100   115   5186    118 --:--:-- --:--:-- --:--:--  5183

Generating TOR CBS Clone 9::defd5aa1-2927-444c-992d-fba6602f117c
Wed Mar  2 12:38:56 UTC 2016

Generating TOR CBS Clone 10::8283420f-b02a-4094-a857-aedf73dffcc3
Wed Mar  2 12:38:56 UTC 2016

Generating TOR CBS Clone 11::822687a8-f364-4dd1-8a8a-3d52687454dd
Wed Mar  2 12:38:57 UTC 2016

Generating TOR CBS Clone 12::4a97d22d-03c1-4b14-a64c-bbf3fa5bab07
Wed Mar  2 12:38:58 UTC 2016

Generating TOR CBS Clone 13::42145009-33a7-4fc4-9865-da7a82e943c1
Wed Mar  2 12:38:58 UTC 2016

Generating TOR CBS Clone 14::58db8ae2-2e0e-4629-aad6-5c228eb4b342
Wed Mar  2 12:38:59 UTC 2016

Generating TOR CBS Clone 15::d0bf36cb-6dd5-4ed3-8444-0e1d61dba865
Wed Mar  2 12:39:00 UTC 2016

Generating TOR CBS Clone 16::459ba327-de60-4bc1-a6ad-200ab1a79475
Wed Mar  2 12:39:00 UTC 2016
Waiting 8 minutes for Clone cycle to complete..
  % Total    % Received % Xferd  Average Speed   Time    Time     Time  Current
                                 Dload  Upload   Total   Spent    Left  Speed
100  5143  100  5028  100   115   4953    113  0:00:01  0:00:01 --:--:--  4958

Generating TOR CBS Clone 17::defd5aa1-2927-444c-992d-fba6602f117c
Wed Mar  2 12:45:44 UTC 2016

Generating TOR CBS Clone 18::8283420f-b02a-4094-a857-aedf73dffcc3
Wed Mar  2 12:45:45 UTC 2016

Generating TOR CBS Clone 19::822687a8-f364-4dd1-8a8a-3d52687454dd
Wed Mar  2 12:45:45 UTC 2016

Generating TOR CBS Clone 20::4a97d22d-03c1-4b14-a64c-bbf3fa5bab07
Wed Mar  2 12:45:46 UTC 2016

Generating TOR CBS Clone 21::42145009-33a7-4fc4-9865-da7a82e943c1
Wed Mar  2 12:45:46 UTC 2016

Generating TOR CBS Clone 22::58db8ae2-2e0e-4629-aad6-5c228eb4b342
Wed Mar  2 12:45:47 UTC 2016

Generating TOR CBS Clone 23::d0bf36cb-6dd5-4ed3-8444-0e1d61dba865
Wed Mar  2 12:45:48 UTC 2016

Generating TOR CBS Clone 24::459ba327-de60-4bc1-a6ad-200ab1a79475
Wed Mar  2 12:45:48 UTC 2016

Generating TOR CBS Clone 25::9b10b078-c82d-48cd-953e-e99d5e90774a
Wed Mar  2 12:45:49 UTC 2016

Generating TOR CBS Clone 26::0692c7dd-6db0-43e6-837d-8cc82ce23c78
Wed Mar  2 12:45:50 UTC 2016

Generating TOR CBS Clone 27::f2c4a89e-fc37-408a-b079-f405e150fa96
Wed Mar  2 12:45:50 UTC 2016

Generating TOR CBS Clone 28::5077f4d8-e5e1-42b6-af58-26a0b55ff640
Wed Mar  2 12:45:51 UTC 2016

Generating TOR CBS Clone 29::f18ec1c3-1698-4985-bfb9-28604bbdf70b
Wed Mar  2 12:45:52 UTC 2016

Generating TOR CBS Clone 30::fd96c293-46e5-49e4-85d5-5181d6984525
Wed Mar  2 12:45:52 UTC 2016

Generating TOR CBS Clone 31::9ea40b0d-fb60-4822-a538-3b9d967794a2
Wed Mar  2 12:45:53 UTC 2016

Generating TOR CBS Clone 32::ea7e2c10-d8ce-4f22-b8b5-241b81dff08c
Wed Mar  2 12:45:54 UTC 2016
Waiting 8 minutes for Clone cycle to complete..
/

Resolving Broken or Crashed Tables in Mariadb (MySQL)

So we had someone with a lot of errors like this in mariadb.

60225  6:24:49 [Note] Server socket created on IP: '0.0.0.0'.
160225  6:24:49 [Note] Event Scheduler: Loaded 0 events
160225  6:24:49 [Note] /usr/libexec/mysqld: ready for connections.
Version: '5.5.44-MariaDB'  socket: '/var/lib/mysql/mysql.sock'  port: 3306  MariaDB Server
160225  6:24:49 [ERROR] mysqld: Table './enovie_lad/wp_options' is marked as crashed and should be repaired
160225  6:24:49 [Warning] Checking table:   './enovie_lad/wp_options'
160225  6:28:18 [ERROR] mysqld: Table './enovie_lad/wp_lad_course_assign' is marked as crashed and should be repaired
160225  6:28:18 [Warning] Checking table:   './enovie_lad/wp_lad_course_assign'
160225  6:28:18 [ERROR] mysqld: Table './enovie_lad/wp_lad_course_attendence' is marked as crashed and should be repaired
160225  6:28:18 [Warning] Checking table:   './enovie_lad/wp_lad_course_attendence'
160225  6:28:18 [ERROR] mysqld: Table './enovie_lad/wp_lad_userlog' is marked as crashed and should be repaired
160225  6:28:18 [Warning] Checking table:   './enovie_lad/wp_lad_userlog'
160227 02:31:55 mysqld_safe Number of processes running now: 0
160227 02:31:55 mysqld_safe mysqld restarted
160227  2:31:55 [Note] /usr/libexec/mysqld (mysqld 5.5.44-MariaDB) starting as process 17264 ...

You could fix this using phpmyadmin’s repair function. See, ask google
Ask Google

Or alternatively you could use mysqlcheck to repair the database(s).

./client/mysqlcheck [OPTIONS] database [tables]
./client/mysqlcheck [OPTIONS] --databases DB1 [DB2 DB3...]

OR

./client/mysqlcheck [OPTIONS] --all-databases

Inside the options you need to define -r, for repair. So if you have a database called db1 and a table called wp_lad_userlog you would run something like

./client/mysqlcheck -r database wp_lad_userlog 

For all databases to be repaired (take care);

 
./client/mysqlcheck -r --all-databases

Updating Metadata and inside view on Cloud Servers and thru Nova API

So, a customer today was playing around with some metadata i.e.

“meta”: {
“rax-heat”: “dfdjh32j21-121c-411d-912c-77209ffc6642”
},

He understood setting the meta data key value pairs like;

nova meta platform-minion0-pp.gb-lon1.kubernetes.metroscales.io set foo=bar

and wanted to retrieve inside and outside of the VM. This is easy to do and can be done like

supernova lon show 812c7fed-ae3b-43ff-a0a1-0f07d52b795a | grep metadata
| metadata                            | {"rax-heat": "dfdjh32j21-121c-411d-912c-77209ffc6642", "foo": "bar", "rax_service_level_automation": "Complete"} |

or with nova

nova show 812c7fed-ae3b-43ff-a0a1-0f07d52b795a | grep metadata

Also it can be done inside the VM directly with xenstore-read

xenstore-read vm-data/user-metadata/build_config