Configuring very very strict Linux Firewall using iptables

So, you want to configure a very very secure Linux Firewall using iptables? no probs. Here is how to do it;

#!/bin/sh
# My system IP/set ip address of server
SERVER_IP="2.2.2.2"

# Flushing all rules
iptables -F
iptables -X

# Setting default filter policy
iptables -P INPUT DROP
iptables -P OUTPUT DROP
iptables -P FORWARD DROP

# Allow ALL traffic on loopback
iptables -A INPUT -i lo -j ACCEPT
iptables -A OUTPUT -o lo -j ACCEPT
 
# Allow INCOMING CONNECTIONS ON SSH PORT 22
iptables -A INPUT -p tcp -s 0/0 -d $SERVER_IP --sport 513:65535 --dport 22 -m state --state NEW,ESTABLISHED -j ACCEPT
iptables -A OUTPUT -p tcp -s $SERVER_IP -d 0/0 --sport 22 --dport 513:65535 -m state --state ESTABLISHED -j ACCEPT
# DROP ALL TRAFFIC COMING IN AND GOING OUT

iptables -A INPUT -j DROP
iptables -A OUTPUT -j DROP

This above configuration locks down everything apart from SSH.

But, most customers want to configure access from their client’s IP address only. I.e. they don’t want SSH to accept connections from any IP address. Only from the client on for example 1.1.1.1. Here’s how to do that:

# Allow incoming ssh only from IP 1.1.1.1
iptables -A INPUT -p tcp -s 1.1.1.1 -d $SERVER_IP --sport 513:65535 --dport 22 -m state --state NEW,ESTABLISHED -j ACCEPT
iptables -A OUTPUT -p tcp -s $SERVER_IP -d 1.1.1.1 --sport 22 --dport 513:65535 -m state --state ESTABLISHED -j ACCEPT

Credit goes to; http://www.cyberciti.biz/tips/linux-iptables-4-block-all-incoming-traffic-but-allow-ssh.html

Pro actively Securing and Analyzing Login Attacks in WordPress and automating abuse reports

So, noticed there were a lot of failed logins being reported by my security software. So, I thought I’d do some manual digging around as to what is going on my box. Here is what I did.

Scan the physical packets coming in/out of the box

tcpdump -i eth0 | grep -v rackspace | grep -v newrelic | grep -v 212.121.212.121

This above line gave me lots of output. I could see a lot of ip’s were hitting tcp port 80 a lot, and I wondered why. Obviously it was a bruteforce login attack.

When analysing attacks it’s important to consult the webserver logs for all access, if port 80 http is being used as a vector of attack it is therefore important to identify which addresses are hitting sensitive files, such as wp-logon.php , this is what I expect is being targeted, so I will target them a little;

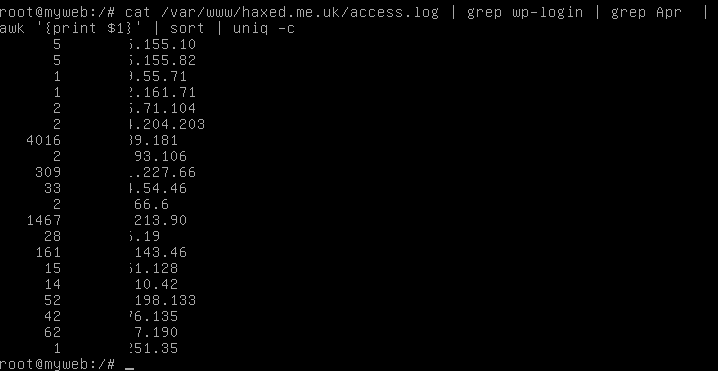
cat /some/path/to/mywebwww/access.log | grep wp-login | grep Apr | awk '{print $1}' | sort | uniq -c

What this does is output the entire webserver access log and only show requests that have wp-login in. Then it removes all entries from Apr, and then it extracts only the IP addresses of those accessing it, and then sorts them uniquely but also -c counting them too, so we know exactly how many access requests have been made to this sensitive wp-logon.php file in just 1 month.
This will allow us to identify the clear attackers and block them.

wp-login

Lets start blocking their access

iptables -I INPUT -s 1.1.1.1 -j DROP

The above line instructs the firewall to block the source ip 1.1.1.1 and DROP all packets coming in on the interface. Simple enough!

What I could do is take the line further, and find out exactly which networks these attacks are coming from by piping the ip addresses to whois. Lets do this now and extract some data we need to start making automated abuse reports with our script;

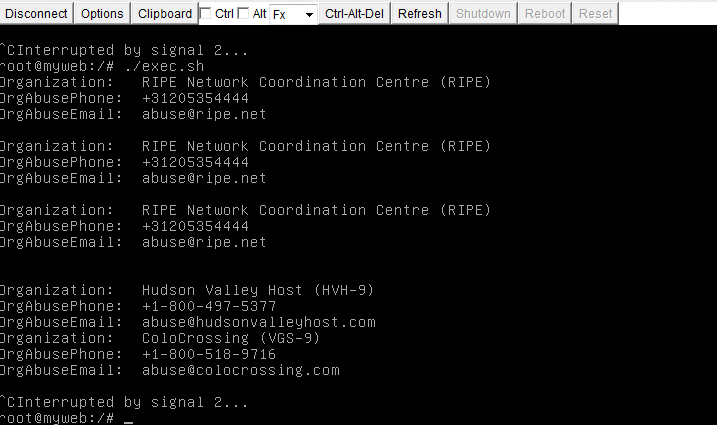
cat /somepath/www/access.log | grep wp-login | grep Apr | awk  '{print $1}' | sort | uniq | xargs -i echo "whois" {} | grep 'Organization\|AbuseEmail\|OrgAbusePhone'; echo;" > exec.sh;

 ./exec.sh

This is what the output looks like
ip-finder

Lets go one step further and refer to the {} output which has the initial IP argument. Then we’ll know which IP to email which abuse contact for when we pipe it to sendmail! ;D

cat /var/logs/access.log | grep wp-login | grep Apr | awk '{print $1}' | sort | uniq | xargs -i echo "echo {}" ";whois" {} "| grep 'OrgAbuseEmail';sleep 3;"

Output looks like

ip-abuse-email-output-automation

Sadly I run out of time with this.. but I will try and get the automatic abuse reporting finished soon 😀ip-abuse-email-output-automation

Creating Isolated Cloud Networks thru API in Rackspace Cloud

Hey! So, today I was playing around with Cloud Networking API and thought I would document the basic process of creating a network. It’s simple enough and follows the precise same logic as many of my other tutorials on cloud files, load balancers and etc.

#!/bin/bash

USERNAME='mycloudusername'
APIKEY='mycloudapikey'
ACCOUNT_NUMBER=10010101
API_ENDPOINT="https://lon.networks.api.rackspacecloud.com/v2.0/"

TOKEN=`curl https://identity.api.rackspacecloud.com/v2.0/tokens -X POST -d '{ "auth":{"RAX-KSKEY:apiKeyCredentials": { "username":"'$USERNAME'", "apiKey": "'$APIKEY'" }} }' -H "Content-type: application/json" |  python -mjson.tool | grep -A5 token | grep id | cut -d '"' -f4`

curl -s -v  \
-H "X-Auth-Token: $TOKEN"  \
-H "X-Project-Id: $ACCOUNT_NUMBER" \
-H "Accept: application/json"  \
-X POST -d @create-network.json "$API_ENDPOINT/networks" | python -mjson.tool

For the above code to create a new network you need to create the create-network.json markup file, it needs to look like and be in this format:

{
    "network":
    {
        "name": "Isolatednet",
        "shared": false,
        "tenant_id": "10010101"
    }
}

It’s important to note you need to define the tenant_id, thats your account number that appears in the URL when you login to mycloud control panel.

Output looks like

* Connection #0 to host lon.networks.api.rackspacecloud.com left intact
{
    "network": {
        "admin_state_up": true,
        "id": "ae36972f-5cba-4327-8bff-15d8b05dc3ee",
        "name": "Isolatednet",
        "shared": false,
        "status": "ACTIVE",
        "subnets": [],
        "tenant_id": "10045567"
    }
}

Installing Kali Linux on the Cloud

So, I want to install Kali Linux on the cloud, which… for me is good, but I highly recommend against doing this on any other cloud than your own private cloud.

katoolin

It’s actually pretty simple to get started with Kali, since it’s based on Debian and Ubuntu based distros (mainly debian from what I understand), it’s possible to install the repo’s on both Ubuntu and Debian. There’s even a really nice tool I found on techmint.com explaining the process. Here I am using wheezy 7. I’m pretty sure I could have used Debian, Jessie 8 though.

Step 1. Update repo and install git

# Update your repository
apt-get update
# Install git
apt-get install git

Step 2. Install katoolin from git

git clone https://github.com/LionSec/katoolin.git  && cp katoolin/katoolin.py /usr/bin/katoolin
# Make sure katoolin can be executed
chmod +x  /usr/bin/katoolin

# Start script to install kali
katoolin

What katoolin looks like

 $$\   $$\             $$\                         $$\ $$\           
 $$ | $$  |            $$ |                        $$ |\__|          
 $$ |$$  /  $$$$$$\  $$$$$$\    $$$$$$\   $$$$$$\  $$ |$$\ $$$$$$$\  
 $$$$$  /   \____$$\ \_$$  _|  $$  __$$\ $$  __$$\ $$ |$$ |$$  __$$\ 
 $$  $$<    $$$$$$$ |  Kali linux tools installer |$$ |$$ |$$ |  $$ |
 $$ |\$$\  $$  __$$ |  $$ |$$\ $$ |  $$ |$$ |  $$ |$$ |$$ |$$ |  $$ |
 $$ | \$$\ \$$$$$$$ |  \$$$$  |\$$$$$$  |\$$$$$$  |$$ |$$ |$$ |  $$ |
 \__|  \__| \_______|   \____/  \______/  \______/ \__|\__|\__|  \__| V1.0 


 + -- -- +=[ Author: LionSec | Homepage: www.lionsec.net
 + -- -- +=[ 330 Tools 


1) Add Kali repositories & Update 
2) View Categories
3) Install classicmenu indicator
4) Install Kali menu
5) Help

Press 1 to add kali repositories and update.
Then press 1 again. It just set the repositories.
Now press 2. It will update the repositories.

Just one more step!

Then type 'gohome' to return to the first menu.
Then press '2' to see selection of packages to install
Then press '0' to install all of them.

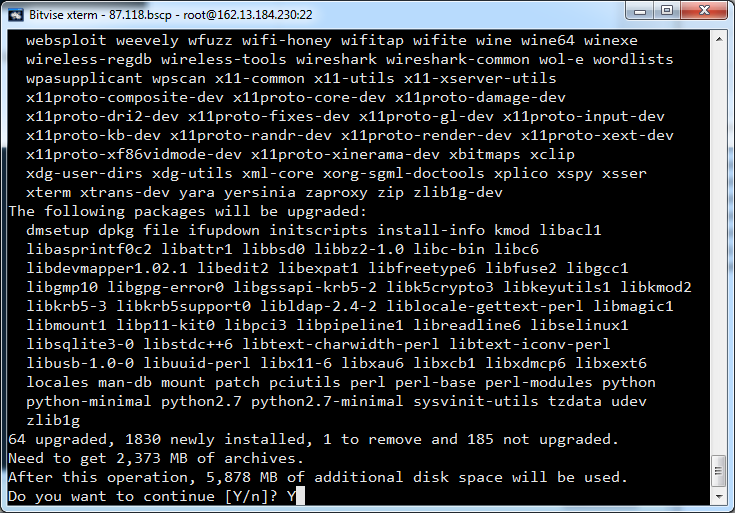
Installing goodies..

katoolin-upgrade

Adding mail ports to Linux firewall with iptables

So a customer had flushed his iptables rules, and sadly wasn’t able to use SMTP and POP. So I put together this basic tutorial explaining how to do it!


The following ports are used for mail commonly:

SMTP 	587
POP 	110
POPS 	995
IMAP 	143
IMAP3 	993

To add these ports to the firewall rules;

# Allows SMTP access

iptables -A INPUT -p tcp --dport 25 -j ACCEPT 

# Allows pop and pops connections 

iptables -A INPUT -p tcp --dport 110 -j ACCEPT
iptables -A INPUT -p tcp --dport 995 -j ACCEPT

# Allows imap and imaps connections 

iptables -A INPUT -p tcp --dport 143 -j ACCEPT
iptables -A INPUT -p tcp --dport 993 -j ACCEPT

Manually change Rackspace root password for Cloud Server

If you lose your password to your machine, and aren’t able to reset the password for your VM thru the mycloud control panel, then it’s possible to do this manually by putting the server into rescue mode and chrooting. Here is how ;

1. Put server into rescue mode. Noting the root password autogenerated for the rescue mode.

Screen Shot 2016-01-21 at 11.14.26 AM
2. Login to server via web console or ssh
3. Mount the ‘old’ original disk (usually partition xvdb1).

 mount /dev/xvdb1 /mnt

4. Chroot to the ‘old’ original disk

  
chroot /mnt

5. Change the root passwd

 passwd

7. Take the server out of rescue mode.
8. You should now be able to login to the server using the new root password. (done in the same way as putting it into rescue mode)

Testing your servers available bandwidth & DDOS resiliency with iperf

So, if you buy a server with say a 1.6Gbps connection in this customers case, you might want to test you have the bandwidth you need, for instance to be resilient against small DOS and DDOS in the sub 500mbit -1000mbit range.

Here is how I did it (quick summary)


$ iperf -c somedestipiwanttospeedtest-censored -p 80 -P 2 -b 100m
WARNING: option -b implies udp testing
------------------------------------------------------------
Client connecting to somedestipiwanttospeedtest-censored, UDP port 80
Sending 1470 byte datagrams
UDP buffer size:  208 KByte (default)
------------------------------------------------------------
[  4] local someipsrc port 53898 connected with somedestipiwanttospeedtest-censored port 80
[  3] local someipsrc port 50460 connected with somedestipiwanttospeedtest-censored port 80


[ ID] Interval       Transfer     Bandwidth
[  4]  0.0-10.0 sec   120 MBytes   101 Mbits/sec
[  4] Sent 85471 datagrams
[  3]  0.0-10.0 sec   120 MBytes   101 Mbits/sec
[  3] Sent 85471 datagrams
[SUM]  0.0-10.0 sec   240 MBytes   201 Mbits/sec
[  3] WARNING: did not receive ack of last datagram after 10 tries.
[  4] WARNING: did not receive ack of last datagram after 10 tries.


$ iperf -c somedestipiwanttospeedtest-censored -p 80 -P 10 -b 100m
WARNING: option -b implies udp testing
------------------------------------------------------------
Client connecting to somedestipiwanttospeedtest-censored, UDP port 80
Sending 1470 byte datagrams
UDP buffer size:  208 KByte (default)
------------------------------------------------------------
[ 12] local someipsrc port 50725 connected with somedestipiwanttospeedtest-censored port 80
[  5] local someipsrc port 40410 connected with somedestipiwanttospeedtest-censored port 80
[  6] local someipsrc port 51075 connected with somedestipiwanttospeedtest-censored port 80
[  4] local someipsrc port 58020 connected with somedestipiwanttospeedtest-censored port 80
[  3] local someipsrc port 50056 connected with somedestipiwanttospeedtest-censored port 80
[  7] local someipsrc port 57017 connected with somedestipiwanttospeedtest-censored port 80
[  8] local someipsrc port 49473 connected with somedestipiwanttospeedtest-censored port 80
[  9] local someipsrc port 50491 connected with somedestipiwanttospeedtest-censored port 80
[ 10] local someipsrc port 40974 connected with somedestipiwanttospeedtest-censored port 80
[ 11] local someipsrc port 38348 connected with somedestipiwanttospeedtest-censored port 80
[ ID] Interval       Transfer     Bandwidth
[ 12]  0.0-10.0 sec   114 MBytes  95.7 Mbits/sec
[ 12] Sent 81355 datagrams
[  5]  0.0-10.0 sec   114 MBytes  95.8 Mbits/sec
[  5] Sent 81448 datagrams
[  6]  0.0-10.0 sec   114 MBytes  95.8 Mbits/sec
[  6] Sent 81482 datagrams
[  4]  0.0-10.0 sec   114 MBytes  95.7 Mbits/sec
[  4] Sent 81349 datagrams
[  3]  0.0-10.0 sec   114 MBytes  95.7 Mbits/sec
[  3] Sent 81398 datagrams
[  7]  0.0-10.0 sec   114 MBytes  95.8 Mbits/sec
[  7] Sent 81443 datagrams
[  8]  0.0-10.0 sec   114 MBytes  95.7 Mbits/sec
[  8] Sent 81408 datagrams
[  9]  0.0-10.0 sec   114 MBytes  95.8 Mbits/sec
[  9] Sent 81421 datagrams
[ 10]  0.0-10.0 sec   114 MBytes  95.7 Mbits/sec
[ 10] Sent 81404 datagrams
[ 11]  0.0-10.0 sec   114 MBytes  95.8 Mbits/sec
[ 11] Sent 81427 datagrams
[SUM]  0.0-10.0 sec  1.11 GBytes   957 Mbits/sec


It looks like you are getting the bandwidth you desire, when repeating the test with 20 connections I can see the bandwidth hits a total of 2.01Gbits/sec

# iperf -c somedestipiwanttospeedtest-censored -p 80 -P 20 -b 100m
WARNING: option -b implies udp testing
------------------------------------------------------------
Client connecting to somedestipiwanttospeedtest-censored, UDP port 80
Sending 1470 byte datagrams
UDP buffer size:  208 KByte (default)
------------------------------------------------------------
[ 22] local someipsrc port 44231 connected with somedestipiwanttospeedtest-censored port 80
[  4] local someipsrc port 55259 connected with somedestipiwanttospeedtest-censored port 80
[  7] local someipsrc port 49519 connected with somedestipiwanttospeedtest-censored port 80
[  3] local someipsrc port 45301 connected with somedestipiwanttospeedtest-censored port 80
[  6] local someipsrc port 48654 connected with somedestipiwanttospeedtest-censored port 80
[  5] local someipsrc port 33666 connected with somedestipiwanttospeedtest-censored port 80
[  8] local someipsrc port 33963 connected with somedestipiwanttospeedtest-censored port 80
[  9] local someipsrc port 39593 connected with somedestipiwanttospeedtest-censored port 80
[ 10] local someipsrc port 36229 connected with somedestipiwanttospeedtest-censored port 80
[ 11] local someipsrc port 36331 connected with somedestipiwanttospeedtest-censored port 80
[ 14] local someipsrc port 54622 connected with somedestipiwanttospeedtest-censored port 80
[ 13] local someipsrc port 36159 connected with somedestipiwanttospeedtest-censored port 80
[ 12] local someipsrc port 53881 connected with somedestipiwanttospeedtest-censored port 80
[ 15] local someipsrc port 43221 connected with somedestipiwanttospeedtest-censored port 80
[ 16] local someipsrc port 60284 connected with somedestipiwanttospeedtest-censored port 80
[ 17] local someipsrc port 49735 connected with somedestipiwanttospeedtest-censored port 80
[ 18] local someipsrc port 43866 connected with somedestipiwanttospeedtest-censored port 80
[ 19] local someipsrc port 44631 connected with somedestipiwanttospeedtest-censored port 80
[ 20] local someipsrc port 56852 connected with somedestipiwanttospeedtest-censored port 80
[ 21] local someipsrc port 59338 connected with somedestipiwanttospeedtest-censored port 80
[ ID] Interval       Transfer     Bandwidth
[ 22]  0.0-10.0 sec   120 MBytes   101 Mbits/sec
[ 22] Sent 85471 datagrams
[  4]  0.0-10.0 sec   120 MBytes   101 Mbits/sec
[  4] Sent 85449 datagrams
[  7]  0.0-10.0 sec   120 MBytes   101 Mbits/sec
[  7] Sent 85448 datagrams
[  3]  0.0-10.0 sec   120 MBytes   101 Mbits/sec
[  3] Sent 85448 datagrams
[  6]  0.0-10.0 sec   120 MBytes   101 Mbits/sec
[  6] Sent 85449 datagrams
[  5]  0.0-10.0 sec   120 MBytes   101 Mbits/sec
[  5] Sent 85448 datagrams
[  8]  0.0-10.0 sec   120 MBytes   101 Mbits/sec
[  8] Sent 85453 datagrams
[  9]  0.0-10.0 sec   120 MBytes   101 Mbits/sec
[  9] Sent 85453 datagrams
[ 10]  0.0-10.0 sec   120 MBytes   101 Mbits/sec
[ 10] Sent 85454 datagrams
[ 11]  0.0-10.0 sec   120 MBytes   101 Mbits/sec
[ 11] Sent 85456 datagrams
[ 14]  0.0-10.0 sec   120 MBytes   101 Mbits/sec
[ 14] Sent 85457 datagrams
[ 13]  0.0-10.0 sec   120 MBytes   101 Mbits/sec
[ 13] Sent 85457 datagrams
[ 12]  0.0-10.0 sec   120 MBytes   101 Mbits/sec
[ 12] Sent 85457 datagrams
[ 15]  0.0-10.0 sec   120 MBytes   101 Mbits/sec
[ 15] Sent 85460 datagrams
[ 16]  0.0-10.0 sec   120 MBytes   101 Mbits/sec
[ 16] Sent 85461 datagrams
[ 17]  0.0-10.0 sec   120 MBytes   101 Mbits/sec
[ 17] Sent 85462 datagrams
[ 18]  0.0-10.0 sec   120 MBytes   101 Mbits/sec
[ 18] Sent 85464 datagrams
[ 19]  0.0-10.0 sec   120 MBytes   101 Mbits/sec
[ 19] Sent 85467 datagrams
[ 20]  0.0-10.0 sec   120 MBytes   101 Mbits/sec
[ 20] Sent 85467 datagrams
[ 21]  0.0-10.0 sec   120 MBytes   101 Mbits/sec
[ 21] Sent 85467 datagrams
[SUM]  0.0-10.0 sec  2.34 GBytes  2.01 Gbits/sec

The last test I did used 2 connections only at 500mbit each;

# iperf -c somedestipiwanttospeedtest-censored -p 80 -P 2 -b 500m
WARNING: option -b implies udp testing
------------------------------------------------------------
Client connecting to somedestipiwanttospeedtest-censored, UDP port 80
Sending 1470 byte datagrams
UDP buffer size:  208 KByte (default)
------------------------------------------------------------
[  4] local someipsrc port 60841 connected with somedestipiwanttospeedtest-censored port 80
[  3] local someipsrc port 51495 connected with somedestipiwanttospeedtest-censored port 80
[ ID] Interval       Transfer     Bandwidth
[  4]  0.0-10.0 sec   570 MBytes   479 Mbits/sec
[  4] Sent 406935 datagrams
[  3]  0.0-10.0 sec   570 MBytes   479 Mbits/sec
[  3] Sent 406933 datagrams
[SUM]  0.0-10.0 sec  1.11 GBytes   957 Mbits/sec

Securing your segmented Network, and interpretation of tcpdump on dual NIC segmented network

Howdy! So, here is a real life example of some basic networking security analysis.

Without giving too much away about the way my own home network works. I have a basic firewall-like setup segmenting my red internet routers network offering from the nic port handling my local network. This offers a level of separation or isolation, that prevents any-old-packet reaching the local network. By default I am allowing services to be routed out to internets only when it is requested first by an application running on boxes inside the local network. If any external client attempts to connect to my router on a particular port without it being SYN ACK, then it won’t be accepted.

Another good thing is it’s easy to find out what destination and source is because eth1 shows me primarily all internet bound and internet from traffic, and the eth0 adapter shows me primarily all local traffic on it’s way to be internet bound thru the firewall and then out the other NIC.

Today I saw some worrying traffic coming thru on eth1, something called teamview;

Here is what it looked like:

# tcpdump -i eth1 | grep teamview
tcpdump: verbose output suppressed, use -v or -vv for full protocol decode
listening on eth1, link-type EN10MB (Ethernet), capture size 65535 bytes
16:07:05.641711 IP firewall.home.50490 > server19703.teamviewer.com.https: Flags [P.], seq 2473010817:2473010841, ack 788873912, win 255, length 24
16:07:05.676803 IP server19703.teamviewer.com.https > firewall.home.50490: Flags [P.], seq 1:25, ack 24, win 251, length 24
16:07:05.891233 IP firewall.home.50490 > server19703.teamviewer.com.https: Flags [.], ack 25, win 255, length 0

As we can see the firewall just ‘dialed’ out to a remote server19703, and I am like ‘wtf’ is this? So I start to panic, then I run:

]# tcpdump -i eth0 | grep teamview
tcpdump: verbose output suppressed, use -v or -vv for full protocol decode
listening on eth0, link-type EN10MB (Ethernet), capture size 65535 bytes
16:07:05.641686 IP 192.168.0.120.50490 > server19703.teamviewer.com.https: Flags [P.], seq 2473010817:2473010841, ack 788873912, win 255, length 24
16:07:05.676846 IP server19703.teamviewer.com.https > 192.168.0.120.50490: Flags [P.], seq 1:25, ack 24, win 251, length 24
16:07:05.891204 IP 192.168.0.120.50490 > server19703.teamviewer.com.https: Flags [.], ack 25, win 255, length 0

This allows me to see, what the nature of the request was, just before the firewall started to route it out on the eth1 adapter. As such it shows me that the local network machine devices ip address on eth0, which is 192.168.0.120, or in other words, my parentals new computer, specifically the one I bought them for christmas from ebay.

What does this mean? It means I’ll be paying a visit to their box to make sure that this is disabled.

Fail2ban on CentOS 7 not working [and solution]

because configuration settings in fail2ban 0.9.0 having been completely re-factored, CentOS7 fail2ban hardening automation now is not safe by merely running an yum install fail2ban.

It will also apparently no longer work if you uncomment the sshd enabled jail in local.conf or jail.conf.

The newer re-factored configuration suggests to use a dedicated file for this to prevent being overwritten as I have now set in my /etc/fail2ban/jail.d/sshd.local

[sshd] enabled = true
port = ssh
#action = firewallcmd-ipset
logpath = %(sshd_log)s
maxretry = 5
bantime = 86400

Do note firewallcmd-ipset needs to be commented out or fail2ban will not start.

Once it has been configured like this, it is happy again. And worked straight away banning my home IP! Whilst before it was quite literally failing to ban :- )

Of course you might need to install it first:

yum install -y epel-release
yum install -y fail2ban fail2ban-systemd

You might also want to start fail2ban, and also set it to run on startup:

systemctl enable fail2ban
systemctl start fail2ban

If you run selinux, then you’ll need (running this command may have security implications)

yum update selinux-policy*

Using SNI with Rackspace Cloud Load Balancer and adding upto 20 SSL Certificates on single LB

This is going to be a short and dirty documentation on how to add multiple SSL certificates to a Rackspace Load Balancer.

1. Authorise with rackspace auth api (Get a token with user and api key credentials)
x-auth-key is apikey and x-auth-user is the mycloud username

curl -D - -H "x-auth-user: myusername" -H "x-auth-key: 1c989d8f89dfd87f3df3dff3d6f7fgf" https://auth.api.rackspacecloud.com/v1.0


HTTP/1.1 204 No Content
Server: nginx
Date: Thu, 19 Nov 2015 15:41:38 GMT
Connection: keep-alive
X-Storage-Token: AAA98345kdfg893DFGDF43iudng39dfgjkdfgDFI$JUIDFJGDFJGDFGDJJHDFGJHIfdg34dfgkdfjgiodfgiodfDFGDdg323
X-Storage-Url: https://storage101.lon3.clouddrive.com/v1/MossoCloudFS_1001001
X-NewRelic-App-Data: PxQGUF9aDwETVlhSBQUP
X-CDN-Management-Url: https://cdn3.clouddrive.com/v1/MossoCloudFS_1001001
X-Auth-Token: AAA98345kdfg893DFGDF43iudng39dfgjkdfgDFI$JUIDFJGDFJGDFGDJJHDFGJHIfdg34dfgkdfjgiodfgiodfDFGDdg323
vary: Accept, Accept-Encoding, X-Auth-Token, X-Auth-Key, X-Storage-User, X-Storage-Pass, X-Auth-User
Cache-Control: s-maxage=86319
Front-End-Https: on

Now you can copy and paste the X-Auth-Token. It is needed for the next step

2. Configure the JSON file to upload an additional certificate and private key via API for a domain hostname. Here I am configuring domain.com

file: lb.json

{
  "certificateMapping": {
     "hostName": "domain.com",
     "certificate": "-----BEGIN CERTIFICATE-----\nMIIC/TCCAeWgAwIBAgIJAOjRMYJKDeryMA0GCSqGSIb3DQEBBQUAMBUxEzARBgNV\nBAMMCmRvbWFpbi5jb20wHhcNMTUxMTE5MTQzMjE3WhcNMjUxMTE2MTQzMjE3WjAV\nMRMwEQYDVQQDDApkb21haW4uY29tMIIBIjANBgkqhkiG9w0BAQEFAAOCAQ8AMIIB\nCgKCAQEAvHTjzWQchX+Gyl/No+ABR9R+F65rJmEPBEutjgWUynOir7ZYu5vmFol8\nhF054W5Xv3Ii4oYJjDJingOqQUBBxJD4jXx8H79y04JGXl8BBrG7azbRbowc4HoP\nRUiVTNaCPgYAGTreiRXmYKb/beotlGDvl0HQQLeDh4iq1X1E8R/lkFRHVAu0rEgC\nIeuJZ2L3Qu06A5yTCwdTJnZmviLmuDQtkfLDqTA8N67U8zjBgKGsj9t7GDSQ7zGp\n6JbTSJXqsXvd7XMLm2Ns2UelVUToxBTwgOIBn0XzZLCIOIlbIn0LHBk8oYEA4JDF\n1mXeqdsFOCtYvFcQBoUihiDjwDdTNQIDAQABo1AwTjAdBgNVHQ4EFgQU1wBZxNte\n9Q//UOl7ZMUvtsXghPEwHwYDVR0jBBgwFoAU1wBZxNte9Q//UOl7ZMUvtsXghPEw\nDAYDVR0TBAUwAwEB/zANBgkqhkiG9w0BAQUFAAOCAQEAUNM56u/cc56ESZY4gubX\nh0UQ8TjVbV2G4EkbBkNnm7RgNK48lFIxc55tshawhdN01JH5ZIgB1RvO1/lqouVs\nJrXwnPULBb4M5FcrjjBVu3bIvOjAUVDogOm7pKP/hJALM9CWMuZcXr5C+sYFczaB\nA7uDuMuQoTZBIGF1NyzfO7vmHT5QbEA/1ZYISWrVFNt8g2oxJY+jdgKacxVujWIs\nFpuiCCdvFVI05wCjj3C8BIN/EAcRIqe5gwr5oI+AtwK7fjK5K47/sREMI+W6Bj1w\nZEDz92S+dNtoSPJTBWiIQFLslTPiaDAu1EjJO1+YRXG7LANdxpQrogvDG1l9VpDW\nRg==\n-----END CERTIFICATE-----",
  "privateKey": "-----BEGIN RSA PRIVATE KEY-----\nMIIEpQIBAAKCAQEAvHTjzWQchX+Gyl/No+ABR9R+F65rJmEPBEutjgWUynOir7ZY\nu5vmFol8hF054W5Xv3Ii4oYJjDJingOqQUBBxJD4jXx8H79y04JGXl8BBrG7azbR\nbowc4HoPRUiVTNaCPgYAGTreiRXmYKb/beotlGDvl0HQQLeDh4iq1X1E8R/lkFRH\nVAu0rEgCIeuJZ2L3Qu06A5yTCwdTJnZmviLmuDQtkfLDqTA8N67U8zjBgKGsj9t7\nGDSQ7zGp6JbTSJXqsXvd7XMLm2Ns2UelVUToxBTwgOIBn0XzZLCIOIlbIn0LHBk8\noYEA4JDF1mXeqdsFOCtYvFcQBoUihiDjwDdTNQIDAQABAoIBAQCSEJr7d0tv4P6s\n3gI5sIXtkXHFkwczcOi9sJYszICdRXDjdZZimpuD/j3HLaaN5gMWvDTzk2XVBrxO\nspKEDnSrEJ3Es6ZUyQMLkh5OSJ43/QtBNvSuFOTQy2oIjhBBxMSfo/DxnSIb6CBt\n6yFwpJ99MICioHzznAjSxId7/qKvq294emBGwpyP6JbCEtrM6rsnBO4J/uHUDLRj\nlU0zLFwFHNQnhnfIuxOoUZthyCSzZgUquC7C52qIPTZxqCydSi045pDoymn6pT43\n5YdafzWarmEqBGcyqDOyjOz01IEicrmFW7e2+DICIOTOvTSeFQtHbO4Rn2VE2V+x\nGNJY3DoFAoGBAORqB6gFlLUKBXdmP1VcEifjwcVtBaY9QwehbH8En6O0N1t5bKFx\nTBaShm2El+7UCeeSz9hx3vmV/4gn9amJnu6stOEUfjbfxe6mw8OtR13g5iSAI9TQ\nXesf1HoCrUsljzAPvBAKxWSQl9e6fYBxmB1IvFvd4n9uvoNWr/lOfbe3AoGBANM3\neddZYHBB0PhgiJ9aq7QkgqUSdv5JlBdtGdPDr3cpIx9QmXMtf+wc8vZ6CSvC3EIn\npADRt3QAIzxQLpXb3ADjBCwwsFCu27IXlVkvxD+yvqaLbAjB/LgbKqt5wR6YAarj\nDQzNzxhGvrCS+CvYSKospY6UK5+V0nuhuPVcuJRzAoGAAPHLTE+RmNoMwbyjgGfc\nD1wqvfVAc7qHH230c+YB/vxMyk0LPPOp++HpOmS0+CDaVaHOyDdYU7HiF58KrgPK\nq3P9X3zlNLbiK6V248VAqUu3x+jbvRKLgOBl0YdXThs+p1U5Utuoi0zpw9Oal0Bg\n/6YAWWTmfd5oXUSrf51qeasCgYEAgMahBZgbgTXPh6+rfKTWbQWZlbU1UYJgxQui\npIb5cwhkvpHwjNWf2cAorffnoYOzsK3kgw9Z72KqGPq1/G5Iq0293Idu6DJEBkf0\nqaTC3SdIr9fvbUOApmsBz/xyrwl0ctDtwvG0IxP27UceAfVjEEYaRly2YB0DcJdA\nYnA+pVsCgYEAoHfkw/ZPmB7r8LesF0+N93AErJ/IiPoCBFNKijVDplzLQbMeWyxL\njcnFdq8vQT0Os4qzRNCR5QbMcprJIh4LC96OIlGWz5NhKCWbGsKxA8N7YoWGYy9Z\nmRkVP6peBU2cGdXRWjCrxkKR+uJM9BCG0Ix3BOPy29nWaCEl+5wjBEc=\n-----END RSA PRIVATE KEY-----"
  }

3. Call API to add certificatemapping json lb hostname configuration file. This just allows example.com to have SSL on the Load Balancer.
(you can add up to 20 Domains). It’s lots cheaper and not as hard as I might have initially thought!!

curl -v -H "X-Auth-Token: $TOKEN" -d @lb.json -X POST -H "content-type: application/json"  https://lon.loadbalancers.api.rackspacecloud.com/v1.0/1001001/loadbalancers/157089/ssltermination/certificatemappings

It’s also possible to update the Load Balancer Certificates via the API, please see https://developer.rackspace.com/docs/cloud-load-balancers/v1/developer-guide/#update-certificate-mapping for more information

4. Confirm the certificate mappings are added (please note 1001011 is the customer DDI and 157090 is the Load Balancer ID).

curl -v -H "X-Auth-Token: $TOKEN" -X GET https://lon.loadbalancers.api.rackspacecloud.com/v1.0/1001011/loadbalancers/157090/ssltermination/certificatemappings


< HTTP/1.1 200 OK
< Content-Type: application/json
< Via: 1.1 Rackspace Cloud Load Balancer API v1.25.11 (Repose/2.11.0)
< Content-Length: 83
< Date: Thu, 19 Nov 2015 15:49:24 GMT
* Server Jetty(8.0.y.z-SNAPSHOT) is not blacklisted
< Server: Jetty(8.0.y.z-SNAPSHOT)
<
* Connection #0 to host lon.loadbalancers.api.rackspacecloud.com left intact
{"certificateMappings":[{"certificateMapping":{"id":999,"hostName":"domain.com"}}]}

You may note that the lb.json file has the certificate all on one line! how to do this? It's not that hard. Here is how I did it:

cat domain.com.cert | sed ':a;N;$!ba;s/\n/\\n/g'
cat domain.com.key  | sed ':a;N;$!ba;s/\n/\\n/g'
-----BEGIN RSA PRIVATE KEY-----\nMIIEpQIBAAKCAQEAvHTjzWQchX+Gyl/No+ABR9R+F65rJmEPBEutjgWUynOir7ZY\nu5vmFol8hF054W5Xv3Ii4oYJjDJingOqQUBBxJD4jXx8H79y04JGXl8BBrG7azbR\nbowc4HoPRUiVTNaCPgYAGTreiRXmYKb/beotlGDvl0HQQLeDh4iq1X1E8R/lkFRH\nVAu0rEgCIeuJZ2L3Qu06A5yTCwdTJnZmviLmuDQtkfLDqTA8N67U8zjBgKGsj9t7\nGDSQ7zGp6JbTSJXqsXvd7XMLm2Ns2UelVUToxBTwgOIBn0XzZLCIOIlbIn0LHBk8\noYEA4JDF1mXeqdsFOCtYvFcQBoUihiDjwDdTNQIDAQABAoIBAQCSEJr7d0tv4P6s\n3gI5sIXtkXHFkwczcOi9sJYszICdRXDjdZZimpuD/j3HLaaN5gMWvDTzk2XVBrxO\nspKEDnSrEJ3Es6ZUyQMLkh5OSJ43/QtBNvSuFOTQy2oIjhBBxMSfo/DxnSIb6CBt\n6yFwpJ99MICioHzznAjSxId7/qKvq294emBGwpyP6JbCEtrM6rsnBO4J/uHUDLRj\nlU0zLFwFHNQnhnfIuxOoUZthyCSzZgUquC7C52qIPTZxqCydSi045pDoymn6pT43\n5YdafzWarmEqBGcyqDOyjOz01IEicrmFW7e2+DICIOTOvTSeFQtHbO4Rn2VE2V+x\nGNJY3DoFAoGBAORqB6gFlLUKBXdmP1VcEifjwcVtBaY9QwehbH8En6O0N1t5bKFx\nTBaShm2El+7UCeeSz9hx3vmV/4gn9amJnu6stOEUfjbfxe6mw8OtR13g5iSAI9TQ\nXesf1HoCrUsljzAPvBAKxWSQl9e6fYBxmB1IvFvd4n9uvoNWr/lOfbe3AoGBANM3\neddZYHBB0PhgiJ9aq7QkgqUSdv5JlBdtGdPDr3cpIx9QmXMtf+wc8vZ6CSvC3EIn\npADRt3QAIzxQLpXb3ADjBCwwsFCu27IXlVkvxD+yvqaLbAjB/LgbKqt5wR6YAarj\nDQzNzxhGvrCS+CvYSKospY6UK5+V0nuhuPVcuJRzAoGAAPHLTE+RmNoMwbyjgGfc\nD1wqvfVAc7qHH230c+YB/vxMyk0LPPOp++HpOmS0+CDaVaHOyDdYU7HiF58KrgPK\nq3P9X3zlNLbiK6V248VAqUu3x+jbvRKLgOBl0YdXThs+p1U5Utuoi0zpw9Oal0Bg\n/6YAWWTmfd5oXUSrf51qeasCgYEAgMahBZgbgTXPh6+rfKTWbQWZlbU1UYJgxQui\npIb5cwhkvpHwjNWf2cAorffnoYOzsK3kgw9Z72KqGPq1/G5Iq0293Idu6DJEBkf0\nqaTC3SdIr9fvbUOApmsBz/xyrwl0ctDtwvG0IxP27UceAfVjEEYaRly2YB0DcJdA\nYnA+pVsCgYEAoHfkw/ZPmB7r8LesF0+N93AErJ/IiPoCBFNKijVDplzLQbMeWyxL\njcnFdq8vQT0Os4qzRNCR5QbMcprJIh4LC96OIlGWz5NhKCWbGsKxA8N7YoWGYy9Z\nmRkVP6peBU2cGdXRWjCrxkKR+uJM9BCG0Ix3BOPy29nWaCEl+5wjBEc=\n-----END RSA PRIVATE KEY-----

Notice the extra \n's after the processing.

Don't be intimidated by the sed line, it just replaces the \n newline with the character \n instead, so the json file is easier to lay out the cert as a 'string'.

Important notes on SNI:

We know we can add certificate mappings on the Load Balancer.
the Load Balancer has been configured for Allowing secure and insecure traffic, Port 443. SSL is terminated at the load balancer. This is what is known as OFFLOADING, it just means the SSL encryption is seen at the load balancer. Behind the load balancer, there is no encryption between it and the server. This allows the SNI hostname to be forwarded to the server, without it being in an encrypted form within the TCP packet.

5. Now lets install apache2 and configure some virtualhosts, at the most basic level. This is for an example and not a perfect setup

apt-get update
apt-get install httpd
vi /etc/apache2/httpd.conf


ServerName example.com
Documentroot /var/www/example.com/html


ServerName domain.com
Documentroot /var/www/domain.com/html


mkdir -p /var/www/domain.com/html
mkdir -p /var/www/example.com/html
echo 'example.com page body testing' > /var/www/example.com/html/index.html
echo 'domain.com page body testing' > /var/www/domain.com/html/index.html
vi /etc/apache2/apache2.conf

add one line in the file like:

Include /etc/apache2/httpd.conf

I just like to configure apache2 this way.

/etc/init.d/apache2 restart

6. Confirm both websites are working thru LB with SNI

# Curl domain
$ curl domain.com
domain.com page body testing

# curl domain 2
$ curl example.com
example.com page body testing

# curl IP address
curl https://194.213.79.117
someotherdefaultpage

# what happened when curling the IP address? Well..There was no TCP servername/hostname forwarded in the header for SNI support to detect the domain x-forwarded-for

# Lets provide the header
curl https://194.213.79.117 -H "host: example.com"

Testing SSL on the hostnames

openssl s_client -connect domain.com:443
openssl s_client -connect domain.com:443 -host domain.com
openssl s_client -connect domain.com:443 -servername domain.com