Finding Stuff quick and dirty way

Hey. So my good friend who is a support engineer was asking me how he could find mail log that wasn’t in the traditional location and he was scratching his head.
So I put this together (which by the way is really bad), but not in a harmful way, it could just be more elegant. But since he is still learning , this seemed like a good time to introduce him to xargs.

find / | grep mail | grep log | xargs -i ls -al {}

Nice and simple though and pretty much straight to the point, if the grep pipes are forgiven. (and wouldn’t blame you if they were not 🙂 )

Building 50 Cloud Servers BASH/API Automation

So, I had a good friend of mine who is a cloud Mentor at Rackspace, reach out to me concerning an easier way of deploying cloud-images, without each time a cloud server is spun up, having to unroll the image into a CBS. His customer wanted to simply have a ‘primary master’ CBS volume, a template of their site if you will, the equivalent of a ‘golden image’, the only difference was it was a CBS Volume. So I set about making this work. It would still take a few hours, at least to provision 50 to 200 servers, but it was much faster than the alternatives. Here is how I did it. I actually have some ideas for how to improve this but I’ve not yet implemented it. That goody is to come in later scripts.

#!/bin/bash

USERNAME='mycloudusername'
APIKEY='mycloudapikey'
ACCOUNT_NUMBER=100101011
API_ENDPOINT="https://lon.blockstorage.api.rackspacecloud.com/v1/$ACCOUNT_NUMBER/volumes"
MASTER_CBS_VOL_ID="d8a67ad1-8037-46bc-8790-efca2cb6e5bd"


TOKEN=`curl https://identity.api.rackspacecloud.com/v2.0/tokens -X POST -d '{ "auth":{"RAX-KSKEY:apiKeyCredentials": { "username":"'$USERNAME'", "apiKey": "'$APIKEY'" }} }' -H "Content-type: application/json" |  python -mjson.tool | grep -A5 token | grep id | cut -d '"' -f4`


# Populate CBS
for i in `seq 1 2`;
do

echo "Generating CBS Clone #$i"
#curl -s -vvvv  \
-X POST "$API_ENDPOINT" \
-H "X-Auth-Token: $TOKEN"  \
-H "X-Project-Id: $ACCOUNT_NUMBER" \
-H "Accept: application/json"  \
-H "Content-Type: application/json" -d '{"volume": {"source_volid": "d8a67ad1-8037-46bc-8790-efca2cb6e5bd", "size": 50, "display_name": "win-'$i'", "volume_type": "SSD"}}'  | jq .volume.id | tr -d '"' >> cbs.created

done

echo "Giving CBS 2 hour grace time for 50 CBS clone"
#sleep 7200

echo "Listing all CBS Volume ID's created"
cat cbs.created
echo ""


# Populate Nova
count=1;
echo "Populating Nova servers with CBS disk"
while read n; do
Echo "Build Task $n Started:"
nova --insecure --os-username mycloudusername --os-auth-system=rackspace  --os-tenant-name 100110111 --os-auth-url https://lon.identity.api.rackspacecloud.com/v2.0/ --os-password myapikeygoeshere boot --flavor general1-1 --block-device-mapping vda="$n":::1 Auto-win-"$count"
((count=count+1))

done < cbs.created

# Move the cbs.created.old away
mv cbs.created cbs.created.old -f

Requirements are nova and jq.
https://stedolan.github.io/jq/
https://developer.rackspace.com/blog/getting-started-using-python-novaclient-to-manage-cloud-servers/

Checking for Network packet Retransmission , troubleshooting network card & switches

So, you might want to test whether the NIC of your box is ‘bad’, one way to do this is looking at the retransmissions.

netstat -s | grep retransmits
   3535665 fast retransmits
   3920918 forward retransmits
   122319 retransmits in slow start
   3652 sack retransmits failed
netstat -s | grep transmit
    10512472 segments retransmited
    733 times recovered from packet loss due to fast retransmit
    Detected reordering 73 times using reno fast retransmit
    TCPLostRetransmit: 196
    400 timeouts after reno fast retransmit
    3535665 fast retransmits
    3920918 forward retransmits
    122319 retransmits in slow start
    13652 sack retransmits failed

This isn’t much use though, because you need to see how many total packets come in:

netstat -s | grep total
    23799703342 total packets received

It’s possible to get the full details with netstat -s , naturally.

Checking Forward and Reverse Connectivity of a Linux Server

A good friend of mine is to thank for this excellent pair of one liners. One is to be executed on source, and the other on destination target.

Testing forward route


# Machine Source
root@iup2-web01:/mnt/www# dd if=/dev/zero bs=1024K count=1024 | nc -v 10.181.164.100 23
Connection to 10.181.164.100 23 port [tcp/telnet] succeeded!
1024+0 records in
1024+0 records out
1073741824 bytes (1.1 GB) copied, 11.0009 s, 97.6 MB/s
---

# Machine Destination
root@iup2-nfs:~# nc -v -l 23 > /dev/null
Listening on [0.0.0.0] (family 0, port 23)
Connection from [10.181.162.15] port 23 [tcp/telnet] accepted (family 2, sport 54373)

However when we try this in reverse, we see a major degradation in the network speed. Here is test with 20MB transfer instead of 1000MB:

Testing Reverse Route

---

# Machine Source
root@iup2-nfs:~# dd if=/dev/zero bs=1024K count=20 | nc -v 10.181.162.15 23
Connection to 10.181.162.15 23 port [tcp/telnet] succeeded!
20+0 records in
20+0 records out
20971520 bytes (21 MB) copied, 144.327 s, 145 kB/s
---
# Machine Destination
root@iup2-web01:/mnt/www#  nc -v -l 23 > /dev/null 
Listening on [0.0.0.0] (family 0, port 23)
Connection from [10.181.164.100] port 23 [tcp/telnet] accepted (family 2, sport 56072)

As we can see one of the machines has some difficulty. The issue at hand was that there was some problems with the virtual switch daemon on the hypervisor. Thanks to my friend Gospodin for documenting this one and sharing with me how he tested it,

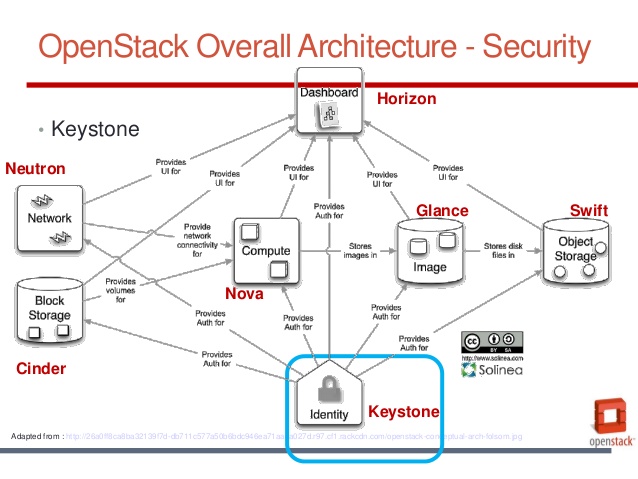
Deploying your own cloud API using Keystone Openstack

Just a quick one. There are a lot of things that aren’t complete, but this is mostly for my reference and to make writing an Ansible playbook massively easier of course!

For the full guide you will want the link at the bottom of the page.

Outlay

openstack-101-update-25-638

Operation

SCH_5002_V00_NUAC-Keystone

Deployment

# EPEL Not Needed for CENTOS 7 on RS Cloud, included for detail
yum install http://dl.fedoraproject.org/pub/epel/7/x86_64/e/epel-release-7-5.noarch.rpm -y

# Install Openstack Liberty repo
yum install centos-release-openstack-liberty

# Upgrade dist packages
yum upgrade -y

# Install openstack client
yum install python-openstackclient -y

# Update selinux policies for Openstack
yum install openstack-selinux -y

# Configure SQL
yum install mariadb mariadb-server MySQL-python -y

# Configure and enable mariadb bind and utf8 settings etc
vi /etc/my.cnf.d/mariadb_openstack.cnf

systemctl enable mariadb.service
systemctl start mariadb.service

# Prepare database privileges ____________TODO_______
# mysql_secure_installation _____TODO______


# Prepare mongodb nosqli set controller address, set start and enabled

yum install mongodb-server mongodb -y
vi /etc/mongod.conf


systemctl enable mongod.service
systemctl start mongod.servicei

# Queuing Install , enable start rabbitmq, add user and set permissions for openstack user
yum install rabbitmq-server -y
systemctl enable rabbitmq-server.service
systemctl start rabbitmq-server.service
rabbitmqctl add_user openstack somepasswordhere
rabbitmqctl set_permissions openstack ".*" ".*" ".*"

# Generate admin_token
openssl rand -hex 15

# Install openstack keystone, httpd and memcached, set to start, enable
yum install openstack-keystone httpd mod_wsgi memcached python-memcached -y
systemctl enable memcached.service
systemctl start memcached.service

# Complete Keystone [Default], [database] connection, [memcache] servers, [token] provider and driver = memcache [revoke] driver = sql [default] verbose = True
vi /etc/keystone/keystone.conf

# Populate the keystone database
su -s /bin/sh -c "keystone-manage db_sync" keystone

# (re)configure httpd
vi /etc/httpd/conf.d/wsgi-keystone.conf
systemctl enable httpd.service
systemctl start httpd.service

# Update environment variable exports for OS_TOKEN=admintoken, OS_URL=http://snetip:35357/v3 OS_IDENTITY_API_VERSION=3 and source it

vi .bash_profile
source .bash_profile

# Create Service entity and API endpoints
openstack service create   --name keystone --description "OpenStack Identity" identity


# API Endpoints
openstack endpoint create --region RegionOne identity public http://10.179.1.188:5000/v2.0
openstack endpoint create --region RegionOne identity internal http://10.179.1.188:5000/v2.0
openstack endpoint create --region RegionOne identity admin http://10.179.1.188:35357/v2.0

# Create project; admin
openstack project create --domain default   --description "Admin Project" admin

# Create admin user for project
openstack user create --domain default   --password-prompt admin


# Create admin's role
openstack role create adminn

# Add admin role to admin project & it's admin user
openstack role add --project admin --user admin admin

# Create Service Project

openstack project create --domain default   --description "Service Project" service

# Create demo project
openstack project create --domain default   --description "Demo Project" demo

# Create the demo user
openstack user create --domain default   --password-prompt demo

# and user role for demo user
openstack role create user

# Add the user role to the demo project and user
openstack role add --project demo --user demo user

# SKIPPED remove keystone-dist-paste.ini

# Unset the OS_TOKEN and OS_URL environment variables
unset OS_TOKEN OS_URL

# Request token for admin user
openstack --os-auth-url http://10.179.1.188:35357/v3  --os-project-domain-id default --os-user-domain-id default   --os-project-name demo --os-username demo --os-auth-type password   token issue

# Verify operation toadd check verification status function
touch demo-openrc.sh
touch admin-openrc.sh
cat /etc/keystone/keystone.conf | grep admin_token

# Test admin api credentials
source admin-openrc.sh
opentack token issue

# Test demo api credentials
source demo-openrc.sh
openstack token issue
http://docs.openstack.org/liberty/install-guide-rdo/environment.html

Track Traffic on Linux Server

Another question we had today was about tracking traffic on a Linux Server, i.e. daily, hourly, weekly and monthly statistics on bandwidth usage. This helps us keep the machine secure, and notice any untoward or extremely high traffic; another easy install:

apt-get install vnstat
# or
yum install vnstat
 

vnstat -u -i eth0

Setting up Linux QOS with Wondershaper software

So, a customer wanted to restrict the amount of bandwidth used by his cloud server, with a kind of self-QOS like service.

To do this is actually quite simple, wondershaper is the magic wand for you.

# Install
apt-get install wondershaper 
# or
yum install wondershaper

#Configure for interface
sudo wondershaper eth1 256 128  

(Values are in kbit, so be sure to remember!)

If this isn’t suitable for you and you want something to restrict user space, like applications, then use trickle.

$ trickle -u {up} -d {down} {program}  

i.e. for restricting firefox to 8Kb/s up and down use:

    $ trickle -u 8 -d 8 firefox  

by popular request: Retropie HOWTO

After many people popularly requesting to me to document how I configured my Raspberry Pi 2 with retropie to play Arcade Games. Many different consoles are supported. It really is quite extensive. From what I understand, the Operating System is ‘retroarch’ with some modifications, and emulation station, a kind of ‘suite’ of Console and Arcade Emulators of various different kinds.


    3do (lr-4do) (EXPERIMENTAL)
    Amiga (UAE4ALL2), (UAE4ARM)
    Amstrad CPC (CPC4Rpi), (lr-cap32)
    Apple II (Linapple)
    Atari 2600 (Stella), (lr-stella)
    Atari 5200, and Atari 8 bit series: 400, 800, 1200XL, 600XL, 800XL, 130XE, XEGS (Atari800)
    Atari 7800 (lr-prosystem)
    Atari Jaguar (lr-virtualjaguar) (EXPERIMENTAL)
    Atari Lynx (lr-handy)
    Atari ST/STE/TT/Falcon (Hatari)
    CoCo (XRoar)
    Commodore 64 (Vice)
    Dragon 32 (XRoar)
    Dreamcast (Reicast) (EXPERIMENTAL!)
    FinalBurn Alpha (PiFBA), (lr-fba), (lr-fba-next)
    Genesis/Megadrive (DGEN), (lr-Genesis-Plus-GX), (lr-picodrive)
    Game Gear (Osmose), (lr-Genesis-Plus-GX)
    Game Boy (lr-gambatte)
    Game Boy Color (lr-gambatte)
    Game Boy Advance (gpSP), (lr-gpSP), (lr-vba-next), (lr-mgba)
    Intellivision (jzIntv)
    Macintosh (BasiliskII)
    MAME (AdvanceMAME), (MAME4ALL-Pi), (lr-imame4all), (lr-mame2003), (lr-mame2010)
    MasterSystem (lr-Genesis-Plus-GX), (lr-picodrive), (Osmose)
    MSX (lr-fmsx), (lr-bluemsx)
    Neo Geo (GnGeo-Pi), (PiFBA), (lr-fba), (lr-fba-next)
    Neo Geo Pocket (Color) (lr-mednafen-ngp)
    Nintendo 64 (Mupen64plus), (lr-mupen64plus)
    Nintendo DS (lr-desmume) (EXPERIMENTAL)
    Nintendo Entertainment System (lr-fceumm), (lr-nestopia)
    PC (DOSBox), (rpix86)
    PC Engine/TurboGrafx-16 (lr-mednafen-pce-fast)
    Ports
        Cave Story (lr-nxengine)
        Descent 1 & 2 (DXX-Rebirth) (EXPERIMENTAL)
        DOOM (lr-prboom), (ZDOOM)
        Duke Nukem 3D (EDuke32)
        KODI (EXPERIMENTAL)
        Minecraft Pi Edition (EXPERIMENTAL)
        OpenTTD (openttd) (EXPERIMENTAL)
        OpenTyrian (EXPERIMENTAL)
        Quake Series (lr-tyrquake), (ioQuake3)
        Super Mario War
        SuperTux
        Wolfenstein 3D
    PlayStation 1 (lr-pcsx-rearmed), (pcsx-rearmed)
    PSP (lr-ppsspp), (ppsspp) (EXPERIMENTAL)
    ScummVM
    Sega 32X (lr-picodrive)
    Sega CD (lr-picodrive)
    Sega Saturn (lr-yabause) (EXPERIMENTAL!)
    Sega SG-1000 (lr-Genesis-Plus-GX)
    Super Nintendo Entertainment System (PiSNES), (snes9x-rpi), (lr-armsnes), (lr-catsfc), (lr-pocketsnes), (lr-snes9x-next)
    Vectrex (lr-vecx)
    Videopac or Odyssey2 (lr-o2em)
    Virtual Boy (lr-beetle-vb) (EXPERIMENTAL)
    WonderSwan (Color) (lr-mednafen-wswan)
    Zmachine (Frotz)
    ZX Spectrum (FBZX), (Fuse), (lr-fuse)

Now down to business, actually getting this up and running. Pre-requisites are Rasperry Pi 2 and some power, and a controller or keyboard, that is about it. Oh of course, you need a super microsd card!

Step 1. Download the Retropie Images to your hard disk.

RPI 3.2.1:
http://downloads.petrockblock.com/images/retropie-v3.2.1-rpi2.img.gz
Screen Shot 2015-12-11 at 5.00.40 PM

Step 2. Download Win32Disk Imager (this is used to put the image you downloaded above onto the microsd)

http://sourceforge.net/projects/win32diskimager/

Screen Shot 2015-12-11 at 5.01.22 PM

Step 3. Open up win32disk imager

It's easy. Make it look a bit like the image below and follow these steps:

Find the retropie-v3.2.1.-rpi2.img.gz file and unzip with winrar, or winzip, or something like 7zip, pkzip, or any uncompressing app should do.
Select that as the 'source image'.
Select the destination (whichever device which is the sdcard in your sdcard reader) , usually something like D:\ , E:\ or F:\, for me it's H:\.

Screen Shot 2015-12-11 at 5.03.07 PM

Step 4. Take that fresh microsd card and pop it into the rasperry pi 2. Connect USB power and keyboard, preferably.

Screen Shot 2015-12-11 at 5.05.25 PM

mmm. Tastes good. Like Raspberries. This is pretty much it. Very easy. But what about the ROMS?! arghh??? Yeah, true. The next two steps for that, but first, it makes sense to expand the filesystem. It basically lets you use the full space on the SDCARD, try not to think about it. It’s important , though.

You can press F4 on the keyboard at any time to drop to command prompt and you can type raspi-config yourself to expand the filesystem. But here is to do it from the ‘retropie’ menu selection in emulation station, the GUI that automatically starts with Retropie.

2beba548-3cf0-11e5-8254-d8329b0f35b8

3be5a282-3cf0-11e5-9f48-58d23552bcda

856bb85a-3cf1-11e5-8697-04f60ecf8563

ad8879c2-3cf1-11e5-8d77-7c81af7dba16

Step 5. Get a generic USB stick, 16GB or 32GB would be ideal, especially if you have a lot of ROMS. Preferably one with an LED on it which shows when it is read/writing. This is handy and you’ll see why later.

Plop the USB stick in your computer, format with FAT32 by right clicking device in windows and selecting ‘FORMAT’.
Create a folder in the highest directory for the USB stick, call the new folder ‘retropie’,
H:\retropie

Plop the USB stick into the retropie, and be patient, wait for the USB stick to flash, and then stop flashing if you have one that flickers LED when its being read/written to

Once the LED on USB stick stops flickering, remove it from the Rasperry pi2, and put it back into your computer. Copy the roms into the relevant folders, i.e. for n64, the n64 folder, for nintendo entertainment system the ‘nes’ folder, for megacd the ‘segacd’ folder, and for genesis the genesis/megadrive folder. You get the idea, it’s really simple. Once you’ve finished copying them to USB stick, take the USB stick out of your pc again.

Place the USB stick in the retropie, it has a service that checks for any changes on the USB stick, and it automatically rsyncs (synchronises the files on the USB stick with it’s sd card. If you were awesome and used an USB stick that flickers LED when writing/reading, wait for it to stop flickering before removing from rpi!

Now restart the thing (and this might not even be necessary), and then the emulation station will show the icons for the devices you’ve added roms for (don’t panic if you can’t see some emulators, if you didn’t put roms in the folder, then it won’t show up, think about it , this makes sense for almost 100 different emulators shipped, not to see the ones you have no roms for! It got me for a little while until I put that together.

Some really super duper important caveats:

Segacd requires copyrighted BIOS uploaded to the /opt/rpi/BIOS folder, or some such. Will document this more later.

Determining exact Disk space usage on a Linux Server

Thanks to my colleague Aaron, he deserves the credit for this, this nice little one-liner for determining largest directories usage on a Linux Server.

Handy for customers having issues with running out of space and helping them identify unnecessary files, runaway logs, and other disk fillers.

FS='/';resize;clear;date;df -h $FS; echo "Largest Directories:"; du -hcx --max-depth=2 $FS 2>/dev/null | grep [0-9]G | sort -grk 1 | head -15 ;echo "Largest Files:"; nice -n 19 find $FS -mount -type f -print0 2>/dev/null| xargs -0 du -k | sort -rnk1| head -n20 |awk -F'\t' '{printf "%8d MB\t%s\n",($1/1024),$NF}'