I wanted to delete all the revisions I had for my posts in wordpress. This is how I did it:
DELETE from wp_posts
WHERE post type = 'revision';

Query OK, 94 rows affected (0.00 sec)
Yay. Simple thing.

I wanted to delete all the revisions I had for my posts in wordpress. This is how I did it:
DELETE from wp_posts WHERE post type = 'revision'; Query OK, 94 rows affected (0.00 sec)
Yay. Simple thing.
So, I thought after doing such a good job with Python that I would take my trouble to PHP. In this case I was running PHP at the commandline, but there is no reason you can’t use these in your web application. That’s one good thing about PHP, right there. It may be the only thing, but, it’s there!
Step 1. Setup php-opencloud and php and composer
yum install php-opencloud php composer
Step 2. Setup composer requirement for php-opencloud (this is what is required for the vendor/autoloader.php file)
composer require rackspace/php-opencloud
Step 3. Configure opencloud
require 'vendor/autoload.php';

use OpenCloud\Rackspace;
Step 4. Configure Authorisation Section, including my username, apikey and REGION ‘LON’. For Dallas Forth Worth this would be DFW, etc.
# Authentication

$client = new Rackspace(Rackspace::US_IDENTITY_ENDPOINT, array(
    'username' => 'myusername',
    'apiKey'   => '90ghaj4532asdsFgsdrghdi9832'
));

$service = $client->computeService(null, 'LON');
Step 5. Set Image to use to create server
$image = $service->image('d5bb9732-6468-4963-85b7-b6d1025cd0c7');
Step 6. Set Flavor to use to create server
$flavor = $service->flavor('general1-1');
Step 7. Proceed with server build
$server = $service->server();

$response = $server->create(array(
        'name'          =>      'Mein New Test Serven',
        'imageId'       =>      $image->getId(),
        'flavorId'      =>      $flavor->getId()
));
?>
Step 8. The completed php file will look something like :
?php
require 'vendor/autoload.php';use OpenCloud\Rackspace;
# Authentication
$client = new Rackspace(Rackspace::US_IDENTITY_ENDPOINT, array(
'username' => 'myusername',
'apiKey' => '90ghaj4532asdsFgsdrghdi9832'
));$service = $client->computeService(null, 'LON');
#
# Cloud Image
$image = $service->image('d5bb9732-6468-4963-85b7-b6d1025cd0c7');
#
# Cloud Server Flavor
$flavor = $service->flavor('general1-1');# Proceed with Server Build
$server = $service->server();
$response = $server->create(array(
'name' => 'Mein New Test Serven',
'imageId' => $image->getId(),
'flavorId' => $flavor->getId()
));?>
Today I have been playing around with some Python. This time using Pyrax and the Rackspace API. Here is how I did it. In my case I was using a CentOS 7 image.
Step 1. Install pip and pyrax
yum install python-pip gcc make
pip install --upgrade pip
pip install pyrax
Step 2. Consult the docs!
https://developer.rackspace.com/docs/cloud-servers/getting-started/
Which has support for JAVA, PHP, Python, GO, RUBY, .NET and more.
Step 3. Create your import directives
import os
import pyrax
Step 3. Create your Authorisation
# Authentication Section
# myusername is the mycloud username for the Rackspace User in portal
# 99ghghghghgh12345a289872342 is the APIKEY, you need to replace these with the values you use for your account
pyrax.set_setting("identity_type", "rackspace")
pyrax.set_default_region('LON')
pyrax.set_credentials('myusername', '99ghghghghgh12345a289872342')

cs = pyrax.cloudservers
Step 4. Listing some flavours: It’s possible to list the different virtual machine flavors (HARDWARE TYPE)
flavor_list = cs.list_flavors()
print flavor_list
Step 5. Set the flavor we want to use to create a server. In this case we are spinning up a performance 1 server with 1GB RAM.
flavor = cs.flavors.get('performance1-1')
Step 6. Set the image we want to use to create the server. I have a custom image from a previous server I made I want to use.
image = pyrax.images.get('d9aa9583-6468-4963-85b7-b6d1025cd0c7')
Step 7. Create the server with the parameters: name, image and flavor.
server = cs.servers.create('testing1', image.id, flavor.id)
The complete file should look like:
import os
import pyrax

# Authentication Section

pyrax.set_setting("identity_type", "rackspace")
pyrax.set_default_region('LON')
pyrax.set_credentials('adambull', '99ghghghghgh12345a289872342')

cs = pyrax.cloudservers

flavor_list = cs.list_flavors()

flavor = cs.flavors.get('performance1-1')

image = pyrax.images.get('d9aa9583-6468-4963-85b7-b6d1025cd0c7')
server = cs.servers.create('testing1', image.id, flavor.id)
So, today I was taking a look at Rackspace’s Load Balancers. I wanted to put together a small tutorial how to spin up multiple cloud servers and add them to a normal HTTP load balancer. This is traditionally a use case for sites that good a lot of traffic, and/or require great redundancy both at the load balancer, and at the server level. i.e. multiple ip addresses and hardware that is failover redundant. If a server or load balancer goes down, then there is provisions to allow a new load balancer or cloud server to take over.
It’s a simple setup.
Step 1. Creating 2 or more Cloud Servers from the mycloud.rackspace.co.uk Control Panel.
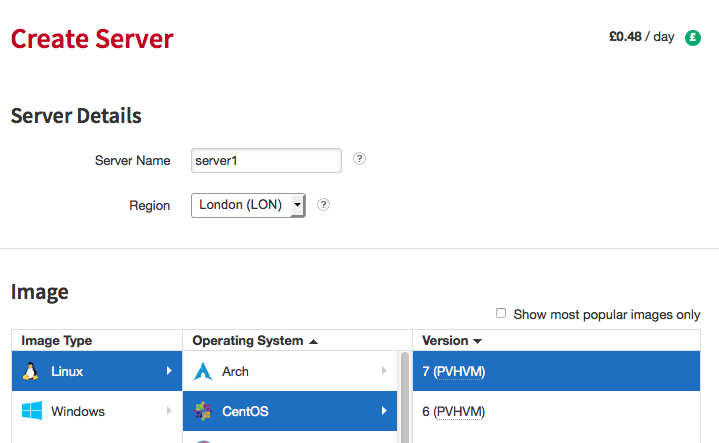
Create two servers, using the above process.
Step 2. I am using SSH Keys, so I provide my public ssh id_dsa.pub for SSH, (for a guide on making SSH keys, see my tutorial on this site)
Create two servers with SSH KEY AUTHENTICATION (optional), using the above process.

Step 3. Install httpd and netcat service, in my case I am using CENTOS 7, which is a nice secure version of RHEL.
RedHat/CentOS Distributions:
yum install httpd nc
Debian/Ubuntu Distributions:
apt-get install httpd netcat
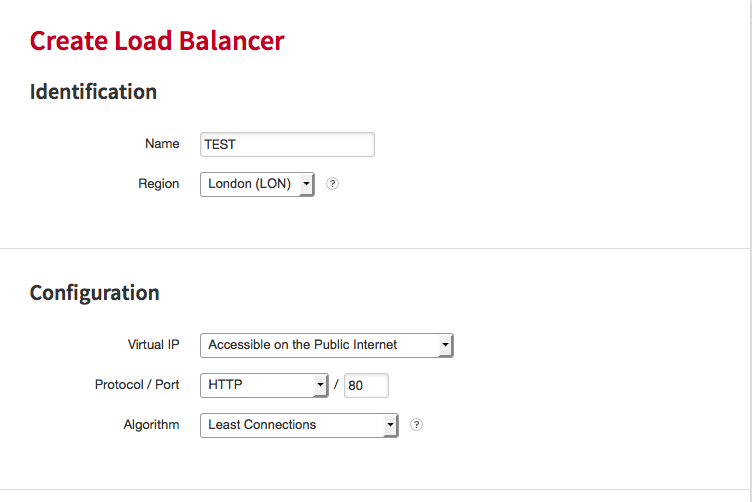
Step 4. Creating A Rackspace Load Balancer
Step 5. Add 2 or more server nodes to the Load Balancer
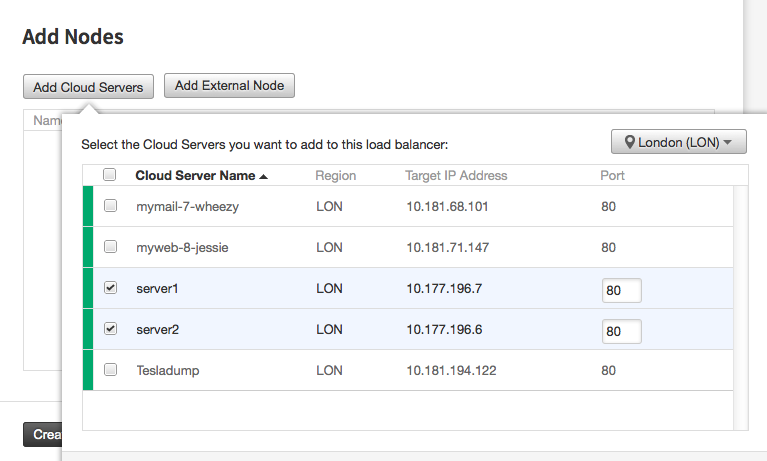
Be sure to tick the number of servers you want to add. Please note, it’s possible to add servers to the Load Balancer that aren’t part of the rackspace Network. To do that you can use the ‘add external node’ button. Please note though, that the requests between load balancer and the destination machine goes over the public network interface. Whereas requests from the load balancer to other rackspace servers will always go thru the service net by default. (that is the local 10.x.x.x IP addresses and networks).
Step 6. Configure Cloud Server Firewall Settings to Accept port 80 and (optionally) port 443
# Allow negotiating of connections on port 80 incoming (HTTP), and port 443 incoming (HTTPS)
sudo iptables -I INPUT 1 -p tcp --dport 80 -j ACCEPT
sudo iptables -I INPUT 1 -p tcp --dport 443 -j ACCEPT
# Allow negotiated connections replies to reach us
sudo iptables -A INPUT -i eth0 -m state --state ESTABLISHED,RELATED -j ACCEPT
Step 7. Restart apache2 / httpd service, and check localhost on port 80
service httpd restart
curl localhost
Step 8. Configure the Load Balancer Algorithm (optional). I wanted to use a round-robin approach, each request increments the serverid. So with 3 servers. It takes 3 incremental requests for serverid 1 to serve http request. With 3 servers, i t takes 4 incremental requests for serverid 2 to serve a request twice!
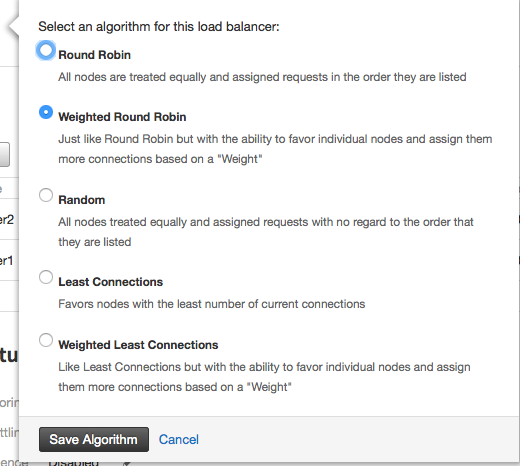
There are various different settings to use.
Step 9. All Done! You’ve configured the load balancer, and attached 2 cloud servers to the load balancer. Requests can come into the load balancer on port 80, and it sends requests to either server1 or server2 on the same port, 80. It is however possible to send requests to the cloud servers on a different port, which is covered in another article on this website. You could for instance create a server using 10 SSL certificates on a single IP, using different ports. Which could work out a lot cheaper than leasing 10 IPV4 or wrestling with your service provider for additional IP’s for SSL usage
Step 10. Test requests to the load balancer
In this setup I have 2 cloud server IP’s: 5.79.24.207 and 5.79.24.205. They both listen on port 80.
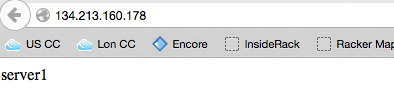
In this setup I have 1 load balancer IP address: 134.213.160.178
I can now connect to the load balancer running on http://134.213.160.178 and it forwards the connections to 5.79.24.207 or 5.79.24.205. If I wanted I could have added another 100 cloud servers to the load balancer, and each time I load a HTTP request to the load balancer, a different cloud server will respond. This allows very large numbers of transactions to go to a website, and for multiple servers to respond individually to seperate customers requesting thru the load balancer. In a production environment after confirming these changes I would then.
Step 11: SET DNS to point to the load balancer IP instead of cloud server IP.
A RECORD ADDED AS BELOW:
mywebsite.com -> 134.213.160.178
Step 12: Confirm Load Balancer is working
For my purposes I am using the default www website for CENTOS 7 HTTPD /var/www/html/index.html . I changed server1 index.html to say only ‘server1’ and I changed server2 index.html to say only ‘server2’. This way I can check the load balancer is giving a different server every second request. It was:

Step 13: Testing for Client IP information with Netcat
tailf /var/log/httpd/access.log
10.190.255.250 - - [05/Oct/2015:10:14:37 +0000] "GET / HTTP/1.1" 200 8 "-" "Mozilla/5.0 (Macintosh; Intel Mac OS X 10.10; rv:39.0) Gecko/20100101 Firefox/39.0"
0.190.255.250 - - [05/Oct/2015:10:14:39 +0000] "GET / HTTP/1.1" 200 8 "-" "Mozilla/5.0 (Macintosh; Intel Mac OS X 10.10; rv:39.0) Gecko/20100101 Firefox/39.0"
10.190.255.250 - - [05/Oct/2015:10:14:40 +0000] "GET / HTTP/1.1" 200 8 "-" "Mozilla/5.0 (Macintosh; Intel Mac OS X 10.10; rv:39.0) Gecko/20100101 Firefox/39.0"
10.190.255.250 - - [05/Oct/2015:10:14:42 +0000] "GET / HTTP/1.1" 200 8 "-" "Mozilla/4.0 (compatible; MSIE 7.0; Windows NT 5.1; InfoPath.1; .NET CLR 2.0.50727; .NET CLR 1.1.4322; MS-RTC LM 8; .NET CLR 3.0.4506.2152; .NET CLR 3.5.30729)"
Presently we can see that requests reaching our servers from cloud load balancer are seeing only the load balancer IP. We need each apache httpd server to know the client IP of each request.
service httpd stop

So, I run netcat on port 80 to see the requests from the load balancer.

[root@server1 html]# nc -l 80
GET / HTTP/1.1
User-Agent: Mozilla/5.0 (Macintosh; Intel Mac OS X 10.10; rv:39.0) Gecko/20100101 Firefox/39.0
X-Forwarded-For: 94.236.7.190
Accept: text/html,application/xhtml+xml,application/xml;q=0.9,*/*;q=0.8
Cache-Control: max-age=0
X-Forwarded-Proto: http
Accept-Language: en-US,en;q=0.5
Host: 134.213.160.178
If-Modified-Since: Mon, 05 Oct 2015 10:11:57 GMT
X-Cluster-Client-Ip: 94.236.7.190
Via: 1.1 542204-LON4WWSG01.secops.rackspace.com 0A02CC2D
X-Forwarded-Port: 80
If-None-Match: "8-52158be551fbf"
Accept-Encoding: gzip, deflate
As we can see there is an X-Forwarded-For header from the load balancer which does reach the cloud server, but by default apache doesn’t know about it and doesn’t put the X-Forwarded-For variable in the Logs, only the src_ip, which is presently the load balancers IP and not our client. So we need to make a small modification to the apache2 default httpd configuration:
Step 14: Modify Apache HTTPD Log ‘combined’ configuration
cat /etc/httpd/conf/httpd.conf
Inside the above file we see the directives:
    # The following directives define some format nicknames for use with
    # a CustomLog directive (see below).
    #
    LogFormat "%h %l %u %t \"%r\" %>s %b \"%{Referer}i\" \"%{User-Agent}i\"" combined

    #
    # If you prefer a logfile with access, agent, and referer information
    # (Combined Logfile Format) you can use the following directive.
    #
    CustomLog "logs/access_log" combined
The part we want to change is very small
LogFormat "%{X-Forwarded-For}i %h %l %u %t \"%r\" %>s %b \"%{Referer}i\" \"%{User-Agent}i\"" combined
We want to add the section above %{X-Forwarded-For}i. This will include the real Client_IP before the Load Balancer IP in the server logs, so it looks like so:
94.236.7.190 10.190.255.250 - - [05/Oct/2015:11:01:11 +0000] "GET / HTTP/1.1" 200 8 "-" "Mozilla/5.0 (Macintosh; Intel Mac OS X 10.10; rv:39.0) Gecko/20100101 Firefox/39.0"