Extending Disk Sizes with LVM

A lot of customers ask the question of how to have a data volume that can be incrementally increased in size vertically over a period of time. Here is how to setup a server like that from start to finish.

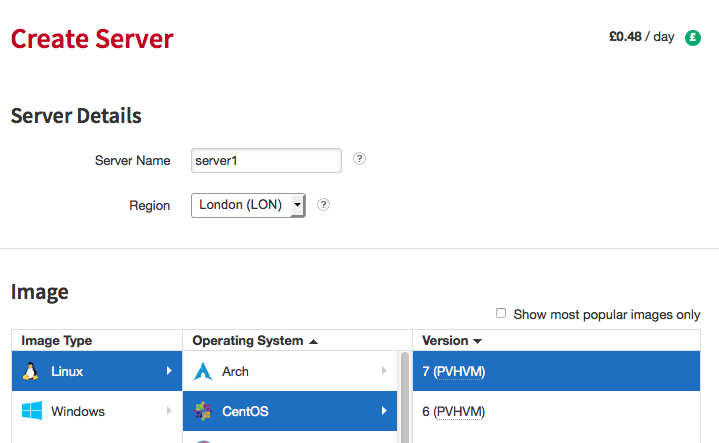
Step 1. Create Rackspace Cloud server
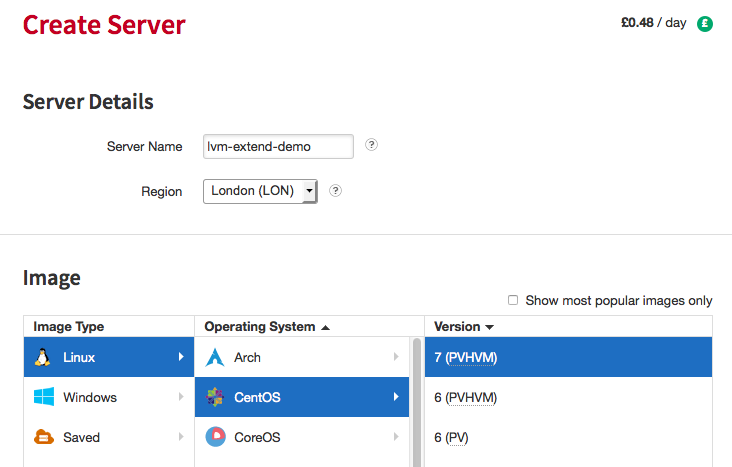
Screen Shot 2015-10-12 at 11.21.40 AM

Click create server at bottom left once you are happy with the distribution you want to use:

Screen Shot 2015-10-12 at 11.24.22 AM

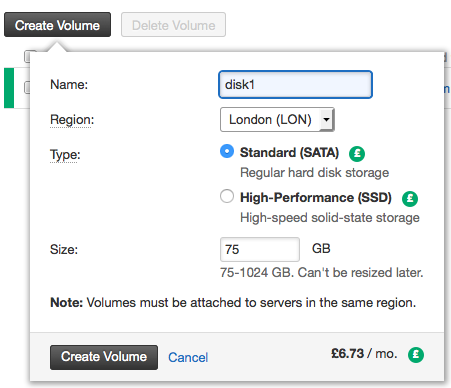
Step 2. Create Cloud Block Storage Volumes. In this case I’m going to create 3 x 75 Gig disks.
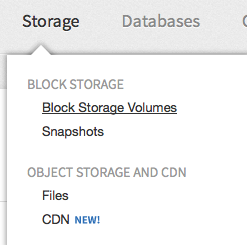
Screen Shot 2015-10-12 at 11.25.30 AM

Screen Shot 2015-10-12 at 11.26.27 AM

Screen Shot 2015-10-12 at 11.26.53 AM

Now your done creating your server and the volumes you are going to use with it. We could have just added 1 Cloud block storage volume, and added the others later, but for this demo, we’re going to show you how to extend the initial partition with the space capacity of the other 2.

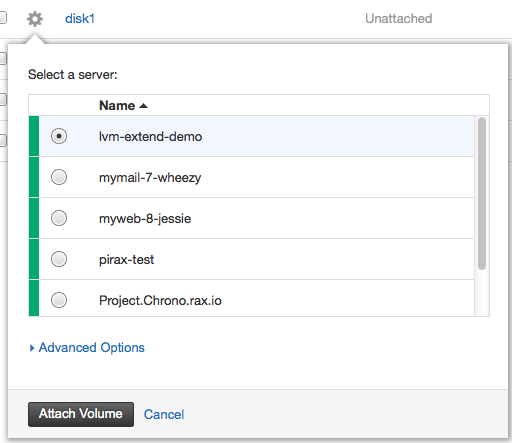
Step 3. Attach your Cloud Block Storage Volumes to the server:
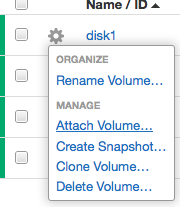
Screen Shot 2015-10-12 at 11.30.05 AM

Screen Shot 2015-10-12 at 11.30.25 AM

Step 4. Login to your Cloud Server

$ ssh [email protected]
The authenticity of host '37.188.1.1 (37.188.1.1)' can't be established.
RSA key fingerprint is 51:e9:e6:c1:4b:f8:24:9f:2a:8a:36:ec:bf:47:23:d4.
Are you sure you want to continue connecting (yes/no)? yes
Warning: Permanently added '37.188.1.1' (RSA) to the list of known hosts.
Last login: Thu Jan  1 00:00:10 1970

Step 5. Run fdisk -l (list) to see attached volumes to server

Disk /dev/xvdc: 536 MB, 536870912 bytes, 1048576 sectors
Units = sectors of 1 * 512 = 512 bytes
Sector size (logical/physical): 512 bytes / 512 bytes
I/O size (minimum/optimal): 512 bytes / 512 bytes
Disk label type: dos
Disk identifier: 0x0004ece3

Device Boot Start End Blocks Id System
/dev/xvdc1 2048 1048575 523264 83 Linux

Disk /dev/xvda: 21.5 GB, 21474836480 bytes, 41943040 sectors
Units = sectors of 1 * 512 = 512 bytes
Sector size (logical/physical): 512 bytes / 512 bytes
I/O size (minimum/optimal): 512 bytes / 512 bytes
Disk label type: dos
Disk identifier: 0x000b1244

Device Boot Start End Blocks Id System
/dev/xvda1 * 2048 41943039 20970496 83 Linux

Disk /dev/xvdb: 80.5 GB, 80530636800 bytes, 157286400 sectors
Units = sectors of 1 * 512 = 512 bytes
Sector size (logical/physical): 512 bytes / 512 bytes
I/O size (minimum/optimal): 512 bytes / 512 bytes

Disk /dev/xvdd: 80.5 GB, 80530636800 bytes, 157286400 sectors
Units = sectors of 1 * 512 = 512 bytes
Sector size (logical/physical): 512 bytes / 512 bytes
I/O size (minimum/optimal): 512 bytes / 512 bytes

I actually discovered at this point that CentOS 7 only supports 3 virtual disks as standard. I’m having the issue because the Rackspace centOS 7 image is shipping with HVM which is causing the issues, if it was just PV type we would be okay. You should switch to a PV version of CentOS now if you want more than 3 virtual disks with your Rackspace Cloud Server.

Step 5: Running the same command on a CentOS 6 PV server allows me to add more disks thru the control panel

[root@lvm-extend-test ~]# fdisk -l

Disk /dev/xvdc: 536 MB, 536870912 bytes
70 heads, 4 sectors/track, 3744 cylinders
Units = cylinders of 280 * 512 = 143360 bytes
Sector size (logical/physical): 512 bytes / 512 bytes
I/O size (minimum/optimal): 512 bytes / 512 bytes
Disk identifier: 0x000f037d

    Device Boot      Start         End      Blocks   Id  System
/dev/xvdc1               8        3745      523264   83  Linux

Disk /dev/xvda: 21.5 GB, 21474836480 bytes
255 heads, 63 sectors/track, 2610 cylinders
Units = cylinders of 16065 * 512 = 8225280 bytes
Sector size (logical/physical): 512 bytes / 512 bytes
I/O size (minimum/optimal): 512 bytes / 512 bytes
Disk identifier: 0x0003e086

    Device Boot      Start         End      Blocks   Id  System
/dev/xvda1   *           1        2611    20970496   83  Linux

Disk /dev/xvdb: 80.5 GB, 80530636800 bytes
255 heads, 63 sectors/track, 9790 cylinders
Units = cylinders of 16065 * 512 = 8225280 bytes
Sector size (logical/physical): 512 bytes / 512 bytes
I/O size (minimum/optimal): 512 bytes / 512 bytes
Disk identifier: 0x00000000


Disk /dev/xvdd: 80.5 GB, 80530636800 bytes
255 heads, 63 sectors/track, 9790 cylinders
Units = cylinders of 16065 * 512 = 8225280 bytes
Sector size (logical/physical): 512 bytes / 512 bytes
I/O size (minimum/optimal): 512 bytes / 512 bytes
Disk identifier: 0x00000000


Disk /dev/xvde: 80.5 GB, 80530636800 bytes
255 heads, 63 sectors/track, 9790 cylinders
Units = cylinders of 16065 * 512 = 8225280 bytes
Sector size (logical/physical): 512 bytes / 512 bytes
I/O size (minimum/optimal): 512 bytes / 512 bytes
Disk identifier: 0x00000000


Disk /dev/xvdf: 80.5 GB, 80530636800 bytes
255 heads, 63 sectors/track, 9790 cylinders
Units = cylinders of 16065 * 512 = 8225280 bytes
Sector size (logical/physical): 512 bytes / 512 bytes
I/O size (minimum/optimal): 512 bytes / 512 bytes
Disk identifier: 0x00000000


Disk /dev/xvdg: 80.5 GB, 80530636800 bytes
255 heads, 63 sectors/track, 9790 cylinders
Units = cylinders of 16065 * 512 = 8225280 bytes
Sector size (logical/physical): 512 bytes / 512 bytes
I/O size (minimum/optimal): 512 bytes / 512 bytes
Disk identifier: 0x00000000

Many disks are now available, we can see them by running:

[root@lvm-extend-test ~]# ls /dev/xv*
/dev/xvda  /dev/xvda1  /dev/xvdb  /dev/xvdc  /dev/xvdc1  /dev/xvdd  /dev/xvde  /dev/xvdf  /dev/xvdg

Step 6: Run cfdisk and start partitioning each disk.

cfdisk /dev/xvdb

Create New PartitionScreen Shot 2015-10-12 at 12.24.14 PMof Primary Partition Type

Screen Shot 2015-10-12 at 12.24.23 PMUsing maximum space available

Screen Shot 2015-10-12 at 12.24.29 PM

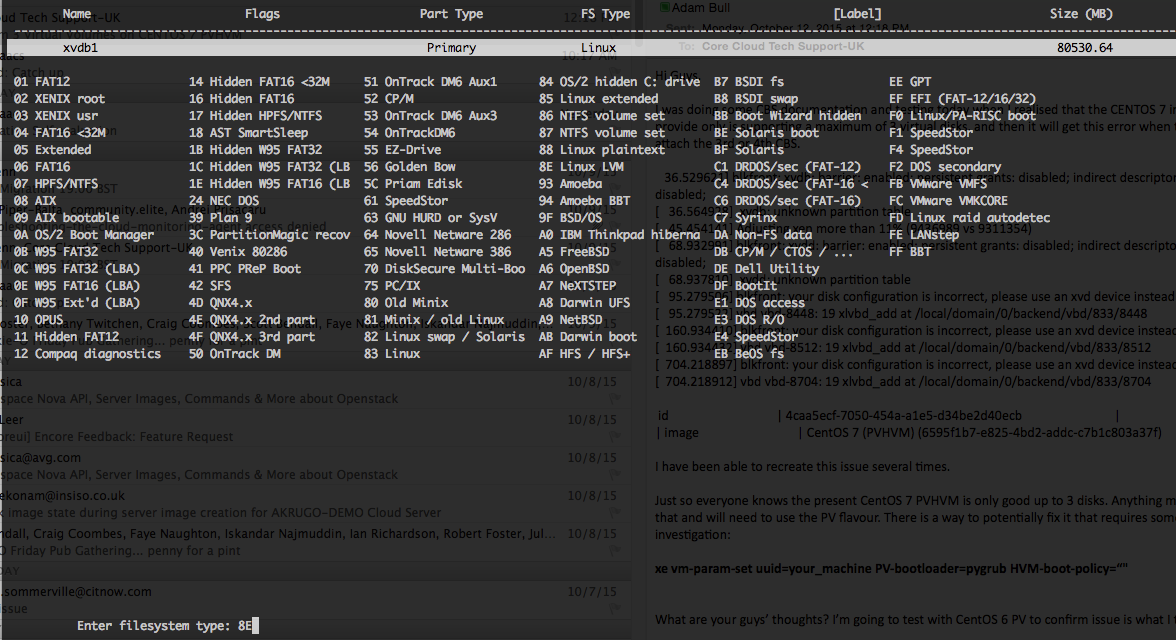
Using type 8E LVM Filesystem TYPE

Screen Shot 2015-10-12 at 12.24.44 PM

Write partition data:
Screen Shot 2015-10-12 at 12.27.40 PM

Step 7: Repeat this for any additional block storage disks you may have. I have a total of 5 CBS volumes, so I need to repeat this another 4 times.

<pre>

cfdisk /dev/xvdc
cfdisk /dev/xvde
cfdisk /dev/xvdf
cfdisk /dev/xvdg

Step 8: Verify that the partitions exist. (check each one has a 1 on the end now)

[root@lvm-extend-test ~]# ls /dev/xvd*
/dev/xvda  /dev/xvda1  /dev/xvdb  /dev/xvdb1  /dev/xvdc  /dev/xvdc1  /dev/xvdd  /dev/xvdd1  /dev/xvde  /dev/xvde1  /dev/xvdf  /dev/xvdf1  /dev/xvdg  /dev/xvdg1

Step 9: Install LVM

 yum install lvm2 

Step 10: Create first physical volume

[root@lvm-extend-test ~]# pvcreate /dev/xvdb1
  Physical volume "/dev/xvdb1" successfully created

Step 11: Check Physical Volume

 [root@lvm-extend-test ~]# pvdisplay
  "/dev/xvdb1" is a new physical volume of "75.00 GiB"
  --- NEW Physical volume ---
  PV Name               /dev/xvdb1
  VG Name
  PV Size               75.00 GiB
  Allocatable           NO
  PE Size               0
  Total PE              0
  Free PE               0
  Allocated PE          0
  PV UUID               7Vv8Rf-hRIr-b7Cb-aaxY-baeg-zVKR-BblJij 

Step 11: Create a volume group on the first physical volume and give it a name DataGroup00

[root@lvm-extend-test ~]# vgcreate DataGroup00 /dev/xvdb1
  Volume group "DataGroup00" successfully created

[root@lvm-extend-test ~]# vgdisplay
  --- Volume group ---
  VG Name               DataGroup00
  System ID
  Format                lvm2
  Metadata Areas        1
  Metadata Sequence No  1
  VG Access             read/write
  VG Status             resizable
  MAX LV                0
  Cur LV                0
  Open LV               0
  Max PV                0
  Cur PV                1
  Act PV                1
  VG Size               75.00 GiB
  PE Size               4.00 MiB
  Total PE              19199
  Alloc PE / Size       0 / 0
  Free  PE / Size       19199 / 75.00 GiB
  VG UUID               Gm00iH-2a15-HO8K-Pbnj-80oh-E2Et-LE1Y2A

Currently the disk is 75GB. We now want to expand/extend with LVM the size of the disk. Doing this is simple enough.

Step 12: Extend Volume size with LVM

[root@lvm-extend-test ~]# vgextend DataGroup00 /dev/xvdd1
  Physical volume "/dev/xvdd1" successfully created
  Volume group "DataGroup00" successfully extended
[root@lvm-extend-test ~]# vgdisplay
  --- Volume group ---
  VG Name               DataGroup00
  System ID
  Format                lvm2
  Metadata Areas        2
  Metadata Sequence No  2
  VG Access             read/write
  VG Status             resizable
  MAX LV                0
  Cur LV                0
  Open LV               0
  Max PV                0
  Cur PV                2
  Act PV                2
  VG Size               149.99 GiB
  PE Size               4.00 MiB
  Total PE              38398
  Alloc PE / Size       0 / 0
  Free  PE / Size       38398 / 149.99 GiB
  VG UUID               Gm00iH-2a15-HO8K-Pbnj-80oh-E2Et-LE1Y2A

Now we can see we got double the space! Lets keep extending it.

Step 13: Extend Volume size again with LVM some more.

[root@lvm-extend-test ~]# vgextend DataGroup00 /dev/xvde1
  Physical volume "/dev/xvde1" successfully created
  Volume group "DataGroup00" successfully extended
[root@lvm-extend-test ~]# vgdisplay
  --- Volume group ---
  VG Name               DataGroup00
  System ID
  Format                lvm2
  Metadata Areas        3
  Metadata Sequence No  3
  VG Access             read/write
  VG Status             resizable
  MAX LV                0
  Cur LV                0
  Open LV               0
  Max PV                0
  Cur PV                3
  Act PV                3
  VG Size               224.99 GiB
  PE Size               4.00 MiB
  Total PE              57597
  Alloc PE / Size       0 / 0
  Free  PE / Size       57597 / 224.99 GiB
  VG UUID               Gm00iH-2a15-HO8K-Pbnj-80oh-E2Et-LE1Y2A

[root@lvm-extend-test ~]# vgextend DataGroup00 /dev/xvdf1
  Physical volume "/dev/xvdf1" successfully created
  Volume group "DataGroup00" successfully extended
[root@lvm-extend-test ~]# vgdisplay
  --- Volume group ---
  VG Name               DataGroup00
  System ID
  Format                lvm2
  Metadata Areas        4
  Metadata Sequence No  4
  VG Access             read/write
  VG Status             resizable
  MAX LV                0
  Cur LV                0
  Open LV               0
  Max PV                0
  Cur PV                4
  Act PV                4
  VG Size               299.98 GiB
  PE Size               4.00 MiB
  Total PE              76796
  Alloc PE / Size       0 / 0
  Free  PE / Size       76796 / 299.98 GiB
  VG UUID               Gm00iH-2a15-HO8K-Pbnj-80oh-E2Et-LE1Y2A

[root@lvm-extend-test ~]# vgextend DataGroup00 /dev/xvdg1
  Physical volume "/dev/xvdg1" successfully created
  Volume group "DataGroup00" successfully extended
[root@lvm-extend-test ~]# vgdisplay
  --- Volume group ---
  VG Name               DataGroup00
  System ID
  Format                lvm2
  Metadata Areas        5
  Metadata Sequence No  5
  VG Access             read/write
  VG Status             resizable
  MAX LV                0
  Cur LV                0
  Open LV               0
  Max PV                0
  Cur PV                5
  Act PV                5
  VG Size               374.98 GiB
  PE Size               4.00 MiB
  Total PE              95995
  Alloc PE / Size       0 / 0
  Free  PE / Size       95995 / 374.98 GiB
  VG UUID               Gm00iH-2a15-HO8K-Pbnj-80oh-E2Et-LE1Y2A

Now we are at 374.98GB Capacity. 5 x 75GB. No problems at all! Imagine if you were doing this with 1000GIG volumes. You could put yourself together a pretty tight CBS. The thing i’d be worried bout was data loss though. So you’d want a server identical to this, with rsync setup across the two for some level of redundancy. and you’d want it, preferably in a completely different datacentre, too.

Last thing now. Actually creating the ext4 filesystem on this volumegroup. We’ve partitioned so that the disk can be used. We’ve created volume and group so that disks can be assigned to the OS as a disk. Now we need to format it with the filesystem. So lets take some steps to do that:

Step 13: Create Logical Volume and Verify


[root@lvm-extend-test ~]# lvcreate -l +100%FREE DataGroup00 -n data
  Logical volume "data" created.

[root@lvm-extend-test ~]# lvdisplay
  --- Logical volume ---
  LV Path                /dev/DataGroup00/data
  LV Name                data
  VG Name                DataGroup00
  LV UUID                JGTRSg-JdNm-aumq-wJFC-VHVb-Sdm9-VVfp5c
  LV Write Access        read/write
  LV Creation host, time lvm-extend-test, 2015-10-12 11:53:45 +0000
  LV Status              available
  # open                 0
  LV Size                374.98 GiB
  Current LE             95995
  Segments               5
  Allocation             inherit
  Read ahead sectors     auto
  - currently set to     256
  Block device           253:0

Step 14: Make Volume Active

[root@lvm-extend-test ~]# vgscan
  Reading all physical volumes.  This may take a while...
  Found volume group "DataGroup00" using metadata type lvm2

Step 15: Create Filesystem on physical volume

[root@lvm-extend-test ~]# mkfs.ext4 /dev/mapper/DataGroup00-data
mke2fs 1.41.12 (17-May-2010)
Filesystem label=
OS type: Linux
Block size=4096 (log=2)
Fragment size=4096 (log=2)
Stride=0 blocks, Stripe width=0 blocks
24576000 inodes, 98298880 blocks
4914944 blocks (5.00%) reserved for the super user
First data block=0
Maximum filesystem blocks=4294967296
3000 block groups
32768 blocks per group, 32768 fragments per group
8192 inodes per group
Superblock backups stored on blocks:
	32768, 98304, 163840, 229376, 294912, 819200, 884736, 1605632, 2654208,
	4096000, 7962624, 11239424, 20480000, 23887872, 71663616, 78675968

Writing inode tables: done
Creating journal (32768 blocks): done
Writing superblocks and filesystem accounting information: done

This filesystem will be automatically checked every 30 mounts or
180 days, whichever comes first.  Use tune2fs -c or -i to override.

Step 16: Making a moint point folder

 mkdir /lvm-data

Step 17: Update your fstab (TAKE CARE) so that the disk is attached to the required on boot


[root@lvm-extend-test ~]# vi /etc/fstab

# Required line 
/dev/mapper/DataGroup00-data    /lvm-data           ext4    defaults        0 0

Step 18: Mount the LVM

[root@lvm-extend-test ~]# mount /lvm-data
[root@lvm-extend-test ~]#

There ya go! You have your 375GB Volume! You can extend this at any point! Just simply make a new CBS volume and then repeat the process of mounting it and then extending it.

Configuring Fail2Ban on Linux Servers (BLOCK/DROP IP addresses that get SSH or IMAP password wrong more than 3 times)

So, I was figuring, because of all the brute force attacks on my servers that I would bother to install fail2ban. Something even better than this would be to change the port your SSH runs on..

Step 1. Install Fail2ban
Ubuntu and Debian Systems

apt-get install fail2ban

Redhat, Fedora and CentOS based Systems

yum install fail2ban

Step 2. Copy the reference config file and edit it in Vi (or nano)

cp /etc/fail2ban/jail.conf /etc/fail2ban/jail.local
vi /etc/fail2ban/jail.local

Step 3. Configure bantime (default 600seconds), and the max_retry (3 attempts).
If someone tries to connect 3 times or more with the wrong password, they’ll be added to IPTABLES DROP rule for 600 seconds

# "bantime" is the number of seconds that a host is banned.
bantime  = 600

maxretry = 3

By default fail2ban starts banning people on SSH immediately, but I found it was also possible to configure fail2ban to block ip addresses attempting to brute force hack my email accounts, here is how I did it.

[sasl]

enabled  = false
port     = smtp,ssmtp,submission,imap2,imap3,imaps,pop3,pop3s
filter   = postfix-sasl
# You might consider monitoring /var/log/mail.warn instead if you are
# running postfix since it would provide the same log lines at the
# "warn" level but overall at the smaller filesize.
logpath  = /var/log/mail.log

It’s possible to alter this configuration but for most people the logpath for SSH is auth.log

[ssh]

enabled  = true
port     = ssh
filter   = sshd
logpath  = /var/log/auth.log
maxretry = 6

Step 4: Restart the Fail2ban service

# most init.d based systems
/etc/init.d/fail2ban restart
# some systemD systems
service fail2ban restart

Creating a Distributed Rackspace Load balancer Website

So, today I was taking a look at Rackspace’s Load Balancers. I wanted to put together a small tutorial how to spin up multiple cloud servers and add them to a normal HTTP load balancer. This is traditionally a use case for sites that good a lot of traffic, and/or require great redundancy both at the load balancer, and at the server level. i.e. multiple ip addresses and hardware that is failover redundant. If a server or load balancer goes down, then there is provisions to allow a new load balancer or cloud server to take over.

It’s a simple setup.

Step 1. Creating 2 or more Cloud Servers from the mycloud.rackspace.co.uk Control Panel.

Screen Shot 2015-10-05 at 11.38.09 AM

Create two servers, using the above process.

Step 2. I am using SSH Keys, so I provide my public ssh id_dsa.pub for SSH, (for a guide on making SSH keys, see my tutorial on this site)

Create two servers with SSH KEY AUTHENTICATION (optional), using the above process.

Screen Shot 2015-10-05 at 11.39.44 AM

Step 3. Install httpd and netcat service, in my case I am using CENTOS 7, which is a nice secure version of RHEL.
RedHat/CentOS Distributions:

yum install httpd nc

Debian/Ubuntu Distributions:

 
apt-get install httpd netcat

Step 4. Creating A Rackspace Load Balancer

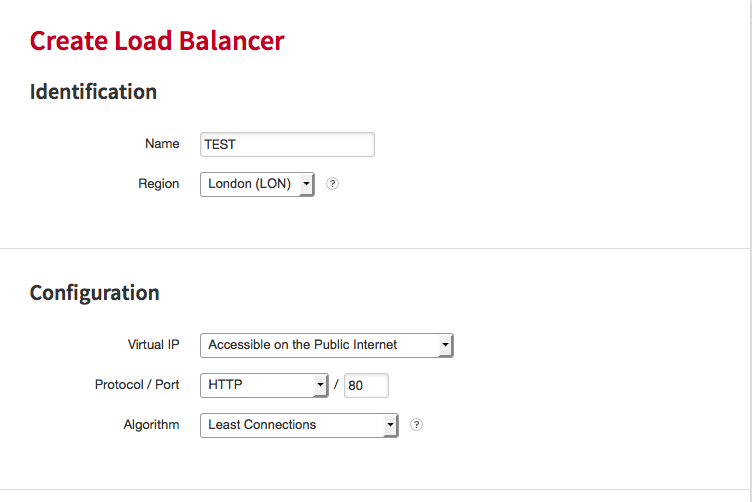
Screen Shot 2015-10-05 at 11.43.41 AM

Step 5. Add 2 or more server nodes to the Load Balancer

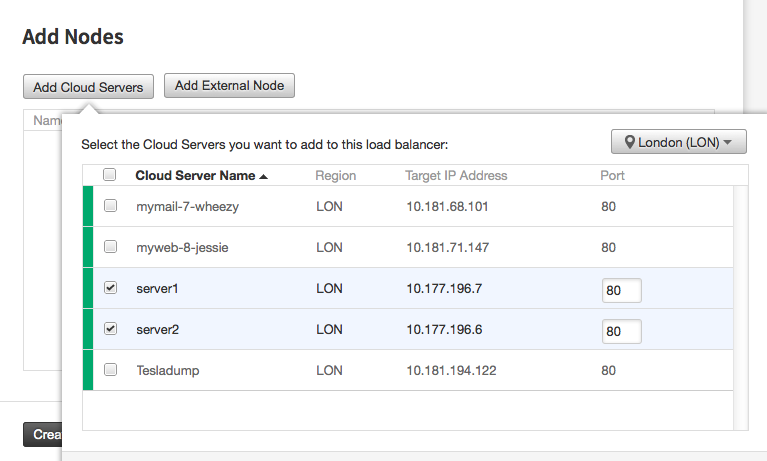
Screen Shot 2015-10-05 at 11.44.09 AM

Be sure to tick the number of servers you want to add. Please note, it’s possible to add servers to the Load Balancer that aren’t part of the rackspace Network. To do that you can use the ‘add external node’ button. Please note though, that the requests between load balancer and the destination machine goes over the public network interface. Whereas requests from the load balancer to other rackspace servers will always go thru the service net by default. (that is the local 10.x.x.x IP addresses and networks).

Step 6. Configure Cloud Server Firewall Settings to Accept port 80 and (optionally) port 443

# Allow negotiating of connections on port 80 incoming (HTTP), and port 443 incoming (HTTPS)
sudo iptables -I INPUT 1 -p tcp --dport 80 -j ACCEPT
sudo iptables -I INPUT 1 -p tcp --dport 443 -j ACCEPT
# Allow negotiated connections replies to reach us
sudo iptables -A INPUT -i eth0 -m state --state ESTABLISHED,RELATED -j ACCEPT

Step 7. Restart apache2 / httpd service, and check localhost on port 80

service httpd restart
curl localhost

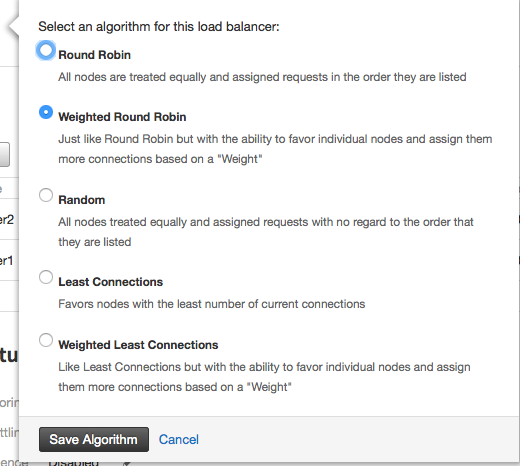
Step 8. Configure the Load Balancer Algorithm (optional). I wanted to use a round-robin approach, each request increments the serverid. So with 3 servers. It takes 3 incremental requests for serverid 1 to serve http request. With 3 servers, i t takes 4 incremental requests for serverid 2 to serve a request twice!

Screen Shot 2015-10-05 at 11.49.41 AM

There are various different settings to use.

Step 9. All Done! You’ve configured the load balancer, and attached 2 cloud servers to the load balancer. Requests can come into the load balancer on port 80, and it sends requests to either server1 or server2 on the same port, 80. It is however possible to send requests to the cloud servers on a different port, which is covered in another article on this website. You could for instance create a server using 10 SSL certificates on a single IP, using different ports. Which could work out a lot cheaper than leasing 10 IPV4 or wrestling with your service provider for additional IP’s for SSL usage

Step 10. Test requests to the load balancer

In this setup I have 2 cloud server IP’s: 5.79.24.207 and 5.79.24.205. They both listen on port 80.

In this setup I have 1 load balancer IP address: 134.213.160.178

I can now connect to the load balancer running on http://134.213.160.178 and it forwards the connections to 5.79.24.207 or 5.79.24.205. If I wanted I could have added another 100 cloud servers to the load balancer, and each time I load a HTTP request to the load balancer, a different cloud server will respond. This allows very large numbers of transactions to go to a website, and for multiple servers to respond individually to seperate customers requesting thru the load balancer. In a production environment after confirming these changes I would then.

Step 11: SET DNS to point to the load balancer IP instead of cloud server IP.

A RECORD ADDED AS BELOW:
mywebsite.com -> 134.213.160.178 

Step 12: Confirm Load Balancer is working

For my purposes I am using the default www website for CENTOS 7 HTTPD /var/www/html/index.html . I changed server1 index.html to say only ‘server1’ and I changed server2 index.html to say only ‘server2’. This way I can check the load balancer is giving a different server every second request. It was:

Screen Shot 2015-10-05 at 12.01.12 PM

Screen Shot 2015-10-05 at 12.01.21 PM

Step 13: Testing for Client IP information with Netcat

tailf /var/log/httpd/access.log
10.190.255.250 - - [05/Oct/2015:10:14:37 +0000] "GET / HTTP/1.1" 200 8 "-" "Mozilla/5.0 (Macintosh; Intel Mac OS X 10.10; rv:39.0) Gecko/20100101 Firefox/39.0"
0.190.255.250 - - [05/Oct/2015:10:14:39 +0000] "GET / HTTP/1.1" 200 8 "-" "Mozilla/5.0 (Macintosh; Intel Mac OS X 10.10; rv:39.0) Gecko/20100101 Firefox/39.0"
10.190.255.250 - - [05/Oct/2015:10:14:40 +0000] "GET / HTTP/1.1" 200 8 "-" "Mozilla/5.0 (Macintosh; Intel Mac OS X 10.10; rv:39.0) Gecko/20100101 Firefox/39.0"
10.190.255.250 - - [05/Oct/2015:10:14:42 +0000] "GET / HTTP/1.1" 200 8 "-" "Mozilla/4.0 (compatible; MSIE 7.0; Windows NT 5.1; InfoPath.1; .NET CLR 2.0.50727; .NET CLR 1.1.4322; MS-RTC LM 8; .NET CLR 3.0.4506.2152; .NET CLR 3.5.30729)"

Presently we can see that requests reaching our servers from cloud load balancer are seeing only the load balancer IP. We need each apache httpd server to know the client IP of each request.

service httpd stop

So, I run netcat on port 80 to see the requests from the load balancer.

[root@server1 html]# nc -l 80
GET / HTTP/1.1
User-Agent: Mozilla/5.0 (Macintosh; Intel Mac OS X 10.10; rv:39.0) Gecko/20100101 Firefox/39.0
X-Forwarded-For: 94.236.7.190
Accept: text/html,application/xhtml+xml,application/xml;q=0.9,*/*;q=0.8
Cache-Control: max-age=0
X-Forwarded-Proto: http
Accept-Language: en-US,en;q=0.5
Host: 134.213.160.178
If-Modified-Since: Mon, 05 Oct 2015 10:11:57 GMT
X-Cluster-Client-Ip: 94.236.7.190
Via: 1.1 542204-LON4WWSG01.secops.rackspace.com 0A02CC2D
X-Forwarded-Port: 80
If-None-Match: "8-52158be551fbf"
Accept-Encoding: gzip, deflate

As we can see there is an X-Forwarded-For header from the load balancer which does reach the cloud server, but by default apache doesn’t know about it and doesn’t put the X-Forwarded-For variable in the Logs, only the src_ip, which is presently the load balancers IP and not our client. So we need to make a small modification to the apache2 default httpd configuration:

Step 14: Modify Apache HTTPD Log ‘combined’ configuration

cat /etc/httpd/conf/httpd.conf

Inside the above file we see the directives:


    # The following directives define some format nicknames for use with
    # a CustomLog directive (see below).
    #
    LogFormat "%h %l %u %t \"%r\" %>s %b \"%{Referer}i\" \"%{User-Agent}i\"" combined

    #
    # If you prefer a logfile with access, agent, and referer information
    # (Combined Logfile Format) you can use the following directive.
    #
    CustomLog "logs/access_log" combined

The part we want to change is very small

LogFormat "%{X-Forwarded-For}i %h %l %u %t \"%r\" %>s %b \"%{Referer}i\" \"%{User-Agent}i\"" combined

We want to add the section above %{X-Forwarded-For}i. This will include the real Client_IP before the Load Balancer IP in the server logs, so it looks like so:

94.236.7.190 10.190.255.250 - - [05/Oct/2015:11:01:11 +0000] "GET / HTTP/1.1" 200 8 "-" "Mozilla/5.0 (Macintosh; Intel Mac OS X 10.10; rv:39.0) Gecko/20100101 Firefox/39.0"

Cancelling a stuck soft reboot task on Xen Server

Today, one of my fellow colleagues received a call about a server that had run out of memory. They sent a soft reboot, and because of that the process task hung. This is because the hypervisor compute node sends a message to the nova agent running on the guest virtual machine! If the guest virtual machine has run out of memory, it’s not possible for nova to receive that command, or, if it does, then the soft (software) reboot can fail, because there is not enough memory to fork the process.

This could have been avoided by issuing a hard reboot straight away, but in this case we needed to cancel the task and send a hard reboot. Here is what I did:

List all pending tasks on xen-server

# xe task-list

uuid ( RO)                : a9f84f3d-0b96-8da2-a1d1-f5b774cd9173
          name-label ( RO): VM.clean_reboot
    name-description ( RO): 
              status ( RO): pending
            progress ( RO): 0.275

Cancel a pending task on xen-server

xe task-cancel uuid=a9f84f3d-0b96-8da2-a1d1-f5b774cd9173

This sets the active_state back to normal and gets rid of the ‘pending soft reboot’, but we need to restart the server too.

Using supernova API to stop and restart the server

supernova lon stop serveruuidhere
supernova lon start serveruuidhere

and…The customer is back up online and running, yay!

Booting a Virtual Machine using the Openstack API using supernova

It’s pretty damn simple to boot a virtual machine using the Openstack API. In this case I want to boot an image that is the same identical reference as the base image that a customer of ours is using that is getting some bad Cloud Block Storage performance. Being able to replicate the circumstances precisely is important when trying to recreate the symptoms of the customer. Configuring a new boot is really easy to do thru the API using supernova.

supernova customer boot testing-cbs-lon --image 9g46rb-79d6-45eb-9505-fb0bf31556d7 --flavor performance1-4

The above command is using my ‘customer’ auth user configuration (single API user, as opposed to admin API). I have asked API to boot a performance server with 4GB ‘performance1-4’ Using the image id ‘9g46rb-79d6-45eb-9505-fb0bf31556d7’ which is a customers image reference running windows. I tell the API I want to call the server testing-cbs-lon, and here is what I get back after running it


+--------------------------------------+-------------------------------------------------------------------+
| Property                             | Value                                                             |
+--------------------------------------+-------------------------------------------------------------------+
| OS-DCF:diskConfig                    | MANUAL                                                            |
| OS-EXT-STS:power_state               | 0                                                                 |
| OS-EXT-STS:task_state                | -                                                                 |
| OS-EXT-STS:vm_state                  | building                                                          |
| RAX-PUBLIC-IP-ZONE-ID:publicIPZoneId | e1cc4036fc52d50ca8ac2e90ff57e6b8c38d850bf6e3bd608e800971          |
| accessIPv4                           |                                                                   |
| accessIPv6                           |                                                                   |
| adminPass                            | censoredforsecurity                                               |
| config_drive                         |                                                                   |
| created                              | 2015-09-17T08:23:25Z                                              |
| flavor                               | 4 GB Performance (performance1-4)                                 |
| hostId                               |                                                                   |
| id                                   | d23cc039-ecc7-442a-81ad-b6bbb7a8c8e9                              |
| image                                | Windows Server 2008 R2 SP1 (8f39aeb0-79d6-45eb-9505-fb0bf31556d7) |
| key_name                             | -                                                                 |
| metadata                             | {}                                                                |
| name                                 | testing-cbs-lon                                                   |
| progress                             | 0                                                                 |
| status                               | BUILD                                                             |
| tenant_id                            | 10045567                                                          |
| updated                              | 2015-09-17T08:23:26Z                                              |
| user_id                              | 05b18e859cad42bb9a5a35ad0a6fba2f                                  |
+--------------------------------------+-------------------------------------------------------------------+

So it’s building, lets presume I want to check on the status of the server now. The id of the server, we can see is ‘d23cc039-ecc7-442a-81ad-b6bbb7a8c8e9’. So lets ask supernova to show the details for this server again for us.

supernova customer show d23cc039-ecc7-442a-81ad-b6bbb7a8c8e9
[SUPERNOVA] Running nova against customer...
+--------------------------------------+-------------------------------------------------------------------+
| Property                             | Value                                                             |
+--------------------------------------+-------------------------------------------------------------------+
| OS-DCF:diskConfig                    | MANUAL                                                            |
| OS-EXT-STS:power_state               | 0                                                                 |
| OS-EXT-STS:task_state                | spawning                                                          |
| OS-EXT-STS:vm_state                  | building                                                          |
| RAX-PUBLIC-IP-ZONE-ID:publicIPZoneId | e1cc4036fc52d50ca8ac2e90ff57e6b8c38d850bf6e3bd608e800971          |
| accessIPv4                           |                                                                   |
| accessIPv6                           |                                                                   |
| config_drive                         |                                                                   |
| created                              | 2015-09-17T08:23:25Z                                              |
| flavor                               | 4 GB Performance (performance1-4)                                 |
| hostId                               | d9a81c37f8f8aba51cd30a04151d99d2bdd60ad4504d4c95f4a3f609          |
| id                                   | d23cc039-ecc7-442a-81ad-b6bbb7a8c8e9                              |
| image                                | Windows Server 2008 R2 SP1 (8f39aeb0-79d6-45eb-9505-fb0bf31556d7) |
| key_name                             | -                                                                 |
| metadata                             | {}                                                                |
| name                                 | testing-cbs-lon                                                   |
| private network                      | 10.1.1.1                                                          |
| progress                             | 80                                                                |
| public network                       | 134.1.1.1     , 2a00:1a48:7810:101:be76:4eff:fe08:1f5d            |
| status                               | BUILD                                                             |
| tenant_id                            | 10045567                                                          |
| updated                              | 2015-09-17T08:28:28Z                                              |
| user_id                              | 05b18e859cad42bb9a5a35ad0a6fba2f                                  |
+--------------------------------------+-------------------------------------------------------------------+

As we can see the server is still building but it has started to get it’s network added.

If I wanted to see all the different flavors available (GB ram , disk, etc) we could run a

supernova customer flavor-list
[SUPERNOVA] Running nova against customer...
+------------------+-------------------------+-----------+------+-----------+------+-------+-------------+-----------+
| ID               | Name                    | Memory_MB | Disk | Ephemeral | Swap | VCPUs | RXTX_Factor | Is_Public |
+------------------+-------------------------+-----------+------+-----------+------+-------+-------------+-----------+
| 2                | 512MB Standard Instance | 512       | 20   | 0         | 512  | 1     | 80.0        | N/A       |
| 3                | 1GB Standard Instance   | 1024      | 40   | 0         | 1024 | 1     | 120.0       | N/A       |
| 4                | 2GB Standard Instance   | 2048      | 80   | 0         | 2048 | 2     | 240.0       | N/A       |
| 5                | 4GB Standard Instance   | 4096      | 160  | 0         | 2048 | 2     | 400.0       | N/A       |
| 6                | 8GB Standard Instance   | 8192      | 320  | 0         | 2048 | 4     | 600.0       | N/A       |
| 7                | 15GB Standard Instance  | 15360     | 620  | 0         | 2048 | 6     | 800.0       | N/A       |
| 8                | 30GB Standard Instance  | 30720     | 1200 | 0         | 2048 | 8     | 1200.0      | N/A       |
| compute1-15      | 15 GB Compute v1        | 15360     | 0    | 0         |      | 8     | 1250.0      | N/A       |
| compute1-30      | 30 GB Compute v1        | 30720     | 0    | 0         |      | 16    | 2500.0      | N/A       |
| compute1-4       | 3.75 GB Compute v1      | 3840      | 0    | 0         |      | 2     | 312.5       | N/A       |
| compute1-60      | 60 GB Compute v1        | 61440     | 0    | 0         |      | 32    | 5000.0      | N/A       |
| compute1-8       | 7.5 GB Compute v1       | 7680      | 0    | 0         |      | 4     | 625.0       | N/A       |
| general1-1       | 1 GB General Purpose v1 | 1024      | 20   | 0         |      | 1     | 200.0       | N/A       |
| general1-2       | 2 GB General Purpose v1 | 2048      | 40   | 0         |      | 2     | 400.0       | N/A       |
| general1-4       | 4 GB General Purpose v1 | 4096      | 80   | 0         |      | 4     | 800.0       | N/A       |
| general1-8       | 8 GB General Purpose v1 | 8192      | 160  | 0         |      | 8     | 1600.0      | N/A       |
| io1-120          | 120 GB I/O v1           | 122880    | 40   | 1200      |      | 32    | 10000.0     | N/A       |
| io1-15           | 15 GB I/O v1            | 15360     | 40   | 150       |      | 4     | 1250.0      | N/A       |
| io1-30           | 30 GB I/O v1            | 30720     | 40   | 300       |      | 8     | 2500.0      | N/A       |
| io1-60           | 60 GB I/O v1            | 61440     | 40   | 600       |      | 16    | 5000.0      | N/A       |
| io1-90           | 90 GB I/O v1            | 92160     | 40   | 900       |      | 24    | 7500.0      | N/A       |
| memory1-120      | 120 GB Memory v1        | 122880    | 0    | 0         |      | 16    | 5000.0      | N/A       |
| memory1-15       | 15 GB Memory v1         | 15360     | 0    | 0         |      | 2     | 625.0       | N/A       |
| memory1-240      | 240 GB Memory v1        | 245760    | 0    | 0         |      | 32    | 10000.0     | N/A       |
| memory1-30       | 30 GB Memory v1         | 30720     | 0    | 0         |      | 4     | 1250.0      | N/A       |
| memory1-60       | 60 GB Memory v1         | 61440     | 0    | 0         |      | 8     | 2500.0      | N/A       |
| performance1-1   | 1 GB Performance        | 1024      | 20   | 0         |      | 1     | 200.0       | N/A       |
| performance1-2   | 2 GB Performance        | 2048      | 40   | 20        |      | 2     | 400.0       | N/A       |
| performance1-4   | 4 GB Performance        | 4096      | 40   | 40        |      | 4     | 800.0       | N/A       |
| performance1-8   | 8 GB Performance        | 8192      | 40   | 80        |      | 8     | 1600.0      | N/A       |
| performance2-120 | 120 GB Performance      | 122880    | 40   | 1200      |      | 32    | 10000.0     | N/A       |
| performance2-15  | 15 GB Performance       | 15360     | 40   | 150       |      | 4     | 1250.0      | N/A       |
| performance2-30  | 30 GB Performance       | 30720     | 40   | 300       |      | 8     | 2500.0      | N/A       |
| performance2-60  | 60 GB Performance       | 61440     | 40   | 600       |      | 16    | 5000.0      | N/A       |
| performance2-90  | 90 GB Performance       | 92160     | 40   | 900       |      | 24    | 7500.0      | N/A       |
+------------------+-------------------------+-----------+------+-----------+------+-------+-------------+-----------+

On the left are the names to use for the first command we entered. So we can spin up a whole host of different servers. If we wanted to know details about a specific flavor, then we can run a flavor-show command like so:

 
[SUPERNOVA] Running nova against customer...
+-----------------------------------+------------------------------------------------------------------------------------------------------------------------------------------------------------------+
| Property                          | Value                                                                                                                                                            |
+-----------------------------------+------------------------------------------------------------------------------------------------------------------------------------------------------------------+
| OS-FLV-EXT-DATA:ephemeral         | 900                                                                                                                                                              |
| OS-FLV-WITH-EXT-SPECS:extra_specs | {"number_of_data_disks": "3", "resize_policy_class": "performance_flavor", "class": "performance2", "disk_io_index": "70", "policy_class": "performance_flavor"} |
| disk                              | 40                                                                                                                                                               |
| extra_specs                       | {"number_of_data_disks": "3", "resize_policy_class": "performance_flavor", "class": "performance2", "disk_io_index": "70", "policy_class": "performance_flavor"} |
| id                                | performance2-90                                                                                                                                                  |
| name                              | 90 GB Performance                                                                                                                                                |
| ram                               | 92160                                                                                                                                                            |
| rxtx_factor                       | 7500.0                                                                                                                                                           |
| swap                              |                                                                                                                                                                  |
| vcpus                             | 24                                                                                                                                                               |
+-----------------------------------+------------------------------------------------------------------------------------------------------------------------------------------------------------------+

A lot of information about the avaialble ram, 90GB, The primary disk and ephemeral (data) disk are shown. This is handy way to get information about virtualised servers, and ends this brief tutorial on using the rackspace openstack API with supernova.

Configuring a Load Balancer with SSL, with & without needing a New IP

So, at work we had a lot of customers that were asking for new ipv4’s all of the time, and it’s a little known thing to the mainstream that it is actually possible to configure SSL just fine without the addition of a new IP, or the implementation of SNI (Server Name Indication).

Here is how I configured a basic apache2 server without the need for additional IP’s or SNI. The trick is to use ports. This works for Debian, Ubuntu and also CentOS, RHEL and Fedora but you will want to replace apt-get with yum for the latter 3 distributions.

(for security purposes, I removed the real private and public network IP of my servers to prevent attacks. It does however not affect the clarity of this tutorial providing that you bear in mind you need to replace your load balancer private IP in the apache2 virtualhost configuration. )

1. Step 1, Install apache2 and enable SSL

apt-get update
apt-get install apache2
a2enmod ssl
service apache2 restart

2. Step 2 Create Self Signed Certificates (optional step), you can use some SSL certificates you purchased instead, place them in /etc/apache2/ssl/your.website.com.crt and /etc/apache2/ssl/yourwebsite.com.key for organisational reasons.

mkdir /etc/apache2/ssl
mkdir -p /var/www/shop.example.com/html
 openssl req -x509 -nodes -days 365 -newkey rsa:2048 -keyout /etc/apache2/ssl/apache.key -out /etc/apache2/ssl/apache.crt

The prompt looks like this; answer the contact and country details, this can generally be anything but be sure to include your FQDN ( fully qualified domain name ) that you want SSL to run with. I will be configured shop.example.com

Country Name (2 letter code) [AU]:US
State or Province Name (full name) [Some-State]:New York
Locality Name (eg, city) []:New York City
Organization Name (eg, company) [Internet Widgits Pty Ltd]:Your Company
Organizational Unit Name (eg, section) []:Department of Catz
Common Name (e.g. server FQDN or YOUR name) []:shop.example.com
Email Address []:[email protected]

3. Step 3 Configure Apache2 with your primary IP address using SSL being sure to ensure that you specify an SSLCertificateFile and SSLCertificateKeyFile. You generated the CertficateFile and KeyFile in step 2, but the below directive is an example of how I configured a HTML website for use with SSL

<VirtualHost 134.213.1.1:443>

ServerName shop.example.com

DocumentRoot /var/www/shop.example.com/html
CustomLog /var/www/shop.example.com/access.log combined
ErrorLog /var/www/shop.example.com/error.log
DirectoryIndex index.html

SSLEngine on
SSLCertificateFile /etc/apache2/ssl/secure.website.com.crt
SSLCertificateKeyFile /etc/apache2/ssl/secure.website.com.key

</VirtualHost>

You now have a functioning SSL website with self signed certificate running on a primary IP. If you want to add a load balancer without an additional IP address then keep reading, because that’s the next part.

4. Create a Load Balancer in the Rackspace Control Panel.
Important things to notice here is that.
a) Configure sensible name for load balancer representing TLD I want to host
b) Configure Port 443 for the incoming connections to the Load Balancer
c) Configure Port 543 for the outgoing connections to your cloud server

Screen Shot 2015-08-25 at 7.47.10 AM
Once your configuration looks like this you should be almost ready.

5. Configure Apache2 for use with a Rackspace Load Balancer

Previously, in step 3, you configured SSL on apache2 for a single IP address which was publicly accessible. Because the server is now behind a load balancer we need to tell the apache2 webserver to listen on a local private ip address, 10.0.0.1, we also need to tell apache2 webserver to expect connections from the load balancer on port 543. So we need to modify the apache configuration for apache2 to listen on port and to bind to the correct IP now load balancer is sending requests thru the private network instead than to it’s public IP. This is the magic of using a load balancer, you don’t need separate IP’s on the apache2 , the load balancer has an IP already, and you can simply identify the SSL configurations in virtualhosts by binding to ports as opposed to IP’s to provide that isolation necessary for secure SSL. It’s simple to do:

Listen 543
<VirtualHost 10.0.0.1:543>
#ServerName localhost
ServerName shop.example.com

DocumentRoot /var/www/shop.example.com/html
CustomLog /var/www/shop.example.com/access.log combined
ErrorLog /var/www/shop.example.com/error.log
DirectoryIndex index.html

SSLEngine on

SSLCertificateFile /etc/apache2/ssl/shop.example.com.crt
SSLCertificateKeyFile /etc/apache2/ssl/shop.example.com.key

</VirtualHost>

As you can see we added a new IP for the VirtualHost, this is the private IP of the Rackspace Server:
Screen Shot 2015-08-25 at 7.56.06 AM
All Rackspace cloud Servers have two networks, a public network IP like we configured earlier as 134.213.1.1. And a private network IP 10.0.0.1 for internal communications between things like the load balancer and this cloud server.

Also you can see we added a Listen 543, this tells Apache2 to listen to connections on this port so that the load balancer can connect to apache2 to send data.

5. Restart apache2 and chmod your directories with the right user and group permissions like you would on any apache2 server

chmod -R www-data:www-data /var/www/shop.example.com/html
service apache2 restart

Installing Rackspace Cloud Backup agent on Linux Systems

So, I had a few customers this week that were having problems going thru the setup of Rackspace Cloud Backup on their Linux System. There is some documentation on Rackspace Knowledge Center about this but it is essentially really really really simple to install. Here are the steps for Debian Systems,:

1. Update your aptitude packages, then make sure python-apt is installed

sudo apt-get update

sudo apt-get install python-apt

2. Download the cloud backup installer

wget 'http://agentrepo.drivesrvr.com/debian/cloudbackup-updater-latest.deb'

3. Install the cloud backup installer

sudo dpkg -i cloudbackup-updater-latest.deb
apt-get install -f

4. Ensure cloudbackup-updater is installed by running

cloudbackup-updater -v

If you get any kind of response at all (other than command not found), it installed OK.

5. Configure the cloudbackup driverclient

sudo /usr/local/bin/driveclient --configure -u yourmycloudusername -k yourmycloudapikeyhere

6. Start the cloud backup driver client daemon service

sudo service driveclient start


Ironically, it’s easier for Redhat based systems (Fedora, Redhat and CentOS)
1. Download the cloudbackup updater RPM

sudo rpm -Uvh 'http://agentrepo.drivesrvr.com/redhat/cloudbackup-updater-latest.rpm'

2. Check updater is installed

sudo cloudbackup-updater -v

3. Configure with your mycloud user and API , Key, in this case you will be prompted to type in your mycloud username and API key details, you find this in “Account settings” of your mycloud control panel

sudo /usr/local/bin/driveclient --configure

4. Start the driveclient cloud backup service

sudo service driveclient start

fixing access denied java.net.SocketPermission error with Rackspace First Gen Servers

A lot of customers complain of not being able to login to the remote administration console because of their latest java 7 or java 8.

I found, thanks to a colleague friend of mine that this can be remedied by installing the latest version of Java 7 revision 80. Here is what I did.

After installing Java 7 , r80, You will have to go into the JAVA configuration and set the security settings to “Medium” for it to work though.

See: https://www.java.com/en/download/help/jcp_security.xml

If you are running Java 7, r79 or earlier, or Java 8 you will need to uninstall java, and then reinstall it again. Being sure to restart the browser you are using. I tested using firefox.

1. Uninstall JAVA from your System Preferences or Control Panel, depending on your OS and confirm that it is missing from the browsers addons/plugins.
2. Reinstall Java SE Runtime Environment 7u80 at http://www.oracle.com/technetwork/java/javase/downloads/jre7-downloads-1880261.html
3. Set JAVA security settings to medium in the JAVA control Panel.
4. Browse to your mycloud console window, and accept any security warnings you get.

I have tested this on my machine and I can confirm that this does work.

Best wishes,
Adam

Remotely administering a MySQL server, and error 10060

Note to self 10060 is caused by an iptables problem, not a MySQL grant problem!!!

Will update this article in coming week.

We had a customer which was getting an error 10060 when trying to connect to MySQL Server. Obviously 10060 error code is explaining that MySQL doesn’t think the remote is allowed, so closes the connection.

The user only has to do a few things to make sure they are allowed, which is basically make sure the right MySQL grants are added on the mysql server they are trying to access remotely. Please note that the section ‘5F398fDKof$%‘ denotes the password, and somemysqluser denotes the username and the 10.2.1.1 denotes the ip address. you will need to replace the ip address with the remote machine you want to access your mysql server, and replace the username with the user you want to connect with. Please, use a different password than ‘5F398fDKof$%‘ as well, to ensure your installation is as secure as it possibly can be.

So, something like this, will be great:

GRANT ALL PRIVILEGES ON DB_NAME.* TO 'somemysqluser'@'10.2.1.1' IDENTIFIED BY '5F398fDKof$%';

HOWTO: SSH with KEYS

So, at work yesterday it was suggested to me that I should setup SSH with keys as to avoid the pain caused by attempts to continually use credentials for specific servers I run.

Doing this might seem daunting to the uninitiated, so here is how I did it between my box and the server I wanted to login with an SSH key instead of regular password. Please note there are some security implications from using SSH keys as opposed to password.

Step 1:  Generate your pair of keys. (2 keys will be made, one for the remote server, and one for your own machine).

ssh-keygen -t dsa

Generating public/private dsa key pair.
Enter file in which to save the key (/home/adam/.ssh/id_dsa): 
Enter passphrase (empty for no passphrase): 
Enter same passphrase again: 
Your identification has been saved in /home/adam/.ssh/id_dsa.
Your public key has been saved in /home/adam/.ssh/id_dsa.pub.
The key fingerprint is:
1d:ab:23:29:9f:d6:7c:3c:39:ab:2b:2c:8f:2f:4d:26 adam@mylocal

Step 2:  your keys are stored, by default in your ‘users’ .ssh folder or ~

cd ~.ssh; ls -l

-rw-------    1 adam     adam          526 Nov  3 01:21 id_dsa
-rw-r--r--    1 adam     adam          330 Nov  3 01:21 id_dsa.pub

Step 3: Observe your beautiful keys.

— id_dsa is your private key. Keep this on the machine you want to login FROM. Do not share the key otherwise it will allow other people to login to your machine. very bad.

— id_dsa.pub is your public key. This can be added to the system you want to login to authorized_keys2 file.

Step 4: Place the public key on the remote server. I simply used scp from the terminal to copy the public key file to the remote server I want to login to.

scp id_dsa.pub [email protected]:./id_dsa.pub

If it works you’ll see a status bar show 100% , 607bytes, Kb/s 0:00 and the time taken to transfer the file

Step 5: Login to the remote server and make public key ready to be used. It is very important these commands are written in this order.

# switch to home dir and make sure .ssh folder exists
cd ~; mkdir .ssh;
cd .ssh

# make sure that the key file is there
touch authorized_keys2

# add key to authorize_keys2 file

cat ../id_dsa.pub >> authorized_keys2
rm ../id_dsa.pub

Step 6:  Ensure correct permissions on the filesystem for ‘secret’ file

chmod 600 authorized_keys2

Step 7: Login using your new ssh keypair

ssh -2 -v [email protected]
debug1: Trying private key: /Users/adam/.ssh/id_rsa
debug1: Offering DSA public key: /Users/adam/.ssh/id_dsa

Job done!